# The Conviction Crescendo: VRSK's Strengthening Defense at Critical Support
## The Power Shift (Points 1→3)
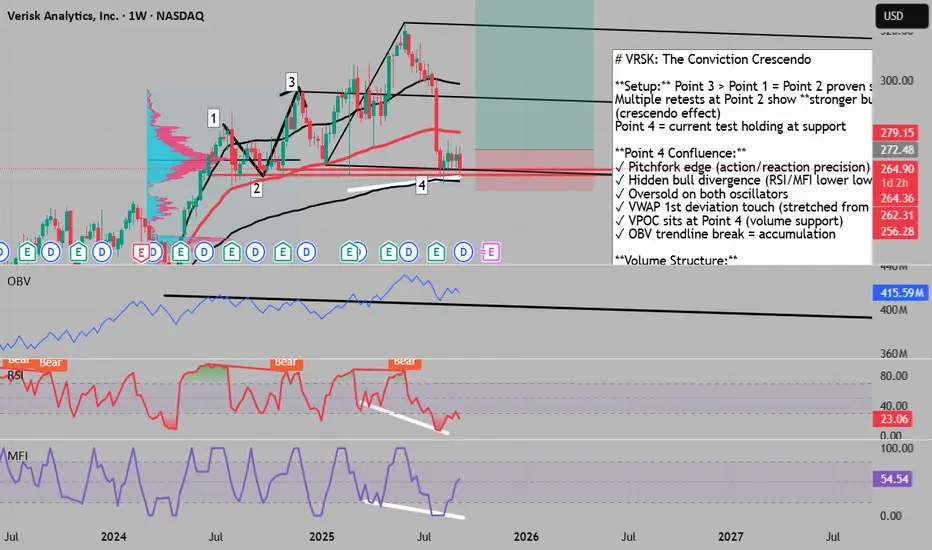
When **Point 3 decisively closed above Point 1**, the market delivered an unambiguous verdict: **Point 2 is now proven support**. The buyers who emerged at Point 2 didn't just challenge the sellers from Point 1 - they **conquered them entirely**, establishing a new high and demonstrating objective strength. This isn't speculation; it's mathematical proof of buyer dominance.
## The Crescendo Effect
What's fascinating here is the **escalating conviction** at Point 2. With multiple retests of this level, each producing a **stronger buyer response** - a crescendo of defensive action. This isn't random; it's the market collectively recognizing Point 2 as increasingly "cheap" territory. **Point 4 represents the current test**, where buyers are once again defending this critical support with conviction.
## Precision Technical Alignment
**The Pitchfork's Mathematical Edge**
Using **action/reaction principles**, the reverse pitchfork precisely identifies Point 4 as the mathematical edge of this move. This isn't arbitrary line-drawing - it's based on Andrews' principle that markets move in measurable, predictable channels.
**Divergence Duality**
• **Price:** Higher low at Point 4
• **RSI/MFI:** Lower lows = **Hidden bullish divergence**
• Both oscillators: **Oversold territory**
This hidden divergence signals continuation of the underlying trend, while oversold conditions suggest immediate bounce potential.
**VWAP Deviation Analysis**
Point 4 touches the **1st standard deviation below VWAP** (anchored from market low). Historically, VRSK has respected VWAP as dynamic support. While this deviation could warn of weakness, within our broader narrative it suggests price has been **stretched too far** from its mean - a rubber band ready to snap back.
## Volume Structure Revelations
**VPOC Magnetic Pull**
The **Volume Point of Control sits precisely at Point 4**. Once our stop order triggers and price moves above the POC, we'll have the market's highest-volume node defending our position - institutional-level support.
**The Exploration Zone Below**
Stretching the volume profile reveals a critical insight: the area below Point 2 is an **exploration zone** - sparse volume indicating these prices were tested but **rejected by the market**. This isn't an acceptance area; it's a void.
The implication? Price won't drift lower aimlessly. Any move below Point 2 would require **strong conviction and purpose** to reach distant value areas. Without that catalyst, the void acts as a natural deterrent.
## The OBV Breakout Signal
The **On-Balance Volume trendline has broken to the upside**, confirming what price action suggests - accumulation is accelerating. Smart money is positioning, even as price tests support.
## Trade Architecture
This setup layers multiple independent confirmations:
• **Structural:** Proven support at Point 2 with escalating defense
• **Mathematical:** Pitchfork edge + VWAP deviation extreme
• **Momentum:** Hidden divergence + oversold conditions
• **Volume:** VPOC support + exploration void below + OBV breakout
• **Behavioral:** Crescendo of buyer conviction with each test
## Risk/Reward Framework
**Entry:** Above Point 4 on confirmation
**Stop:** Below Point 2 (protected by volume void)
**Target 1:** VWAP mean reversion
**Target 2:** Point 3 resistance test
**Invalidation:** Acceptance below Point 2 would negate the "proven support" thesis
---
**Bottom Line:** The repeated tests of Point 2 with increasingly strong reactions, combined with mathematical precision from the pitchfork, divergence signals, and volume structure, create a high-conviction reversal setup where buyers have repeatedly proven their commitment to defending this level.
## The Power Shift (Points 1→3)
When **Point 3 decisively closed above Point 1**, the market delivered an unambiguous verdict: **Point 2 is now proven support**. The buyers who emerged at Point 2 didn't just challenge the sellers from Point 1 - they **conquered them entirely**, establishing a new high and demonstrating objective strength. This isn't speculation; it's mathematical proof of buyer dominance.
## The Crescendo Effect
What's fascinating here is the **escalating conviction** at Point 2. With multiple retests of this level, each producing a **stronger buyer response** - a crescendo of defensive action. This isn't random; it's the market collectively recognizing Point 2 as increasingly "cheap" territory. **Point 4 represents the current test**, where buyers are once again defending this critical support with conviction.
## Precision Technical Alignment
**The Pitchfork's Mathematical Edge**
Using **action/reaction principles**, the reverse pitchfork precisely identifies Point 4 as the mathematical edge of this move. This isn't arbitrary line-drawing - it's based on Andrews' principle that markets move in measurable, predictable channels.
**Divergence Duality**
• **Price:** Higher low at Point 4
• **RSI/MFI:** Lower lows = **Hidden bullish divergence**
• Both oscillators: **Oversold territory**
This hidden divergence signals continuation of the underlying trend, while oversold conditions suggest immediate bounce potential.
**VWAP Deviation Analysis**
Point 4 touches the **1st standard deviation below VWAP** (anchored from market low). Historically, VRSK has respected VWAP as dynamic support. While this deviation could warn of weakness, within our broader narrative it suggests price has been **stretched too far** from its mean - a rubber band ready to snap back.
## Volume Structure Revelations
**VPOC Magnetic Pull**
The **Volume Point of Control sits precisely at Point 4**. Once our stop order triggers and price moves above the POC, we'll have the market's highest-volume node defending our position - institutional-level support.
**The Exploration Zone Below**
Stretching the volume profile reveals a critical insight: the area below Point 2 is an **exploration zone** - sparse volume indicating these prices were tested but **rejected by the market**. This isn't an acceptance area; it's a void.
The implication? Price won't drift lower aimlessly. Any move below Point 2 would require **strong conviction and purpose** to reach distant value areas. Without that catalyst, the void acts as a natural deterrent.
## The OBV Breakout Signal
The **On-Balance Volume trendline has broken to the upside**, confirming what price action suggests - accumulation is accelerating. Smart money is positioning, even as price tests support.
## Trade Architecture
This setup layers multiple independent confirmations:
• **Structural:** Proven support at Point 2 with escalating defense
• **Mathematical:** Pitchfork edge + VWAP deviation extreme
• **Momentum:** Hidden divergence + oversold conditions
• **Volume:** VPOC support + exploration void below + OBV breakout
• **Behavioral:** Crescendo of buyer conviction with each test
## Risk/Reward Framework
**Entry:** Above Point 4 on confirmation
**Stop:** Below Point 2 (protected by volume void)
**Target 1:** VWAP mean reversion
**Target 2:** Point 3 resistance test
**Invalidation:** Acceptance below Point 2 would negate the "proven support" thesis
---
**Bottom Line:** The repeated tests of Point 2 with increasingly strong reactions, combined with mathematical precision from the pitchfork, divergence signals, and volume structure, create a high-conviction reversal setup where buyers have repeatedly proven their commitment to defending this level.
all my paid ( pro ) scripts can be obtained for a low price of 19.99 / month at : whop.com/sabr-pro-tools/access-to-all-pro-tools/
Declinazione di responsabilità
Le informazioni e le pubblicazioni non sono intese come, e non costituiscono, consulenza o raccomandazioni finanziarie, di investimento, di trading o di altro tipo fornite o approvate da TradingView. Per ulteriori informazioni, consultare i Termini di utilizzo.