EdgeXplorer - Smart Candle Patterns + SwingsEdgeXplorer – Smart Candle Patterns & Swings
Smart Candle Patterns & Swings by EdgeXplorer is a dual-function visual analysis tool that intelligently detects major swing points and overlays them with recognized candle reversal patterns. This tool brings together classical candlestick analysis and market structure theory, helping traders identify high-probability zones where price action may shift.
The script not only marks swing highs/lows as HH, LH, HL, or LL, but also labels key candlestick patterns—from Hammers to Engulfings to Three Black Crows—providing real-time context for possible trend continuation or reversal setups.
⸻
🔍 What Does This Tool Do?
This indicator performs two primary functions:
1. Swing Structure Labeling – Marks each new pivot as a higher high (HH), lower high (LH), higher low (HL), or lower low (LL)
2. Smart Candle Pattern Detection – Identifies 14 of the most widely studied candlestick reversal patterns and displays them alongside the swing label
It’s a lightweight, unobtrusive way to bring structure and pattern recognition to your chart—no repainting, no noise, and no signal promises.
⸻
⚙️ How It Works – Technical Breakdown
1. Swing Highs and Lows
• The script uses a pivot detection window (Pivot Length) to find local swing highs and lows
• When a new pivot forms:
• It is classified as one of:
• HH – Higher High
• LH – Lower High
• HL – Higher Low
• LL – Lower Low
• These swing points act as visual guides for traders tracking structure
2. Candlestick Pattern Logic
At each confirmed pivot, the script evaluates the candle and its neighbors for a match from a built-in library of 14 classical reversal patterns:
Pattern Description
Hammer Small body, long lower wick – bullish signal after a downtrend
Inverted Hammer Long upper wick, signals failed bearish push
Bullish Engulfing Green candle fully engulfs red one
Bearish Engulfing Red candle fully engulfs green one
Hanging Man Long lower wick after uptrend, often bearish
Shooting Star Long upper wick after uptrend, bearish signal
Doji Small or zero body, signals indecision
Morning Star Three-candle bullish reversal pattern
Evening Star Three-candle bearish reversal pattern
Spinning Top Small body with upper/lower wicks, signals indecision
Bullish Marubozu Large green candle with no wicks
Bearish Marubozu Large red candle with no wicks
Three White Soldiers Three large bullish candles in a row
Three Black Crows Three large bearish candles in a row
Each pattern is detected using precise criteria based on body size, wick ratios, and relative position to previous candles.
⸻
📈 What You See on the Chart
Visual Meaning
Swing Label (e.g., HH, LL) Identifies structural pivot and its type
Pattern Name (e.g., Doji, Bullish Engulfing) Displayed alongside swing label if pattern is detected
Label Tooltip Shows a short description of the pattern’s meaning
Color
• Swing High = red (customizable)
• Swing Low = green (customizable)
⸻
📊 Inputs & Customization
Input Description
Pivot Length Number of bars to the left/right used to confirm swing highs/lows
Swing High Label Color Customize color of HH/LH labels
Swing Low Label Color Customize color of HL/LL labels
All labels are plotted using small visual markers to avoid cluttering the chart.
⸻
🧠 How to Interpret It in Live Markets
This indicator provides context, not confirmation. Use it to:
• Validate your manual swing structure tracking with automatic HH/LL labels
• Identify when a key candle pattern forms at a major swing (e.g., Shooting Star at a HH)
• Spot potential reversal zones or breakout failures
• Add confluence to Smart Money Concepts, price action setups, or other technical strategies
Example:
• A new LL forms with a Hammer → Potential reversal from bearish exhaustion
• A HH forms with a Shooting Star → Possible trap or overextension
⸻
🧪 Use Case Ideas
• 🔄 Reversal Confirmation – Combine swing structure with pattern match for early reversal entries
• 🧭 Structure Validation – Let the HH/LL labels validate your trend bias
• 📉 Exhaustion Signals – Watch for Doji/Spinning Top patterns at mature moves
• ⚠️ Avoid Choppy Conditions – Use absence of patterns to avoid entering low-conviction zones
This tool works across all asset classes: crypto, forex, stocks, indices, and even futures.
Indicatori e strategie

DP_ORB Entry & Exit IndicatorDisclaimer:
This indicator is for educational purposes only. It does not constitute financial advice. Always do your own research and manage your risk. Also, I cannot take full credit for 'ORB' as its a well known strategy amongst many traders, but I do need to give a special shout out to @TheBigDaddyMax for putting me on to this.
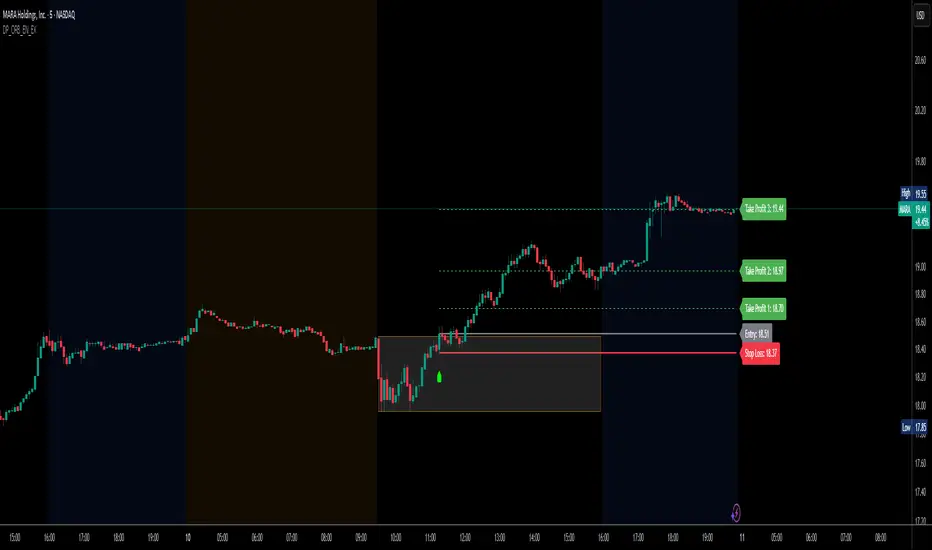
DP_ORB Entry & Exit Indicator
Description:
The DP_ORB Entry & Exit Indicator is a powerful tool designed for traders who utilize the Opening Range Breakout (ORB) strategy on the NYSE session. This indicator visually identifies the initial volatility window of the trading day, by marking the 15m High, and 15m Low into a ORB Box, & then tracks breakout opportunities, and provides clear, dynamic trade management levels—all directly on your chart.
Key Features:
Automatic Opening Range (ORB) Box:
Identifies and plots the high and low of the user-defined opening range (default 9:30–9:45 NYSE) for visual reference and strategy foundation.
Breakout Entry Signals:
Automatically detects and marks long or short breakout entries when price closes above or below the ORB range, with additional momentum confirmation.
Dynamic Stop Loss:
Stop loss is intelligently set to the previous bar’s low for long trades (or high for shorts), adapting to market structure at entry.
Take Profit Targets:
Up to three fully adjustable take-profit levels are plotted, calculated as percentages from entry, supporting progressive trade management.
Visual Trade Management:
Entry, stop loss, and take profit levels are displayed as extending dashed lines from entry point to the current bar, with labels always shown just to the right of price for clarity on all timeframes.
Automatic Reset and Cleanup:
Visuals and logic reset daily and upon exit, ensuring a clean, uncluttered chart experience.
How to Use:
Set your preferred opening range time and take profit levels in the settings.
Wait for a breakout and confirmation during the NYSE session.
Use the on-chart lines and labels to manage your trade according to your risk and strategy plan.
Best For:
Day traders and scalpers seeking a disciplined, visual, and fully-automated approach to opening range breakout trading.
Buy High, Cry Later™ [v.1]🟢 Buy Signal Logic:
RSI > 200? Buy.
MACD crossing in the opposite direction? Buy harder.
A green candle appeared? That’s bullish af.
Elon tweeted something? YOLO all-in.
Signal confirmed by 2 pigeons landing on your window.
🔴 Sell Signal Logic:
Price down 0.1%? Panic sell.
Your neighbor just bought in? Dump it.
Wife walks in? Liquidate everything and pretend you're doing taxes.
Trade hit breakeven? Close immediately, you're not greedy.
💬 Alerts Include:
“Moon incoming 🚀🚀 (probably...)”
“Dump detected – but it might reverse. Or not. Who knows.”
“Just close the chart and go outside, man.”
🛠️ Features:
Ultra-premium “Repaint Mode” – only shows correct signals after they worked.
Martingale-enhanced entries: “Double down or cry trying.”
AI-enhanced backtest: 100% win rate on cherry-picked data from 2003.
⚠️ Disclaimer:
This tool may cause excessive optimism, overtrading, or spontaneous weeping. Not responsible for margin calls or emotional damage.

Intelligent Top & Bottom Finder v9.8 Keyvankh📈 Intelligent Top & Bottom Finder v9.8 Keyvankh
A next-generation all-in-one trading system for precise tops, bottoms, and reversals across all timeframes.
---
🟢 Overview
This indicator is a powerful and intelligent solution for detecting market tops and bottoms, key reversals, and S/R zones with institutional-grade accuracy. Designed for traders seeking an edge in any market (crypto, forex, stocks), it combines advanced candlestick recognition, multi-indicator confirmation, smart support/resistance clustering, and strict signal filtering into one seamless tool.
---
🔎 How Does It Work?
1. Advanced Support & Resistance Clustering
Automatically detects and draws high-probability support and resistance zones using dynamic ATR-based pivot clustering.
Highlights breakouts and retest (flip) zones in real-time, adapting to changing market structure.
2. Full Candlestick Pattern Recognition
Scans for 15+ classic and advanced patterns: Engulfing, Pin Bar, Doji, Three Bar, Marubozu, Hammer, Shooting Star, Three White Soldiers, Three Black Crows, Tweezer, Morning/Evening Star, Kicker, Belt Hold, and more.
Scores each pattern’s strength based on location (S/R zone, retest, breakout), volume context, and confirmation signals.
3. Multi-Indicator Confirmation Engine**
Integrates and scores confirmation from up to five additional sources:
RSI Games 1.2** (smoothed LTF momentum shifts)
MACD Divergence** (bullish/bearish momentum reversal)
QQE+ v7 Advanced** (dynamic volatility filter)
OBV Trend Filter** (volume-backed trend validation)
Volume Game** (net volume spike and reversal detection)
Each module can be enabled or disabled to fit your personal trading style.
4. Institutional S/R and Retest Logic
Real-time recognition of major trendline breaks, retest zones, and price flips.
Automatic labeling and coloring of S/R zones, retest boxes, and confirmation candles.
5. Smart Buy & Sell Signal Generation**
Combines all scoring modules with strict logical filters and “failsafe override” logic (guaranteeing signal on confirmed hammers, engulfings, etc. even if other filters disagree).
Plots clear “BUY” and “SELL” labels only when a strong, multi-factor signal appears—minimizing noise and maximizing reliability.
Built-in fallback logic (optional) for edge cases.
6. Alerts & Automation Ready
TradingView alerts for all BUY, SELL, or ANY signal conditions—perfect for auto-trading or notification setups.
---
*⚙️ Customizable Inputs
Enable/Disable any module (RSI Games, MACD, OBV, QQE+, Candlestick Scanner, Volume Game)
Minimum Confirmations** required for a signal (1–10)
Pivot/Zone Sensitivity:** ATR multiplier, pivots per cluster, retest bar duration
LTF (Lower Timeframe) Confirmation:** Fully configurable
---
📊 How To Use**
Apply on any timeframe and symbol**—crypto, stocks, forex, indices.
Use as a **standalone reversal/entry tool** or to confirm your own technical setups.
Combine with your favorite momentum, trend, or volume indicators for advanced confluence.
Set up **TradingView alerts** for auto-trading, Telegram/email notifications, or trade journaling.
---
🟢 What Makes This Unique?
All-in-one multi-indicator fusion:** No more juggling a dozen scripts.
Institutional logic:** Goes beyond basic signals with true S/R, retest, and volume logic.
Full transparency:** Source code is clear and commented (if published open-source).
Fast and reliable:** Optimized for minimal lag and maximum accuracy.
---
⚠️ Disclaimer**
This indicator is a tool to assist with trade timing and risk management. **No system is 100% accurate.** Always use in conjunction with your own analysis and risk management practices.
---
📚 Credits & License**
Created by Keyvan Khodakhah.
You may use, modify, or share this script under the (mozilla.org).
Please credit the original author if you fork or reuse in public.
---
Questions, feedback, or collaboration? Contact: Keyvankh
---
Precision in technical analysis comes from layers of confluence and discipline. This tool brings that precision to your chart.

[FREE] Multiple Indicators Screener [NASAlgoTrading] Multiple Indicators Screener indicator is designed to help traders quickly scan multiple cryptocurrencies across different timeframes using a combination of proven technical indicators. It provides a comprehensive, at-a-glance view of market conditions to help identify high-probability trading opportunities.
How It Helps Traders Maximize Profits
✅ Saves Time – No need to switch between charts; all key metrics are displayed in one place.
✅ Confirms Trends – Combines multiple indicators to filter high-probability setups.
✅ Multi-Timeframe Alignment – Finds trades where short-term and long-term trends agree.
✅ Overbought/Oversold Alerts – Helps spot potential reversals using RSI, Stochastic, and TSI.
✅ Trend Strength Validation – ADX and Supertrend confirm whether a trend is worth trading.
Why Use This Script?
✔ Completely Free – No hidden costs or premium upgrades.
✔ Easy to Use – No complex setup; works out of the box.
✔ Customizable – Adjust timeframes, indicators, and assets to fit your strategy.
Best For:
Swing Traders – Identify trends across multiple timeframes.
Day Traders – Quickly scan for intraday opportunities.
Crypto Traders – Optimized for popular cryptocurrency pairs.
Start using this powerful screener today to enhance your trading efficiency and spot the best setups with ease! 🚀

Fair Value Gap & Liquidity Zones [Combined]mixed FVG and buyside and sellside liquidity
xxxxxxxxxxxxxxxxxxxxxxxxxxxxxxxxxxxxxxxxxxxxxxxxxxxxxxxxxxxxxxxxxxxxxxxxxxxxxxxxxx

Smart Impulse Exhaustion Finder (ATR + ADX Filter)
Smart Impulse Exhaustion Finder (ATR + ADX Filter)
This advanced script helps you spot potential trend exhaustion points exactly where impulsive moves may lose strength.
It automatically combines multiple conditions:
✅ Identifies fresh swing highs and lows using a smart lookback range.
✅ Confirms strong price extension with a minimum ATR distance from the previous swing.
✅ Uses RSI extremes, volume spikes, and candle wick rejection to detect signals only when at least two out of three exhaustion factors align.
✅ Filters out false signals during sideways chop using an ADX trend strength filter.
✅ Ignores noise candles like dojis by requiring a clear minimum body size.
This makes the tool flexible for catching late-stage trend impulses that might be due for a pullback or reversal — ideal for trailing stop strategies, partial profit taking, or hunting reversal setups on crypto, forex or stocks.
How to use
📌 Tip: This is a sniper-type tool that can catch the very start of a reversal.
Therefore, when trading its signals, it’s strongly recommended to use a Risk:Reward ratio of at least 1:3 — especially for crypto markets.
The idea is simple:
Look for exhaustion signals at fresh swing highs for potential short pullbacks.
Or at fresh swing lows for potential long reversals.
Combine with your own trend and context tools.
Always test thoroughly before live trading.
Inputs
🔹 Extremum Lookback: Defines how far back to check for fresh highs/lows.
🔹 ATR Threshold: Controls the minimum impulse distance.
🔹 ADX Filter: Ensures signals only appear in meaningful trending conditions.
🔹 Body and Wick Filters: Reduce noise by rejecting tiny candles and highlighting clear rejection tails.
Disclaimer
⚠️ This script is for educational purposes only and does not constitute financial advice.
Trade responsibly — always use proper risk management and test before deploying in live conditions.

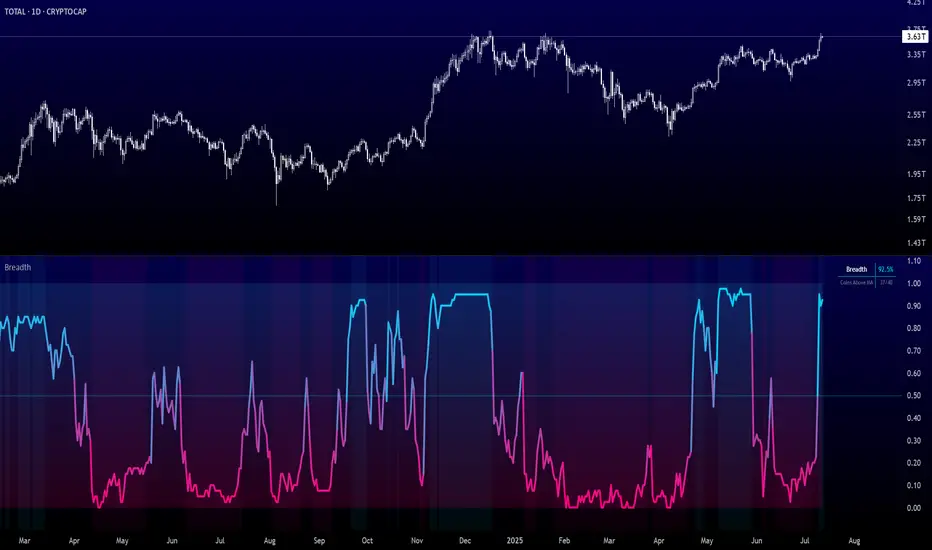
Crypto Breadth | AlphaNatt\ Crypto Breadth | AlphaNatt\
A dynamic, visually modern market breadth indicator designed to track the strength of the top 40 cryptocurrencies by measuring how many are trading above their respective 50-day moving averages. Built with precision, branding consistency, and UI enhancements for fast interpretation.
\ 📊 What This Script Does\
* Aggregates the performance of \ 40 major cryptocurrencies\ on Binance
* Calculates a \ breadth score (0.00–1.00)\ based on how many tokens are above their moving averages
* Smooths the breadth with optional averaging
* Displays the result as a \ dynamic, color-coded line\ with aesthetic glow and gradient fill
* Provides automatic \ background zones\ for extreme bullish/bearish conditions
* Includes \ alerts\ for key threshold crossovers
* Highlights current values in an \ information panel\
\ 🧠 How It Works\
* Pulls real-time `close` prices for 40 coins (e.g., XRP, BNB, SOL, DOGE, PEPE, RENDER, etc.)
* Compares each coin's price to its 50-day SMA (adjustable)
* Assigns a binary score:
• 1 if the coin is above its MA
• 0 if it’s below
* Aggregates all results and divides by 40 to produce a normalized \ breadth percentage\
\ 🎨 Visual Design Features\
* Smooth blue-to-pink \ color gradient\ matching the AlphaNatt brand
* Soft \ glow effects\ on the main line for enhanced legibility
* Beautiful \ multi-stop fill gradient\ with 16 transition zones
* Optional \ background shading\ when extreme sentiment is detected:
• Bullish zone if breadth > 80%
• Bearish zone if breadth < 20%
\ ⚙️ User Inputs\
* \ Moving Average Length\ – Number of periods to calculate each coin’s SMA
* \ Smoothing Length\ – Smooths the final breadth value
* \ Show Background Zones\ – Toggle extreme sentiment overlays
* \ Show Gradient Fill\ – Toggle the modern multicolor area fill
\ 🛠️ Utility Table (Top Right)\
* Displays live breadth percentage
* Shows how many coins (e.g., 27/40) are currently above their MA
\ 🔔 Alerts Included\
* \ Breadth crosses above 50%\ → Bullish signal
* \ Breadth crosses below 50%\ → Bearish signal
* \ Breadth > 80%\ → Strong bullish trend
* \ Breadth < 20%\ → Strong bearish trend
\ 📈 Best Used For\
* Gauging overall market strength or weakness
* Timing trend transitions in the crypto market
* Confirming trend-based strategies with broad market support
* Visual dashboard in macro dashboards or strategy overlays
\ ✅ Designed For\
* Swing traders
* Quantitative investors
* Market structure analysts
* Anyone seeking a macro view of crypto performance
Note: Not financial advise
Profit Sniper RSI Based Buy/Sell📌 Profit Sniper RSI – Intelligent Buy/Sell Signals Based on Adaptive RSI Zones
Profit Sniper RSI is a precision-engineered indicator that generates high-confidence Buy and Sell signals by dynamically interpreting the Relative Strength Index (RSI) across five market zones. It is designed to reduce signal noise and avoid false breakouts using a combination of crossover logic, zone validation, and trend sentiment detection.
🔍 Underlying Concept:
This script divides the RSI into five structured zones:
- **0–24**: Power Sell (Extreme bearish momentum)
- **24–40**: Sell (Weak price action with downward pressure)
- **40–60**: Neutral/Consolidation (No clear trend)
- **60–76**: Buy (Bullish initiation zone)
- **76–100**: Power Buy (Strong bullish momentum)
Signals are generated **only after the RSI crosses a zone boundary** (e.g., from below 60 to above 60), and only **after the candle closes**, which helps filter out noise from intra-bar RSI fluctuations.
📈 Signal Logic:
- **Buy signals** are triggered when RSI crosses key thresholds (24, 40, or 60) upward, indicating rising strength.
- **Sell signals** are triggered when RSI crosses downward below 76, 60, or 40, suggesting trend weakness or reversal.
- **Power Buy and Power Sell signals** are reserved for extreme crossovers beyond 76 and below 24, respectively.
- The script avoids repeated signals (e.g., Buy after Buy) by tracking the last confirmed signal state.
🔧 Customization:
- Users can toggle visibility of Buy, Sell, Power Buy, and Power Sell signals independently.
- Adjustable RSI length input to fit different market conditions or timeframes.
- Displays a real-time info panel showing the current RSI, last signal type, the RSI level at the time of the last signal, and the price when the signal was triggered.
🧠 How It Helps Traders:
- Reduces false entries by only generating signals **after candle closure**.
- Designed to work across **any timeframe** and **any market** (Crypto, Forex, Stocks).
- Ideal for traders who rely on **RSI-based confirmation** before entry and prefer minimal visual clutter.
- Acts as a sniper tool — waiting for clear RSI structure and crossover before acting.
⚠️ Note:
This script does **not repaint**. All signals are based on closed-bar RSI logic. While no indicator guarantees profitability, this tool is built for serious traders who value disciplined entries backed by momentum structure.
💡 Tip: Combine Profit Sniper RSI with key support/resistance or trendline zones for added confluence and trade precision.

Ultra Supply & DemandUltra Supply and Demand fixed.
Order Block Detection: Identifies potential order blocks (demand/supply zones)

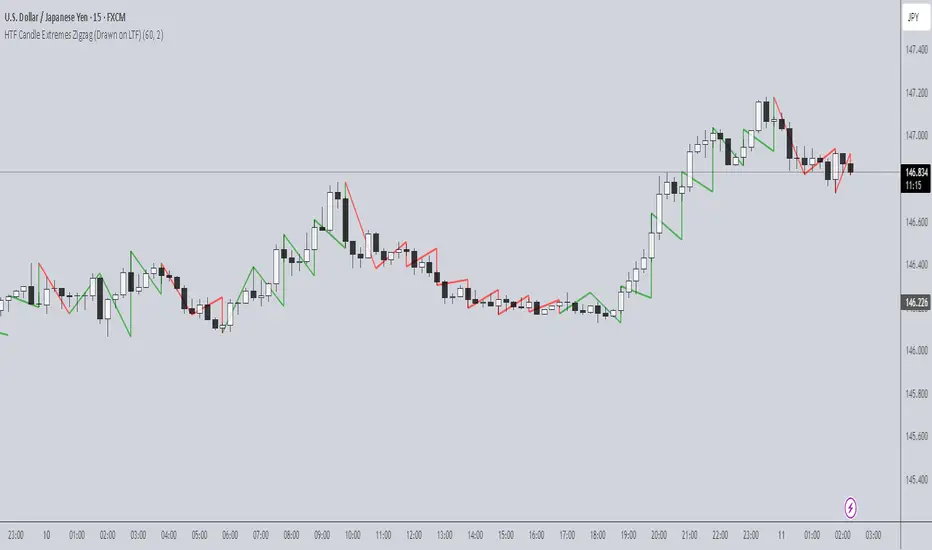
HTF Candle Extremes Zigzag (Drawn on LTF)HTF Candle Extremes Zigzag (Drawn on LTF)
This indicator plots zigzag lines connecting the extremes (highs and lows) of Higher Timeframe (HTF) candles directly on your lower timeframe (LTF) chart. It visually highlights trend changes and HTF candle structure by drawing colored lines representing uptrends and downtrends based on HTF candle extremes.
"Key Features"
Higher Timeframe Tracking: Select any HTF to track candle extremes using the built-in security function.
Zigzag Lines: Connects HTF candle lows to highs in an intuitive zigzag pattern.
Trend Indication: Uptrend lines are green, downtrend lines are red (customizable colors).
Customizable Line Width: Adjust the thickness of the zigzag lines for better visibility.
Drawn on Lower Timeframe: All lines appear on your active lower timeframe chart, allowing easy visual correlation.
"How It Works"
The script fetches the open, high, low, close, and time data of the specified HTF candle. It detects new HTF bars and identifies trend direction changes by comparing the highs and lows of consecutive HTF candles.
- When an uptrend is detected, vertical lines are drawn from low to high of the HTF candle, connected to the previous extreme low.
- When a downtrend is detected, vertical lines are drawn from high to low, connected to the previous extreme high.
- Transitions between trends are highlighted by connecting the last extreme of the previous trend to the current extreme, creating a clean zigzag pattern.
Usage Notes:
Ideal for traders who want to visualize HTF market structure and trend changes while analyzing price action on lower timeframes.
---
© The_Forex_Steward
(mozilla.org)
Auto LevelsSimple auto level tracker that automatically detects and plots the high/low for the current week, day, and month, as well as the previous week/day/month.
Includes a built-in dashboard that shows how close or far price is from each level, along with directional guidance (above/below). The closest level to current price is automatically highlighted for quick awareness.
Everything is fully toggleable to only show the levels and info that is needed.

VisionThis indicator helps visually distinguish and analyze the Asian, London, and New York trading sessions. It's a great tool for intraday traders focusing on time-based liquidity zones.
🔧 Features:
Asian range box, London / New York high-low lines with distinct colors.
Customizable time windows, Asian range deviations and colors.

Universal Trade Levels & Signal Classifierscript has been enhanced and generalized for all instruments — not just ES or SPX.
You now get the following classifications:
💎 Perfect Trade – trend confirmed, strong signal, ATR + VWAP + volume aligned
🚀 Sure Shot Trade – very high volume + ATR breakout + directional bias
⚡ Quick Call/Put – fast actionable setups
❌ No Trade – avoid/no confirmation
The logic works across any timeframe and any ticker.
You can now test this live on any instrument in TradingView. Let me know if you’d like to add things like:
Multi-timeframe confirmation
Re-entry logic
Heatmap table of confidence levels
Signal filtering based on RSI, OBV, etc.

Zero-Lag RSI DivergenceZero-Lag RSI Divergence
Overview
This indicator identifies RSI divergences in real-time without delay, providing immediate signals as price-momentum discrepancies develop. The indicator analyzes price action against RSI momentum across dual configurable periods, enabling traders to detect potential reversal opportunities with zero lag.
Key Features
Instant Divergence Detection : Identifies bullish and bearish divergences immediately upon formation without waiting for candle confirmation or historical validation. This eliminates signal delay but may increase false signals due to higher sensitivity.
Dual Period Analysis : Configure detection across two independent cycles - Short Period (default 15) and Long Period (default 50) - allowing for multi-timeframe divergence analysis and enhanced signal validation across different market conditions.
Visual Divergence Lines : Automatically draws dashed lines connecting divergence points between price highs/lows and corresponding RSI peaks/troughs, clearly illustrating the momentum-price relationship.
Customizable RSI Parameters : Adjustable RSI length (default 14) allows optimization for different market volatility and trading timeframes.
How It Works
The indicator continuously monitors price action patterns and RSI momentum:
- Bullish Divergence : Detected when price makes lower lows while RSI makes higher lows, suggesting potential upward momentum
- Bearish Divergence : Identified when price makes higher highs while RSI makes lower highs, indicating potential downward momentum
The algorithm uses candle color transitions and immediate RSI comparisons to trigger signals without historical repainting , ensuring backtesting accuracy and real-time reliability.
How To Read
Important Notes
Higher Signal Frequency : The zero-lag approach increases signal sensitivity, generating more frequent alerts that may include false signals. Consider using additional confirmation methods for trade entries.
Non-Repainting : All signals are generated and maintained without historical modification, ensuring consistent backtesting and forward-testing results.
Input Parameters
RSI Length: Period for RSI calculation (default: 14)
Short/Long Periods: Lookback periods for divergence detection (default: 15/50)
Line Colors: Customizable colors for short and long period divergence lines
Label Settings: Optional divergence labels with custom text
This indicator is designed for traders seeking immediate divergence identification across multiple timeframes while maintaining signal integrity and backtesting reliability.
RSI PotentialRSI Potential
This indicator does more than just track RSI; it measures the "energy" or "fuel" left in a trend. It answers a critical question: how much further can the price move before momentum is exhausted?
The key insight is that high momentum often means low potential, and vice versa. This inverse relationship is what allows the indicator to provide powerful, forward-looking signals about trend health and potential reversals.
Think of it like a race car:
Momentum is the car's current speed.
Potential is the amount of fuel left in the tank.
A car at top speed (high momentum) is burning fuel rapidly (potential is decreasing). A car just starting (low momentum) has a full tank of fuel (high potential). This indicator helps you see the fuel gauge, not just the speedometer.
This indicator plots three distinct components in a separate pane below your chart:
1. Upside Potential (Green Line)
What it shows: The percentage price increase required to hit the Overbought RSI Level. In other words, how much "fuel" is left for the upward trend.
How to interpret it:
Low Value (Approaching Zero): This is a warning sign. It means the price is already in high gear, and there is very little room left to run before hitting overbought exhaustion. Even if the price is rocketing up (high momentum), low potential signals the rally is likely on its last legs.
High Value: This indicates the market has a full tank of fuel for a rally. Even if the price is moving sideways or slowly (low momentum), the high potential suggests that if a new uptrend starts, it has the energy to be sustainable and significant.
2. Downside Potential (Red Line)
What it shows: The percentage price decrease required to hit the Oversold RSI Level—the "fuel" for a downtrend.
How to interpret it:
Low Value (Approaching Zero): A warning for bears. The price may be dropping fast (high momentum), but it's running out of energy to fall further. This signals seller exhaustion and increases the probability of a bounce or reversal.
High Value: The market has significant room to fall before becoming oversold. This can confirm the health of a new downtrend or suggest that a current downtrend has more to go.
3. Net Potential (Columns / Histogram)
What it shows: The net balance of energy: Upside Potential - Downside Potential. It answers, "Which side has more fuel in the tank?"

Наклонные уровниSloping levels indicator. With the ability to display multiple levels on different ranges
telegram @megavk

RSI Zones - Directional Entry StrictRSI Zones - Directional Entry Strict
When RSI returns to the 60–65 zone from above, momentum is weakening and a sell is valid; above 65 suggests the zone may break. The same applies for buys at 35–40: returning from below signals momentum loss, while below 35 indicates likely breakout. Only consider divergence above 65 or below 35 for high-probability reversal setups.

EdgeXplorer - Profit Bottoms EdgeXplorer – Profit Bottoms
⸻
🔍 What This Indicator Does
Profit Bottoms is a custom momentum oscillator designed to reveal price strength inflections through correlation logic. It identifies potential market exhaustion zones, highlights overbought/oversold conditions, and visually marks swing tops and bottoms — helping traders pinpoint profit-taking opportunities or early reversals across any asset or timeframe.
It features a flexible histogram view, color-coded background trends, and precision labels for clearer insight into market sentiment momentum shifts.
⸻
⚙️ How It Works
At the core of this indicator is a correlation function:
• It measures how strongly the price (close) correlates with bar index progression over a lookback window — essentially evaluating how directional recent price action has been.
• This results in a “strength index” ranging between +1 (strong uptrend) and -1 (strong downtrend).
• It tracks the slope of this index to infer trend direction and visually represent shifts.
From there, the indicator layers on:
• Dynamic overbought/oversold zones (±0.9)
• Swing high/low detection based on local peaks and troughs
• Trend background shading based on momentum slope
• Optional histogram and fill display styles
⸻
📈 Visual Components Explained
Element Meaning
🔮 Pulse Strength Line (purple line) Primary oscillator showing strength of directional movement
🌈 Colored Fill Fills above/below baseline to represent bullish/bearish intensity
🟢 Green Background Slope of strength index is rising (trend gaining)
🔴 Red Background Slope of strength index is falling (trend weakening)
🔼 ↑ Label Price is entering extreme overbought territory
🔽 ↓ Label Price is entering extreme oversold territory
🟠 Circle Markers Swing Top (Teal) or Swing Bottom (Orange)
📊 Histogram / Line Style Alternate visualizations of the oscillator based on user preference
⸻
📊 Input Settings Explained
Setting Description
Window Size Lookback period for correlation calculation
Bull Fill / Bear Fill Gradient colors for up/down momentum
Mark Tops/Bottoms Enables visual detection of swing highs/lows
Highlight Overbought/Oversold Displays zone entry markers (↑/↓) near extremes
Show Pulse Histogram Adds either histogram or line view
Histogram Style Choose between histogram bars, a thin line, or hide the visual entirely
⸻
🧠 How to Interpret in Different Market Conditions
Condition Interpretation
Strength Index near +1 Strong upward correlation — trend likely maturing or overbought
Strength Index near -1 Strong downward correlation — trend possibly exhausted or oversold
Cross below 0 Momentum shift from bullish to bearish
Cross above 0 Momentum shift from bearish to bullish
Swing Top Detected Potential short-term exhaustion — profit zone for longs
Swing Bottom Detected Early reversal zone or buying opportunity
The colored background makes it easy to visually segment the chart by trend environment, while the swing markers and zone labels add precision entry/exit timing cues.
⸻
🧪 Use Cases & Strategy Tips
• Scalpers & intraday traders: Use swing tops/bottoms with zone labels for tight entries.
• Swing traders: Watch for strength fading as a warning sign to exit positions.
• Divergence Spotting: Compare price action to the oscillator for hidden signals.
• Momentum Riders: Use histogram mode with background coloring to stay in trend longer.
For example:
If you see a swing bottom occur just below the -0.9 zone, paired with a background color flip from red to green — that’s a high-probability setup for reversion or breakout.
⸻
🧷 Alerts Included
This indicator provides built-in alerts for key conditions:
• EPS+ Top Detected → Swing Top
• EPS+ Bottom Detected → Swing Bottom
• EPS+ Overbought Zone → Strength Index > 1
• EPS+ Oversold Zone → Strength Index < -1
These can be used in alert-based automation or simply for manual signal confirmation.

CVD Signal (Above/Below Zero Line)CVD Long or Short Signal when the CVD is above or below zero line.

Estilo Pako Mejorado - Tendencia, Liquidez y ConfirmaciónThis indicator is designed to replicate the entry logic used in high-accuracy institutional-style trading, specifically inspired by strategies used on XAU/USD (gold) in 15-minute timeframes.
It generates high-probability trade signals based on the following key conditions:
Clear market trend: Identified using the 20 EMA and 50 EMA crossover (trend confirmation).
Liquidity sweep detection: Triggers when price takes out recent highs/lows (20-bar lookback), suggesting stop-hunt behavior.
Candle confirmation: Requires a bullish or bearish engulfing candle as price reverts after the sweep.
Optional visual features include:
Order Blocks (OB): Displays the last opposite candle before a strong market move.
Liquidity zones: Marks recent swing highs/lows where liquidity likely sits.
The indicator only plots entry signals when all three conditions are aligned, aiming to reduce false positives and improve trade precision.
Best used on:
XAU/USD or major FX pairs
15-minute timeframe
In trending markets with clean structure
You can combine this indicator with alerts or automation tools to build a semi-automated or fully automated trading system.

Volume-Confirmed Price Momentum# **Volume-Confirmed Price Momentum (VCPM) Indicator**
## **🔍 Overview**
Introducing the **Volume-Confirmed Price Momentum (VCPM)**, a sophisticated dual-metric indicator designed to identify high-probability momentum moves by analyzing the relationship between price action and volume dynamics. This indicator combines correlation analysis with volume strength validation to filter out weak signals and highlight institutional-backed movements.
---
## **⚙️ Core Mechanics**
**Price-Volume Correlation Engine:**
- Calculates real-time correlation between price movements and volume
- Configurable lookback period (default: 8 bars)
- Option to use price changes or absolute values
- Correlation range: -1.0 (perfect negative) to +1.0 (perfect positive)
**Volume Strength Analyzer:**
- Compares current volume against its moving average (default: 128 periods)
- Normalizes volume ratio to 0-1 scale for consistent interpretation
- Identifies when volume significantly exceeds historical norms
---
## **📊 Signal Generation**
### **🟢 Bullish Confirmation Signal**
**Trigger:** Positive correlation > 0.6 + Volume ratio > 0.5
- Price and volume moving in harmony upward
- Above-average volume confirms the move
- Indicates strong institutional buying interest
### **🔴 Bearish Confirmation Signal**
**Trigger:** Negative correlation < -0.6 + Volume ratio > 0.5
- Price declining with increasing volume
- Suggests distribution or institutional selling
- High-confidence bearish momentum
---
## **🎯 Trading Applications**
**Breakout Validation:**
Filter false breakouts by requiring volume confirmation before entering positions.
**Trend Continuation:**
Identify when existing trends have strong volume backing for continuation plays.
**Distribution Detection:**
Spot potential tops when price struggles despite high volume (negative correlation).
**Entry Timing:**
Built-in alert system notifies when both conditions align for optimal entry points.
---
## **🔧 Customization Features**
- **Correlation Period:** Adjust sensitivity (2-500 bars)
- **Volume Averaging:** Modify volume comparison timeframe
- **Alert Thresholds:** Fine-tune correlation and volume ratio triggers
- **Visual Options:** Toggle volume histogram display
- **Price Source:** Choose from OHLC or custom sources
---
## **💡 Why VCPM Works**
Traditional momentum indicators often generate false signals during low-volume periods. VCPM solves this by requiring **dual confirmation**: price momentum must be supported by corresponding volume activity. This approach:
- Reduces whipsaws and false breakouts
- Identifies institutional participation
- Provides higher conviction trade setups
- Works across all timeframes and markets
---
## **📈 Best Use Cases**
✅ **Crypto markets** (high volatility, volume-driven)
✅ **Stock breakouts** (earnings, news events)
✅ **Forex majors** (during high-impact news)
✅ **Futures trading** (momentum confirmation)
---
## **⚠️ Important Notes**
- Works best in liquid markets with consistent volume data
- Combine with support/resistance levels for enhanced accuracy
- Consider market context (trending vs. ranging conditions)
- Not recommended for extremely low-volume periods
---
## **🚀 Getting Started**
1. Add VCPM to your chart as a sub-panel indicator
2. Configure correlation threshold (start with 0.6)
3. Set volume ratio threshold (start with 0.5)
4. Enable alerts for automated signal detection
5. Backtest on your preferred timeframe and instrument
---
**Ready to enhance your momentum trading with volume confirmation? Try VCPM and experience the difference institutional-backed signals can make in your trading results.**
*Available in Pine Script v6 - Compatible with all TradingView accounts*

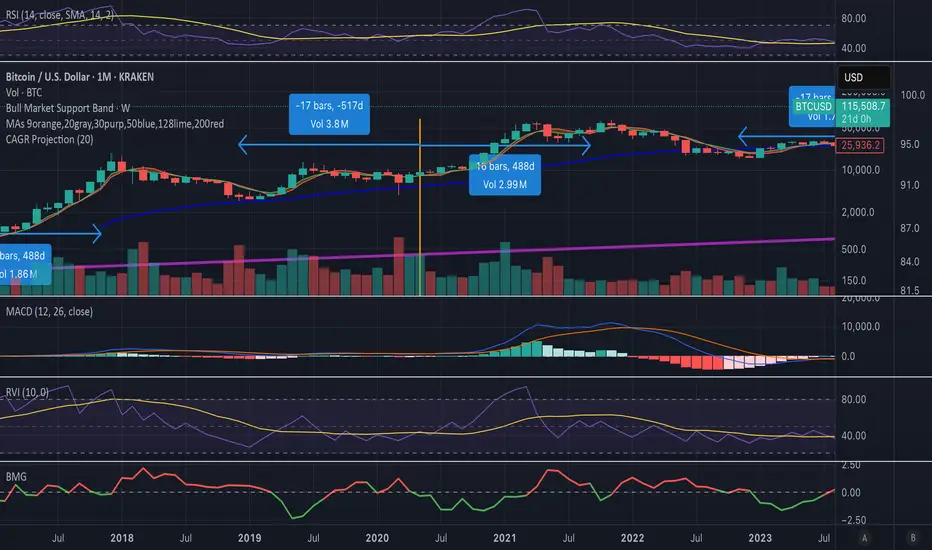
Bull Momentum GaugeBull Momentum Gauge
The Bull Momentum Gauge is a powerful momentum oscillator designed to identify the underlying strength and sustainability of major market trends. Instead of trying to predict tops and bottoms, this indicator helps traders and investors ride long-term bull markets by signaling when momentum is building and when it is starting to fade.
What it Does
At its core, this tool measures how statistically "stretched" or "compressed" an asset's price is relative to its long-term (1-year) trend. It does this by:
Calculating the price's deviation from its 365-day moving average.
Normalizing this deviation into a Z-score to measure its statistical significance.
Comparing the inverted Z-score to its own 200-day moving average to gauge the momentum of the trend itself.
The result is a single, smooth line that oscillates around a zero value.
How to Use It
The signals are simple and based on the indicator's relationship to the zero line:
Green Line (Gauge below 0): This indicates that the price has been compressed relative to its long-term trend and is now showing signs of building upward momentum. A cross into the green zone can be interpreted as a potential entry signal for a new bull run.
Red Line (Gauge above 0): This suggests that the price has become over-extended or "stretched" and the upward momentum is beginning to weaken. A cross into the red zone can be used as a potential exit signal, indicating it may be time to take profits and wait for the next cycle.
This indicator is designed to work across multiple timeframes (Daily, Weekly, Monthly) and provides a clear, data-driven framework for navigating major market cycles.