PROTECTED SOURCE SCRIPT
SMF-Z & OBV-Z Oscillator (v6)
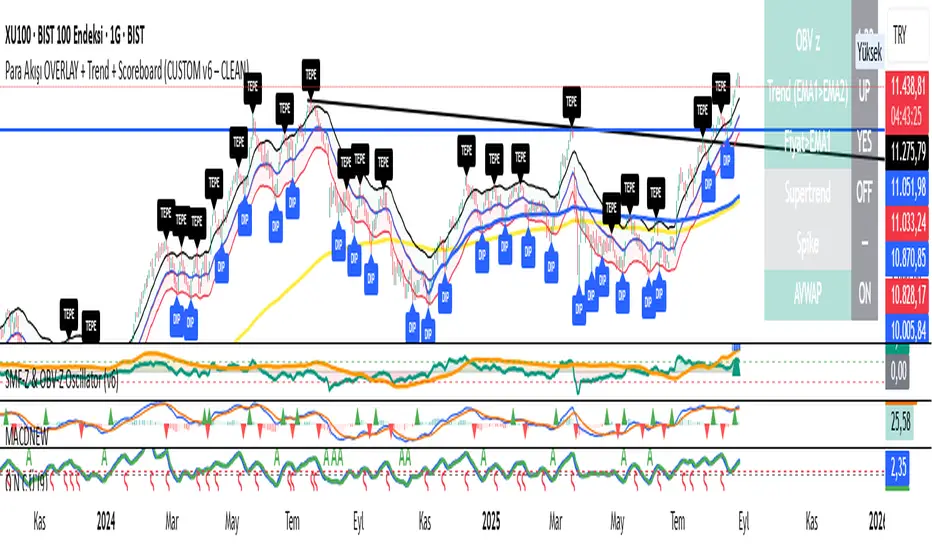
🧭 Quick Reference
• SMF-Z (teal): flow of money.
• OBV-Z (orange): volume support for price moves.
• Zero line (0): neutral. Positive side = bullish bias, negative side = bearish bias.
• ±2 levels: “extreme” zone (unusual inflow/outflow).
• IN/OUT triangles: short-term strong money inflow/outflow (spike signals).
✅ Core Rules
LONG (buy/hold)
Both SMF-Z and OBV-Z above zero and rising (upward slope).
Zero line crossover (especially if both cross around the same bar) + IN spike = strong confirmation.
Expansion toward +2 = momentum intact, let profits run.
EXIT / SELL (close long or consider short)
Either SMF-Z or OBV-Z drops below zero (especially both together).
OUT spike (heavy selling pressure) = aggressive exit signal.
Rolling over from +2 downward (especially if OBV-Z turns first) = momentum fading.
SHORT (sell side)
Both indicators below zero and falling; zero line crossunders + OUT spike = strong confirmation.
Expansion toward −2 shows trend strength; taking profit on reversal from −2 is reasonable.
♟️ Divergences (most reliable signal)
Positive divergence: Price makes a new low while SMF-Z/OBV-Z form a higher low → strong accumulation sign (especially if paired with an IN spike).
Negative divergence: Price makes a new high while SMF-Z/OBV-Z form a lower high → distribution/selling sign (confirmed with an OUT spike).
🔧 Parameter Effects
SMF z-window / OBV z-window: shorter (20–50) = more sensitive but noisier; longer (100–200) = slower but more reliable.
OBV EMA: smaller (10–13) = faster response; larger (34–55) = smoother.
Spike window & σ (spK): shorter window or smaller sigma = more frequent spikes; larger = fewer but more selective spikes.
📝 Simple Playbook
Filter: Check if both SMF-Z and OBV-Z are on the same side of zero before taking a trade.
Trigger: Zero line crossover + IN/OUT spike.
Management:
For longs: exit/reduce if OBV-Z falls below zero or an OUT spike appears.
For shorts: exit/reduce if SMF-Z rises above zero or an IN spike appears.
Extra confirmation: If Supertrend/EMA from the overlay indicator agrees with SMF-Z & OBV-Z, confidence is stronger.
⚠️ Cautions
In sideways markets, frequent whipsaws around zero are common → always wait for confirmation (both indicators + spike + trend filter).
+2/−2 zones do not guarantee reversal by themselves; in strong trends the indicators can stay there for a while.
Script protetto
Questo script è pubblicato come codice protetto. Tuttavia, è possibile utilizzarlo liberamente e senza alcuna limitazione – per saperne di più clicca qui.
Declinazione di responsabilità
Le informazioni ed i contenuti pubblicati non costituiscono in alcun modo una sollecitazione ad investire o ad operare nei mercati finanziari. Non sono inoltre fornite o supportate da TradingView. Maggiori dettagli nelle Condizioni d'uso.