Institutional Confluence Mapper [JOAT]Institutional Confluence Mapper (ICM)
Introduction
The Institutional Confluence Mapper is an open-source multi-factor analysis tool that combines five analytical modules into a unified confluence scoring system. It synthesizes institutional trading concepts including Relative Rotation analysis, Smart Money flow detection, Liquidity zone mapping, Session-based timing, and Volatility regime classification.
Rather than relying on a single indicator, ICM evaluates market conditions through multiple lenses simultaneously, presenting a clear confluence score (0-100%) that reflects the alignment of various market factors.
This script is fully open-source under the Mozilla Public License 2.0.
Originality and Purpose
This indicator is NOT a random mashup of existing indicators. It is an original implementation that creates a unified institutional analysis framework:
Why Multiple Modules? Most retail traders struggle because they rely on single indicators that provide conflicting signals. Institutional traders evaluate markets through multiple frameworks simultaneously. ICM bridges this gap by providing a unified view of complementary analysis methods.
The Confluence Scoring System: Each module contributes to a weighted confluence score (0-100%). Scores above 65% indicate bullish confluence; below 35% indicates bearish confluence.
How Components Work Together:
RRG (Relative Rotation) determines macro bias - is this asset outperforming or underperforming its benchmark?
Institutional Flow confirms smart money activity - are institutions accumulating or distributing?
Volatility Regime determines strategy selection - trend-follow or mean-revert?
Liquidity Detection identifies key levels - where are the stop hunts happening?
Session Analysis optimizes timing - when should you trade?
The Five Core Modules
1. Relative Rotation Momentum Matrix (RRG)
Compares the current symbol against a benchmark (default: SPY) using the JdK RS-Ratio methodology with double-smoothed EMA. Assets rotate through four quadrants:
LEADING: Outperforming with positive momentum (strongest bullish)
WEAKENING: Outperforming but losing momentum
LAGGING: Underperforming with negative momentum (strongest bearish)
IMPROVING: Underperforming but gaining momentum
2. Institutional Flow Analysis
Analyzes volume patterns to detect smart money activity:
Volume Z-Score measures how unusual current volume is
Buy/Sell pressure estimation based on candle structure
Unusual volume detection highlights institutional activity
3. Volatility Regime System
Uses ATR percentile ranking to classify market conditions:
COMPRESSION: Low volatility (ATR < 20th percentile) - potential breakout
EXPANSION: High volatility (ATR > 80th percentile) - trending
TRENDING_BULL/BEAR: Directional trends based on EMA alignment
RANGING: Sideways consolidation
4. Liquidity Detection
Identifies institutional liquidity targets using swing point analysis:
Swing highs/lows are tracked and displayed as dashed lines
Purple dashed lines mark resistance/sell-side liquidity
Teal dashed lines mark support/buy-side liquidity
Gold diamonds appear when liquidity sweeps are detected (potential reversals)
5. Session Momentum Profiler
Tracks trading sessions based on your selected timezone:
Asian Session: 7PM - 4AM EST
London Session: 3AM - 12PM EST
New York Session: 9:30AM - 4PM EST
London/NY Overlap: 8AM - 12PM EST (peak liquidity)
Visual Elements
Main Dashboard (Top-Right):
BIAS: Overall direction with confluence percentage
RRG: Current quadrant and momentum
FLOW: Smart money bias and volume status
REGIME: Market condition and volatility percentile
SESSION: Active trading session and current time
LIQUIDITY: Active zones and grab signals
SIGNAL: Actionable recommendation
Chart Elements:
Gold Diamond: Liquidity grab (potential reversal point)
Teal Dashed Line: Support / Buy-side liquidity zone
Purple Dashed Line: Resistance / Sell-side liquidity zone
EMA 21/55/200: Trend structure with cloud fill
Volatility Bands: ATR-based channels
How to Use
Step 1: Check the BIAS row for overall market direction
Step 2: Check REGIME to understand market conditions
Step 3: Identify key levels using liquidity zones and EMAs
Step 4: Wait for confluence above 65% (bullish) or below 35% (bearish)
Step 5: Look for gold diamond signals at key levels
Best Setups
Bullish: Confluence >65%, RRG in LEADING/IMPROVING, bullish flow, price near teal support zone.
Bearish: Confluence <35%, RRG in LAGGING/WEAKENING, bearish flow, price near purple resistance zone.
Reversal: Gold diamond appears after price sweeps a liquidity zone.
Key Input Parameters
Benchmark Symbol: Compare against (default: SPY)
RS-Ratio/Momentum Lookback: RRG calculation periods
Volume Analysis Period: Flow detection lookback
Swing Length: Liquidity zone detection
ATR Period/Rank Period: Regime classification
Timezone: Session detection timezone
Alerts
Liquidity Grab Bull: Bullish sweep detected
Liquidity Grab Bear: Bearish sweep detected
High Confluence Bull: Confluence above 70%
High Confluence Bear: Confluence below 30%
Best Practices
Use on 1H, 4H, or Daily timeframes for reliable signals
Combine with price action for confirmation
Respect the regime - don't fight strong trends
Trade during London/NY overlap for best liquidity
Wait for high confluence scores before entering
Always use proper risk management
Limitations
Works best on liquid markets with sufficient volume
Session features optimized for forex/crypto markets
RRG requires a valid benchmark symbol
No indicator predicts the future - use proper risk management
Disclaimer
This indicator is for educational and informational purposes only. It is not financial advice. Trading involves substantial risk of loss. Past performance does not guarantee future results.
-Made with passion by officialjackofalltrades
Indicatorstrategy

TurboRSI Pro [JOAT]TurboRSI Pro - Multi-Length RSI Ensemble with Dynamic Momentum Analysis
Introduction
TurboRSI Pro is an open-source indicator that reimagines the classic RSI by calculating multiple RSI lengths simultaneously and combining them into a single, more reliable momentum reading. Instead of relying on a single RSI period that may lag or produce false signals, this indicator creates an ensemble of RSI values across a configurable range, providing a smoother and more robust momentum assessment.
The indicator is designed for traders who want deeper insight into momentum conditions without the noise that comes from single-period oscillators.
Originality and Purpose
This indicator is NOT a simple RSI with different settings. It is an original implementation that solves a fundamental problem with traditional RSI:
The Problem with Single-Period RSI: Traditional RSI uses a single lookback period (typically 14). The issue is that different market conditions favor different RSI lengths. A 14-period RSI might work well in one market phase but produce false signals in another. There's no "perfect" RSI length that works in all conditions.
The Multi-Length Solution: TurboRSI Pro calculates RSI across a range of lengths (default: 10 to 20) simultaneously, then averages all values to create a composite reading. This ensemble approach filters out period-specific noise while preserving genuine momentum shifts. When multiple RSI lengths agree, the signal is more reliable.
OB/OS Strength Percentage: The indicator tracks how many individual RSI lengths are in overbought or oversold territory. When 100% of lengths are overbought, it's a much stronger signal than when only 50% are. This percentage-based approach is original to this indicator and provides conviction assessment.
Candle Heatmap Innovation: An optional feature colors price bars based on deviation from a 200-bar linear regression line. This shows when price is statistically overextended (HOT/COLD) independent of RSI, providing another layer of analysis.
How the components work together:
Multi-length RSI ensemble provides a more robust momentum reading than single-period RSI
OB/OS Strength percentages quantify how many timeframes agree on the momentum condition
Dynamic channels expand/contract based on momentum strength across all calculated lengths
Candle heatmap adds statistical price deviation context independent of RSI
Core Concept: Multi-Length RSI Ensemble
Traditional RSI uses a single lookback period (typically 14). The problem is that different market conditions favor different RSI lengths. TurboRSI Pro solves this by:
Calculating RSI across a range of lengths (default: 10 to 20)
Averaging all RSI values to create a composite reading
Tracking how many individual RSI lengths are in overbought or oversold territory
Displaying this information as "OB Strength" and "OS Strength" percentages
This approach filters out noise while preserving genuine momentum shifts.
How the Multi-Length RSI Works
The calculation uses an efficient array-based approach:
int N = maxLength - minLength + 1
float diff = nz(srcInput - srcInput )
for i = 0 to N - 1
int len = minLength + i
float alpha = 1.0 / len
float numRma = alpha * diff + (1 - alpha) * array.get(numArr, i)
float denRma = alpha * math.abs(diff) + (1 - alpha) * array.get(denArr, i)
float rsiVal = denRma != 0 ? 50 * numRma / denRma + 50 : 50
avgRSI += rsiVal
Each RSI length is calculated using the RMA (Running Moving Average) formula, then all values are averaged. The result is a composite RSI that responds to momentum changes while filtering out period-specific noise.
Visual Components
1. Multi-Length RSI Line
The main oscillator line displays the averaged RSI value with a gradient color:
Green gradient when RSI is above 50 (bullish momentum)
Red gradient when RSI is below 50 (bearish momentum)
Color intensity increases as RSI approaches extreme levels
2. Dynamic Channels
Two adaptive channel lines track momentum extremes:
Upper Channel: Expands when multiple RSI lengths enter overbought territory
Lower Channel: Expands when multiple RSI lengths enter oversold territory
Channel width indicates momentum strength across all calculated lengths
3. Candle Heatmap
An optional feature that colors price bars based on deviation from a linear regression line:
Red/Orange bars: Price is significantly above the regression line (overextended to upside)
Blue bars: Price is significantly below the regression line (overextended to downside)
Yellow bars: Price is near the regression line (neutral)
The heatmap uses a 200-bar regression calculation to identify when price has deviated significantly from its statistical trend.
4. Reference Lines
Standard RSI reference levels are displayed:
80 and 20: Extreme overbought/oversold
70 and 30: Standard overbought/oversold thresholds
50: Neutral momentum line
5. Background Zones
Shaded areas indicate the percentage of RSI lengths in extreme territory:
Green shading from bottom: Percentage of lengths in overbought
Red shading from top: Percentage of lengths in oversold
Dashboard Panel
The dashboard displays real-time analysis in a 7-row table:
RSI Value: Current composite RSI reading (large text for visibility)
Momentum: Current state - OVERBOUGHT, OVERSOLD, BULLISH, BEARISH, or NEUTRAL
OB Strength: Percentage of RSI lengths currently above the overbought threshold
OS Strength: Percentage of RSI lengths currently below the oversold threshold
Heat Level: Current price deviation state - HOT, WARM, NEUTRAL, COOL, or COLD
Trend Bias: Overall trend assessment based on RSI level and channel direction
Optional Stochastic RSI
When enabled, an additional Stochastic RSI line is plotted. This applies the stochastic formula to the RSI itself, providing another layer of momentum analysis. The Stochastic RSI is more sensitive to short-term momentum shifts.
Input Parameters
RSI Settings:
Min RSI Length: Starting length for the RSI range (default: 10)
Max RSI Length: Ending length for the RSI range (default: 20)
Source: Price source for calculation (default: ohlc4)
Overbought: Upper threshold (default: 70)
Oversold: Lower threshold (default: 30)
Candle Heatmap:
Enable Heatmap: Toggle bar coloring on/off (default: enabled)
Regression Length: Lookback for linear regression calculation (default: 200)
Display:
Show Dashboard: Toggle the information panel (default: enabled)
Show Dynamic Channels: Toggle channel lines (default: enabled)
Show Stochastic RSI: Toggle additional Stoch RSI line (default: disabled)
Colors:
Bullish: Color for bullish conditions (default: teal)
Bearish: Color for bearish conditions (default: red)
Neutral: Color for neutral conditions (default: gray)
How to Use TurboRSI Pro
Identifying Momentum Shifts:
Watch for RSI crossing above 50 for bullish momentum confirmation
Watch for RSI crossing below 50 for bearish momentum confirmation
Use the gradient color to quickly assess momentum direction
Using OB/OS Strength:
When OB Strength reaches 100%, all RSI lengths are overbought - strong reversal potential
When OS Strength reaches 100%, all RSI lengths are oversold - strong bounce potential
Partial readings (e.g., 50%) indicate mixed conditions across timeframes
Heatmap Analysis:
HOT readings combined with high RSI suggest overextension - caution for longs
COLD readings combined with low RSI suggest oversold conditions - watch for reversal
Use heatmap divergence from RSI for additional confirmation
Channel Interpretation:
Expanding upper channel with rising RSI confirms strong bullish momentum
Expanding lower channel with falling RSI confirms strong bearish momentum
Channel contraction suggests momentum is weakening
Alert Conditions
Six alert conditions are available:
RSI Overbought: RSI crosses above overbought threshold
RSI Oversold: RSI crosses below oversold threshold
RSI Bullish Cross: RSI crosses above 50
RSI Bearish Cross: RSI crosses below 50
All RSI Overbought: Every RSI length is in overbought territory
All RSI Oversold: Every RSI length is in oversold territory
Best Practices
Use on higher timeframes (1H, 4H, Daily) for more reliable signals
Combine with price action analysis - RSI confirms, it does not predict
Pay attention to OB/OS Strength percentages for conviction assessment
The heatmap works best on assets with clear trending behavior
Adjust min/max RSI lengths based on your trading style - wider range for smoother signals
Limitations
Like all oscillators, can remain in overbought/oversold territory during strong trends
The heatmap regression may lag during rapid price movements
Multi-length calculation requires more processing than single RSI
Best suited for swing trading and position trading timeframes
Technical Notes
This indicator is written in Pine Script v6 and uses:
Array-based calculations for efficient multi-length RSI computation
Linear regression for heatmap deviation analysis
Gradient coloring for intuitive visual feedback
State management for dynamic channel calculations
The source code is open and available for review and modification.
Disclaimer
This indicator is provided for educational and informational purposes only. It is not financial advice. Trading involves substantial risk of loss. Past performance does not guarantee future results. Always conduct your own analysis and use proper risk management.
-Made with passion by officialjackofalltrades

RSI Trend Authority [JOAT]RSI Trend Authority - VAR-RSI with OTT Trend Detection System
Introduction
RSI Trend Authority is an open-source overlay indicator that combines Variable Index Dynamic Average (VAR) smoothed RSI with the Optimized Trend Tracker (OTT) to create a complete trend detection and signal generation system. Unlike traditional RSI which oscillates in a separate pane, this indicator scales the RSI to price and overlays it directly on your chart, making trend analysis more intuitive.
The indicator generates clear BUY and SELL signals when the smoothed RSI crosses the OTT trailing stop line, providing actionable entry points with trend confirmation.
Originality and Purpose
This indicator is NOT a simple mashup of RSI and moving averages. It is an original implementation that transforms RSI into a trend-following overlay system:
Why VAR Smoothing? Traditional RSI is noisy and produces many false signals. The Variable Index Dynamic Average (VAR) is an adaptive smoothing algorithm based on the Chande Momentum Oscillator principle. It adjusts its smoothing factor based on market conditions - responding quickly during trends and smoothing out during choppy markets. This creates an RSI that filters noise while preserving genuine momentum shifts.
Why OTT Trailing Stop? The Optimized Trend Tracker (OTT) is a percentage-based trailing stop mechanism that only moves in the direction of the trend. When VAR-RSI crosses above OTT, a bullish trend is confirmed; when it crosses below, a bearish trend is confirmed. This provides clear, actionable signals rather than subjective interpretation.
Price Scaling Innovation: By scaling RSI (0-100) to price using the formula (RSI * close / 50), the indicator overlays directly on the price chart. This allows traders to see how momentum relates to actual price levels, making trend analysis more intuitive than a separate oscillator pane.
ATR Boundaries: Optional volatility-based boundaries show when price is extended relative to its normal range, helping identify potential reversal zones.
How the components work together:
VAR smoothing removes RSI noise while preserving trend information
OTT provides a dynamic trailing stop that generates clear crossover signals
Price scaling allows direct overlay on the chart for intuitive analysis
ATR boundaries add volatility context for profit target estimation
Core Components
1. VAR-RSI (Variable Index Dynamic Average RSI)
The foundation of this indicator is the VAR smoothing algorithm applied to RSI. VAR is an adaptive moving average that adjusts its smoothing factor based on the Chande Momentum Oscillator principle:
f_var_calc(float data, int length) =>
int a = 9
float b = data > nz(data ) ? data - nz(data ) : 0.0
float c = data < nz(data ) ? nz(data ) - data : 0.0
float d = math.sum(b, a)
float e = math.sum(c, a)
float f = nz((d - e) / (d + e))
float g = math.abs(f)
float h = 2.0 / (length + 1)
float x = ta.sma(data, length)
This creates an RSI that:
Responds quickly during trending conditions
Smooths out during choppy, sideways markets
Reduces false signals compared to raw RSI
2. OTT (Optimized Trend Tracker)
The OTT acts as a dynamic trailing stop that follows the VAR-RSI:
In uptrends, OTT trails below the VAR-RSI line
In downtrends, OTT trails above the VAR-RSI line
The OTT Percent parameter controls how closely it follows
When VAR-RSI crosses above OTT, a bullish trend is confirmed. When VAR-RSI crosses below OTT, a bearish trend is confirmed.
3. Price Scaling
The RSI (0-100 scale) is converted to price scale using:
float scaleFactor = close / 50.0
float varRSIScaled = varRSI * scaleFactor
This allows the indicator to overlay directly on price, showing how momentum relates to actual price levels.
Visual Components
VAR-RSI Line (Cyan/Magenta)
The main indicator line with gradient coloring:
Cyan gradient when RSI is above 50 (bullish)
Magenta gradient when RSI is below 50 (bearish)
Line thickness of 3 for clear visibility
OTT Line (Yellow Circles)
The trailing stop line displayed as circles:
Acts as dynamic support in uptrends
Acts as dynamic resistance in downtrends
Crossovers generate trading signals
Trend Fill
The area between VAR-RSI and OTT is filled:
Cyan fill during bullish trends
Magenta fill during bearish trends
Fill transparency allows price visibility
Buy position and LONG on Dashboard with a Uptrend:
ATR Boundaries (Optional)
Dotted lines showing volatility-based price boundaries:
Upper band: Close + (ATR x Multiplier)
Lower band: Close - (ATR x Multiplier)
Color matches current trend direction
Buy/Sell Signals
Clear labels appear at signal points:
BUY label below bar when VAR-RSI crosses above OTT
SELL label above bar when VAR-RSI crosses below OTT
Additional glow circles highlight signal bars
Bar Coloring
Optional feature that colors price bars:
Cyan bars during bullish trend
Magenta bars during bearish trend
Dashboard Panel
The 8-row dashboard provides comprehensive status information:
Signal: Current position - LONG or SHORT (large text)
VAR-RSI: Current smoothed RSI value (large text)
RSI State: OVERBOUGHT, OVERSOLD, BULLISH, or BEARISH
OTT Trend: UPTREND or DOWNTREND based on OTT direction
Bars Since: Number of bars since last signal
Price: Current close price (large text)
OTT Level: Current OTT trailing stop value
Input Parameters
RSI Settings:
RSI Length: Period for RSI calculation (default: 100)
Source: Price source (default: close)
VAR Settings:
VAR Length: Adaptive smoothing period (default: 50)
OTT Settings:
OTT Period: Trailing stop calculation period (default: 30)
OTT Percent: Distance percentage for trailing stop (default: 0.2)
ATR Trend Boundaries:
Show ATR Boundaries: Toggle visibility (default: enabled)
ATR Length: Period for ATR calculation (default: 14)
ATR Multiplier: Distance multiplier (default: 2.0)
Display Options:
Show Buy/Sell Signals: Toggle signal labels (default: enabled)
Show Status Table: Toggle dashboard (default: enabled)
Table Position: Choose corner placement
Color Bars by Trend: Toggle bar coloring (default: enabled)
Color Scheme:
Bullish Color: Main bullish color (default: cyan)
Bearish Color: Main bearish color (default: magenta)
OTT Line: Trailing stop color (default: yellow)
VAR-RSI Line: Main line color (default: teal)
ATR colors for boundaries
How to Use RSI Trend Authority
Signal-Based Trading:
Enter LONG when BUY signal appears (VAR-RSI crosses above OTT)
Enter SHORT when SELL signal appears (VAR-RSI crosses below OTT)
Use the OTT line as a trailing stop reference
Trend Confirmation:
Cyan fill indicates bullish trend - favor long positions
Magenta fill indicates bearish trend - favor short positions
Check RSI State in dashboard for momentum context
Using the Dashboard:
Monitor "Bars Since" to assess signal freshness
Check RSI State for overbought/oversold warnings
Use OTT Level as a reference for stop placement
ATR Boundaries:
Price near upper ATR band in uptrend suggests extension
Price near lower ATR band in downtrend suggests extension
Boundaries help identify potential reversal zones
Parameter Optimization
For Faster Signals:
Decrease RSI Length (try 50-80)
Decrease VAR Length (try 30-40)
Decrease OTT Period (try 15-25)
For Smoother Signals:
Increase RSI Length (try 120-150)
Increase VAR Length (try 60-80)
Increase OTT Period (try 40-50)
For Tighter Stops:
Decrease OTT Percent (try 0.1-0.15)
For Wider Stops:
Increase OTT Percent (try 0.3-0.5)
Alert Conditions
Three alert conditions are available:
Buy Signal: VAR-RSI crosses above OTT
Sell Signal: VAR-RSI crosses below OTT
Trend Change: OTT direction changes
Understanding the OTT Calculation
The OTT uses a percentage-based trailing mechanism:
float farkOTT = mavgOTT * ottPercent * 0.01
float longStopCalc = mavgOTT - farkOTT
float shortStopCalc = mavgOTT + farkOTT
longStop := mavgOTT > nz(longStop ) ? math.max(longStopCalc, nz(longStop )) : longStopCalc
shortStop := mavgOTT < nz(shortStop ) ? math.min(shortStopCalc, nz(shortStop )) : shortStopCalc
This ensures the trailing stop only moves in the direction of the trend, never against it.
Best Practices
Use on 1H timeframe or higher for more reliable signals
Wait for signal confirmation before entering trades
Consider RSI State when evaluating signal quality
Use ATR boundaries for profit target estimation
The longer RSI length (100) provides smoother trend detection
Combine with support/resistance analysis for better entries
Limitations
Signals may lag during rapid price movements due to smoothing
Works best in trending markets; may whipsaw in ranges
The overlay nature means RSI values are scaled, not absolute
Default parameters are optimized for crypto and forex; adjust for other markets
Technical Notes
This indicator is written in Pine Script v6 and uses:
VAR (Variable Index Dynamic Average) for adaptive smoothing
OTT (Optimized Trend Tracker) for trailing stop calculation
ATR for volatility-based boundaries
Gradient coloring for intuitive trend visualization
The source code is open and available for review and modification.
Disclaimer
This indicator is provided for educational and informational purposes only. It is not financial advice. Trading involves substantial risk of loss. Past performance does not guarantee future results. Always conduct your own analysis and use proper risk management.
-Made with passion by officialjackofalltrades

Vortex Trend Matrix [JOAT]Vortex Trend Matrix - Multi-Factor Trend Confluence System
Introduction and Purpose
Vortex Trend Matrix is an open-source overlay indicator that combines Ichimoku-style equilibrium analysis with the Vortex Indicator to create a comprehensive trend confluence system. The core problem this indicator solves is that single trend indicators often give conflicting signals. Price might be above a moving average but momentum might be weakening.
This indicator addresses that by combining five different trend factors into a single composite score, making it easy to identify when multiple factors align for high-probability trend trades.
Why These Components Work Together
Each component measures trend from a different perspective:
1. Cloud Position - Price above/below the equilibrium cloud indicates overall trend bias. The cloud acts as dynamic support/resistance.
2. TK Relationship - Conversion line vs Base line (like Tenkan/Kijun in Ichimoku). Conversion above Base = bullish momentum.
3. Lagging Span - Current price compared to price N bars ago. Confirms whether current move has follow-through.
4. Vortex Indicator - VI+ vs VI- measures directional movement strength. Provides momentum confirmation.
5. Base Direction - Whether the base line is rising or falling. Indicates medium-term trend direction.
How the Trend Score Works
float trendScore = 0.0
// Cloud position (+2/-2)
trendScore += aboveCloud ? 2.0 : belowCloud ? -2.0 : 0.0
// TK relationship (+1/-1)
trendScore += conversionLine > baseLine ? 1.0 : conversionLine < baseLine ? -1.0 : 0.0
// Lagging span (+1/-1)
trendScore += laggingBull ? 1.0 : laggingBear ? -1.0 : 0.0
// Vortex (+1.5/-1.5)
trendScore += vortexBull ? 1.5 : vortexBear ? -1.5 : 0.0
// Base direction (+0.5/-0.5)
trendScore += baseDirection * 0.5
Score ranges from approximately -6 to +6:
- +4 or higher = STRONG BULL
- +2 to +4 = BULL
- -2 to +2 = NEUTRAL
- -4 to -2 = BEAR
- -4 or lower = STRONG BEAR
Signal Types
TK Cross Up/Down - Conversion line crosses Base line (momentum shift)
Base Direction Change - Base line changes direction (medium-term shift)
Strong Bull/Bear Trend - Score reaches +4/-4 (high confluence)
Dashboard Information
Trend - Overall status with composite score
Cloud - Price position (ABOVE/BELOW/INSIDE)
TK Cross - Conversion vs Base relationship
Lagging - Lagging span bias
Vortex - VI+/VI- relationship
VI+/VI- - Individual vortex values
How to Use This Indicator
For Trend Following:
1. Enter long when trend score reaches +4 or higher (STRONG BULL)
2. Enter short when trend score reaches -4 or lower (STRONG BEAR)
3. Use cloud as dynamic support/resistance for entries
For Momentum Timing:
1. Watch for TK Cross signals for entry timing
2. Base direction changes indicate medium-term shifts
3. Vortex confirmation adds conviction
For Risk Management:
1. Exit when trend score drops to neutral
2. Use cloud edges as stop-loss references
3. Reduce position when score weakens
Input Parameters
Conversion Period (9) - Fast equilibrium line
Base Period (26) - Slow equilibrium line
Lead Span Period (52) - Cloud projection period
Displacement (26) - Cloud and lagging span offset
Vortex Period (14) - Period for vortex calculation
VI+ Strength (1.10) - Threshold for strong bullish vortex
VI- Strength (0.90) - Threshold for strong bearish vortex
Timeframe Recommendations
4H-Daily: Best for equilibrium-based analysis
1H: Good for intraday trend following
Lower timeframes may require adjusted periods
Limitations
Equilibrium calculations have inherent lag
Cloud displacement means signals are delayed
Works best in trending markets
May whipsaw in ranging conditions
Open-Source and Disclaimer
This script is published as open-source under the Mozilla Public License 2.0 for educational purposes.
This indicator does not constitute financial advice. Trend analysis does not guarantee profitable trades. Always use proper risk management.
- Made with passion by officialjackofalltrades

Sentinel Market Structure [JOAT]
Sentinel Market Structure - Smart Money Structure Analysis
Introduction and Purpose
Sentinel Market Structure is an open-source overlay indicator that identifies swing highs/lows, tracks market structure (HH/HL/LH/LL), detects Break of Structure (BOS) and Change of Character (CHoCH) signals, and marks order blocks. The core problem this indicator solves is that retail traders often miss structural shifts that smart money traders use to identify trend changes.
This indicator addresses that by automatically tracking market structure and alerting traders to key structural breaks that often precede significant moves.
Why These Components Work Together
Each component provides different structural information:
1. Swing Detection - Identifies significant pivot highs and lows. These are the building blocks of market structure.
2. Structure Labels (HH/HL/LH/LL) - Classifies each swing relative to the previous swing. Higher Highs + Higher Lows = uptrend. Lower Highs + Lower Lows = downtrend.
3. Break of Structure (BOS) - Identifies when price breaks a swing level in the direction of the trend. This is a continuation signal.
4. Change of Character (CHoCH) - Identifies when price breaks a swing level against the trend. This is a potential reversal signal.
5. Order Blocks - Marks the last opposing candle before an impulse move. These zones often act as future support/resistance.
How the Detection Works
Swing Detection:
bool swingHighDetected = high == ta.highest(high, swingLength * 2 + 1)
bool swingLowDetected = low == ta.lowest(low, swingLength * 2 + 1)
BOS vs CHoCH Logic:
// BOS: Break in direction of trend (continuation)
bool bullishBOS = close > lastSwingHigh and marketTrend >= 0
// CHoCH: Break against trend (reversal signal)
bool bullishCHOCH = close > lastSwingHigh and marketTrend < 0
Order Block Detection:
bool bullOB = close < open and // Previous candle bearish
close > open and // Current candle bullish
close > high and // Breaking above
(high - low) > ta.atr(14) * 1.5 // Strong impulse
Signal Types
HH (Higher High) - Swing high above previous swing high (bullish structure)
HL (Higher Low) - Swing low above previous swing low (bullish structure)
LH (Lower High) - Swing high below previous swing high (bearish structure)
LL (Lower Low) - Swing low below previous swing low (bearish structure)
BOS↑/BOS↓ - Break of structure in trend direction (continuation)
CHoCH↑/CHoCH↓ - Change of character against trend (potential reversal)
Dashboard Information
Trend - Current market bias (BULLISH/BEARISH/NEUTRAL)
Swing High - Last swing high price with HH/LH label
Swing Low - Last swing low price with HL/LL label
Structure - Current structure state (HH+HL, LH+LL, etc.)
Price - Price position relative to structure
How to Use This Indicator
For Trend Following:
1. Identify trend using structure (HH+HL = uptrend, LH+LL = downtrend)
2. Enter on BOS signals in trend direction
3. Use swing levels for stop placement
For Reversal Trading:
1. Watch for CHoCH signals (break against trend)
2. Confirm with order block formation
3. Enter on retest of order block zone
For Risk Management:
1. Place stops beyond swing highs/lows
2. Use structure lines as trailing stop references
3. Exit when CHoCH signals against your position
Input Parameters
Swing Detection Length (5) - Bars on each side for pivot detection
Show Swing High/Low Points (true) - Toggle swing markers
Show BOS/CHoCH (true) - Toggle structural break signals
Show Structure Lines (true) - Toggle horizontal swing lines
Show Order Blocks (true) - Toggle order block zones
Zone Extension (50) - How far order block boxes extend
Timeframe Recommendations
15m-1H: Good for intraday structure analysis
4H-Daily: Best for swing trading structure
Lower timeframes require smaller swing detection length
Limitations
Swing detection has inherent lag (needs confirmation bars)
Not all BOS/CHoCH signals lead to continuation/reversal
Order block zones are simplified (not full ICT methodology)
Structure analysis is subjective - different traders see different swings
Open-Source and Disclaimer
This script is published as open-source under the Mozilla Public License 2.0 for educational purposes.
This indicator does not constitute financial advice. Market structure analysis does not guarantee trade outcomes. Always use proper risk management.
- Made with passion by officialjackofalltrades

Quantum Candle Scanner [JOAT]
Quantum Candle Scanner - Advanced Multi-Pattern Recognition System
Introduction and Purpose
Quantum Candle Scanner is an open-source overlay indicator that detects multiple candlestick patterns including engulfing patterns, kicker patterns, inside bar setups, momentum candles, and higher-high/lower-low sequences. The core problem this indicator solves is that traders often miss patterns because they're looking for only one type. Different patterns work better in different market conditions.
This indicator addresses that by scanning for five distinct pattern types simultaneously, giving traders a comprehensive view of price action signals.
Why These Five Pattern Types Work Together
Each pattern type identifies different market behavior:
1. Engulfing Patterns - Classic reversal signals where current candle completely engulfs the previous candle. Best for identifying potential turning points.
2. Kicker Patterns - Strong reversal signals with gap confirmation. The current candle opens beyond the previous candle's open with opposite direction. Best for identifying high-momentum reversals.
3. Inside Bar Patterns - Consolidation breakout signals where a candle's range is contained within the previous candle, followed by a breakout. Best for identifying compression before expansion.
4. Momentum Candles - Identifies the largest body candle over a lookback period. Best for spotting institutional activity.
5. HH/HL and LH/LL Sequences - Three-bar structure patterns showing trend continuation. Best for confirming trend direction.
How the Detection Works
Engulfing Pattern:
bool engulfBullBase = open <= math.min(close , open ) and
close >= math.max(close , open ) and
isBullish(0) and
getBodyPct(0) > bodyMinPct
Kicker Pattern:
bool kickerBull = isBearish(1) and isBullish(0) and
open > open and low > low and
getBodyPct(0) > 40 and getBodyPct(1) > 40
Inside Bar:
bool insideBarSetup = low < low and high > high
bool insideBarBull = insideBarSetup and isBullish(0)
HH/HL Sequence:
bool hhhlSeq = high > high and low > low and
high > high and low > low and
close > close
Optional Filters
ATR Filter - Only shows patterns where candle body exceeds ATR (strong candles only)
Body Minimum % - Requires minimum body percentage for engulfing patterns
Close Beyond Prior H/L - Requires engulfing candle to close beyond prior high/low
Dashboard Information
Engulfing - Total engulfing patterns detected
Kicker - Kicker pattern count
Inside Bar - Inside bar breakout count
HH/LL Seq - Structure sequence count
Total - Combined pattern count
How to Use This Indicator
For Reversal Trading:
1. Look for engulfing or kicker patterns at key support/resistance
2. Confirm with HH/HL or LH/LL sequence breaking
3. Enter with stop beyond the pattern
For Breakout Trading:
1. Identify inside bar setups (consolidation)
2. Enter on breakout candle in direction of break
3. Use the inside bar range for stop placement
For Trend Confirmation:
1. Use HH/HL sequences to confirm uptrend structure
2. Use LH/LL sequences to confirm downtrend structure
3. Momentum candles indicate institutional participation
Input Parameters
Detect Engulfing/Kicker/Inside Bar/Momentum/HHLL (all true) - Toggle each pattern type
Min Body % for Engulfing (0) - Minimum body percentage
ATR Filter (false) - Only show strong candles
Engulf Must Close Beyond Prior H/L (true) - Stricter engulfing definition
Compact Mode (false) - Shorter labels for cleaner charts
Timeframe Recommendations
1H-Daily: Best for reliable pattern detection
15m-30m: More patterns but higher noise
Use Compact Mode on lower timeframes
Limitations
Pattern detection is mechanical and does not consider context
Not all patterns lead to successful trades
Kicker patterns are rare but powerful
Inside bar breakouts can fail (false breakouts)
Open-Source and Disclaimer
This script is published as open-source under the Mozilla Public License 2.0 for educational purposes.
This indicator does not constitute financial advice. Pattern detection does not guarantee trade outcomes. Always use proper risk management.
- Made with passion by officialjackofalltrades

Pulse Volume Commitment [JOAT]
Pulse Volume Commitment - Three-Dimensional Momentum Analysis
Introduction and Purpose
Pulse Volume Commitment is an open-source oscillator indicator that analyzes price action through three distinct dimensions: Quantity (candle count), Quality (body structure), and Commitment (volume-weighted quality). The core problem this indicator solves is that simple bullish/bearish candle counts miss important context. A market can have more green candles but still be weak if those candles have small bodies and low volume.
This indicator addresses that by requiring all three dimensions to align before generating strong signals, filtering out weak moves that lack conviction.
Why These Three Dimensions Work Together
Each dimension measures a different aspect of market conviction:
1. Quantity - Counts bullish vs bearish candles over the lookback period. Tells you WHO is winning the candle count battle.
2. Quality - Scores candles by body size relative to total range. Full-bodied candles (small wicks) indicate stronger conviction than doji-like candles. Tells you HOW decisively price is moving.
3. Commitment - Weights quality scores by volume. High-quality candles on high volume indicate institutional participation. Tells you WHETHER smart money is involved.
When all three align (e.g., more bullish candles + bullish quality + bullish commitment), the signal is significantly more reliable.
How the Calculations Work
Quantity Analysis:
int greenCount = 0
int redCount = 0
for i = 0 to lookbackPeriod - 1
if close > open
greenCount += 1
if close < open
redCount += 1
bool quantityBull = greenCount > redCount
Quality Analysis (body-to-range scoring):
for i = 0 to lookbackPeriod - 1
float candleBody = close - open // Signed (positive = bull)
float candleRange = high - low
float bodyQuality = candleRange > 0 ? (candleBody / candleRange * 100) * candleRange : 0.0
sumBodyQuality += bodyQuality
bool qualityBull = sumBodyQuality > 0
Signal Types
FULL BULL - All three dimensions bullish (Quantity + Quality + Commitment)
FULL BEAR - All three dimensions bearish
LEAN BULL/BEAR - 2 of 3 dimensions agree
MIXED - No clear consensus
STRONG BUY/SELL - Full confluence + ADX confirms trending market
ADX Integration
The indicator includes ADX (Average Directional Index) to filter signals:
- ADX >= 20 = TRENDING market (signals more reliable)
- ADX < 20 = RANGING market (signals may whipsaw)
Strong signals only trigger when full confluence occurs in a trending environment.
Dashboard Information
Quantity - BULL/BEAR/FLAT with green/red candle ratio
Quality - Directional bias based on body quality scoring
Commit - Volume-weighted commitment reading
ADX - Trend strength (TRENDING/RANGING)
Signal - Confluence status (FULL BULL/FULL BEAR/LEAN/MIXED)
Action - STRONG BUY/STRONG SELL/WAIT
How to Use This Indicator
For High-Conviction Entries:
1. Wait for FULL BULL or FULL BEAR confluence
2. Confirm ADX shows TRENDING
3. Enter when Action shows STRONG BUY or STRONG SELL
For Filtering Weak Setups:
1. Avoid entries when signal shows MIXED
2. Be cautious when ADX shows RANGING
3. Require at least 2 of 3 dimensions to agree
For Divergence Analysis:
1. Watch for Quantity bullish but Commitment bearish (distribution)
2. Watch for Quantity bearish but Commitment bullish (accumulation)
Input Parameters
Lookback Period (9) - Bars to analyze for all three dimensions
ADX Smoothing (14) - Period for ADX calculation
ADX DI Length (14) - Period for directional indicators
Timeframe Recommendations
15m-1H: Good for intraday momentum analysis
4H-Daily: Best for swing trading confluence
Lookback period may need adjustment for different timeframes
Limitations
Lookback period affects signal responsiveness vs reliability tradeoff
Volume data quality varies by exchange
ADX filter may cause missed entries in early trends
Works best on liquid instruments with consistent volume
Open-Source and Disclaimer
This script is published as open-source under the Mozilla Public License 2.0 for educational purposes.
This indicator does not constitute financial advice. Confluence signals do not guarantee profitable trades. Always use proper risk management.
- Made with passion by officialjackofalltrades

Eclipse Multi-Oscillator [JOAT]Eclipse Multi-Oscillator - Unified Momentum Confluence System
Introduction and Purpose
Eclipse Multi-Oscillator is an open-source indicator that combines four classic oscillators (RSI, Stochastic, CCI, and Williams %R) into a single unified view with confluence detection. The core problem this indicator solves is oscillator disagreement: traders often see RSI oversold while Stochastic is neutral, or CCI overbought while Williams %R is mid-range. This creates confusion about the true momentum state.
This indicator addresses that by displaying all four oscillators together and counting how many agree on overbought or oversold conditions, providing a clear confluence score that cuts through the noise.
Why These Four Oscillators Work Together
Each oscillator measures momentum differently, and their combination provides a more complete picture:
1. RSI (Relative Strength Index) - Measures the magnitude of recent price changes. Best at identifying momentum exhaustion.
2. Stochastic - Compares closing price to the high-low range. Best at identifying where price is within its recent range.
3. CCI (Commodity Channel Index) - Measures price deviation from statistical mean. Best at identifying unusual price movements.
4. Williams %R - Similar to Stochastic but inverted. Provides confirmation of Stochastic readings.
When 3 or more of these oscillators agree on overbought or oversold, the signal is significantly more reliable than any single oscillator alone.
How Confluence Scoring Works
The indicator counts how many oscillators are in extreme territory:
int obCount = 0
if rsi > rsiOB
obCount += 1
if stochK > stochOB
obCount += 1
if cci > cciOB
obCount += 1
if willRScaled > stochOB
obCount += 1
bool strongOverbought = obCount >= 3
bool strongOversold = osCount >= 3
The confluence score ranges from -4 (all oversold) to +4 (all overbought), with 0 being neutral.
Signal Types
Strong Oversold - 3+ oscillators below oversold threshold (potential bounce)
Strong Overbought - 3+ oscillators above overbought threshold (potential pullback)
OB/OS Exit - RSI leaving extreme zone with Stochastic confirmation (potential reversal)
Divergence - Price makes new high/low while RSI does not (potential reversal warning)
Dashboard Information
RSI/Stoch K/CCI/Will %R - Current values with zone status (OB/OS/MID)
Confluence - Overall bias (STRONG OS, STRONG OB, Lean Bull/Bear, Neutral)
OB Count - How many oscillators are overbought (0-4)
OS Count - How many oscillators are oversold (0-4)
How to Use This Indicator
For Reversal Trading:
1. Wait for Strong Oversold (3+ oscillators agree)
2. Look for bullish candlestick pattern or support level
3. Enter long with stop below recent low
4. Take profit when confluence returns to neutral or overbought
For Trend Confirmation:
1. Check confluence direction matches your trade bias
2. Avoid longs when confluence is strongly overbought
3. Avoid shorts when confluence is strongly oversold
For Divergence Trading:
1. Watch for "D" labels indicating RSI divergence
2. Bullish divergence at support = potential long
3. Bearish divergence at resistance = potential short
Input Parameters
RSI Length (14) - Period for RSI calculation
Stochastic K/D Length (14/3) - Periods for Stochastic
CCI Length (20) - Period for CCI
Williams %R Length (14) - Period for Williams %R
OB/OS Thresholds - Customizable levels for each oscillator
Timeframe Recommendations
15m-1H: Good for intraday momentum analysis
4H-Daily: Best for swing trading confluence
Very short timeframes may produce noisy signals
Limitations
All oscillators can remain in extreme territory during strong trends
Confluence does not predict direction, only identifies extremes
Divergence detection is simplified and may miss some patterns
Works best in ranging or moderately trending markets
Open-Source and Disclaimer
This script is published as open-source under the Mozilla Public License 2.0 for educational purposes. The source code is fully visible and can be studied.
This indicator does not constitute financial advice. Oscillator confluence does not guarantee reversals. Past performance does not guarantee future results. Always use proper risk management.
- Made with passion by officialjackofalltrades

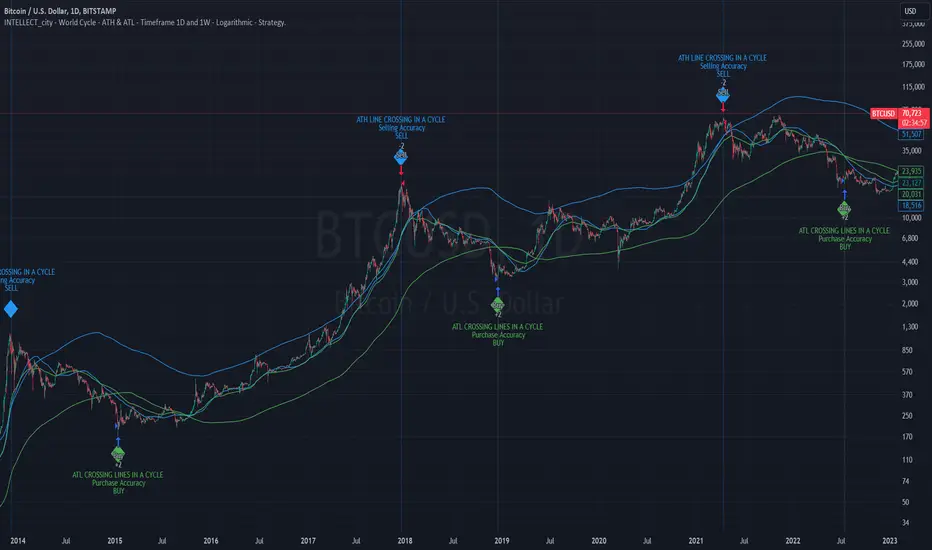
Intelle_city - World Cycle - Ath & Atl - Logarithmic - Strategy.Overview
Indicators: Strategy !
INTELLECT_city - World Cycle - ATH & ATL - Timeframe 1D and 1W - Logarithmic - Strategy - The Pi Cycle Top and Bottom Oscillator is an adaptation of the original Pi Cycle Top chart. It compares the 111-Day Moving Average circle and the 2 * 350-Day Moving Average circle of Bitcoin’s Price. These two moving averages were selected as 350 / 111 = 3.153; An approximation of the important mathematical number Pi.
When the 111-Day Moving Average circle reaches the 2 * 350-Day Moving Average circle, it indicates that the market is becoming overheated. That is because the mid time frame momentum reference of the 111-Day Moving Average has caught up with the long timeframe momentum reference of the 2 * 350-Day Moving Average.
Historically this has occurred within 3 days of the very top of each market cycle.
When the 111 Day Moving Average circle falls back beneath the 2 * 350 Day Moving Average circle, it indicates that the market momentum of that cycle is significantly cooling down. The oscillator drops down into the lower green band shown where the 111 Day Moving Average is moving at a 75% discount relative to the 2 * 350 Day Moving Average.
Historically, this has highlighted broad areas of bear market lows.
IMPORTANT: You need to set a LOGARITHMIC graph. (The function is located at the bottom right of the screen)
IMPORTANT: The INTELLECT_city indicator is made for a buy-sell strategy; there is also a signal indicator from INTELLECT_city
IMPORTANT: The Chart shows all cycles, both buying and selling.
IMPORTANT: Suitable timeframes are 1 daily (recommended) and 1 weekly
-----------------------------
Описание на русском:
-----------------------------
Обзор индикатора
INTELLECT_city - World Cycle - ATH & ATL - Timeframe 1D and 1W - Logarithmic - Strategy - Логарифмический - Сигнал - Осциллятор вершины и основания цикла Пи представляет собой адаптацию оригинального графика вершины цикла Пи. Он сравнивает круг 111-дневной скользящей средней и круг 2 * 350-дневной скользящей средней цены Биткойна. Эти две скользящие средние были выбраны как 350/111 = 3,153; Приближение важного математического числа Пи.
Когда круг 111-дневной скользящей средней достигает круга 2 * 350-дневной скользящей средней, это указывает на то, что рынок перегревается. Это происходит потому, что опорный моментум среднего временного интервала 111-дневной скользящей средней догнал опорный момент импульса длинного таймфрейма 2 * 350-дневной скользящей средней.
Исторически это происходило в течение трех дней после вершины каждого рыночного цикла.
Когда круг 111-дневной скользящей средней опускается ниже круга 2 * 350-дневной скользящей средней, это указывает на то, что рыночный импульс этого цикла значительно снижается. Осциллятор опускается в нижнюю зеленую полосу, показанную там, где 111-дневная скользящая средняя движется со скидкой 75% относительно 2 * 350-дневной скользящей средней.
Исторически это высветило широкие области минимумов медвежьего рынка.
ВАЖНО: Выставлять нужно ЛОГАРИФМИЧЕСКИЙ график. (Находиться функция с правой нижней части экрана)
ВАЖНО: Индикатор INTELLECT_city сделан для стратегии покупок продаж, есть также и сигнальный от INTELLECT_сity
ВАЖНО: На Графике видны все циклы, как на покупку так и на продажу.
ВАЖНО: Подходящие таймфреймы 1 дневной (рекомендовано) и 1 недельный
-----------------------------
Beschreibung - Deutsch
-----------------------------
Indikatorübersicht
INTELLECT_city – Weltzyklus – ATH & ATL – Zeitrahmen 1T und 1W – Logarithmisch – Strategy – Der Pi-Zyklus-Top- und Bottom-Oszillator ist eine Anpassung des ursprünglichen Pi-Zyklus-Top-Diagramms. Er vergleicht den 111-Tage-Gleitenden-Durchschnittskreis und den 2 * 350-Tage-Gleitenden-Durchschnittskreis des Bitcoin-Preises. Diese beiden gleitenden Durchschnitte wurden als 350 / 111 = 3,153 ausgewählt; eine Annäherung an die wichtige mathematische Zahl Pi.
Wenn der 111-Tage-Gleitenden-Durchschnittskreis den 2 * 350-Tage-Gleitenden-Durchschnittskreis erreicht, deutet dies darauf hin, dass der Markt überhitzt. Das liegt daran, dass der Momentum-Referenzwert des 111-Tage-Gleitenden-Durchschnitts im mittleren Zeitrahmen den Momentum-Referenzwert des 2 * 350-Tage-Gleitenden-Durchschnitts im langen Zeitrahmen eingeholt hat.
Historisch gesehen geschah dies innerhalb von 3 Tagen nach dem Höhepunkt jedes Marktzyklus.
Wenn der Kreis des 111-Tage-Durchschnitts wieder unter den Kreis des 2 x 350-Tage-Durchschnitts fällt, deutet dies darauf hin, dass die Marktdynamik dieses Zyklus deutlich nachlässt. Der Oszillator fällt in das untere grüne Band, in dem der 111-Tage-Durchschnitt mit einem Abschlag von 75 % gegenüber dem 2 x 350-Tage-Durchschnitt verläuft.
Historisch hat dies breite Bereiche mit Tiefstständen in der Baisse hervorgehoben.
WICHTIG: Sie müssen ein logarithmisches Diagramm festlegen. (Die Funktion befindet sich unten rechts auf dem Bildschirm)
WICHTIG: Der INTELLECT_city-Indikator ist für eine Kauf-Verkaufs-Strategie konzipiert; es gibt auch einen Signalindikator von INTELLECT_city
WICHTIG: Das Diagramm zeigt alle Zyklen, sowohl Kauf- als auch Verkaufszyklen.
WICHTIG: Geeignete Zeitrahmen sind 1 täglich (empfohlen) und 1 wöchentlich
buy/sell signals with Support/Resistance (InvestYourAsset) 📣The present indicator is a MACD based buy/sell signals indicator with support and resistance, that can be used to identify potential buy and sell signals in a security's price.
📣It is based on the MACD (Moving Average Convergence Divergence) indicator, which is a momentum indicator that shows the relationship between two moving averages of a security's price.
📣 The indicator also plots support and resistance levels, which can be used to confirm buy and sell signals. The support and resistance can also be used as a stoploss for existing position.
👉 To use the indicator, simply add it to your trading chart. The indicator will plot three sections:
📈 Price and Signals: This section plots the security's price and the MACD buy and sell signals.
📈 MACD Oscillator: This section plots the MACD oscillator, which is a histogram that shows the difference between the two moving averages.
📈 Moving Averages: This section plots the two moving averages that the MACD oscillator is based on.
📈 Support and Resistance: This section plots support and resistance levels, which are calculated based on the security's recent price action.
👉 To identify buy and sell signals, you can look for the following:
📈 Buy signal: When shorter Moving Average crosses over longer Moving Average.
📈 Sell signal: When shorter moving average crosses under longer moving average.
📈 You can also look for divergences between the MACD oscillator and the security's price. A divergence occurs when the MACD oscillator is moving in one direction, but the security's price is moving in the opposite direction. Divergences can be a sign of a potential trend reversal.
👉 To confirm buy and sell signals, you can look for support and resistance levels take a look at below snapshot. If a buy signal occurs at a support level, it is a stronger signal than if it occurs at a random price level. Similarly, if a sell signal occurs at a resistance level, it is a stronger signal than if it occurs at a random price level.
⚡ Here is a example of how to use the indicator to identify buy signal:
☑ Add the indicator to your trading chart.
☑Look for a buy signal when short MA crosses over Long MA.
☑Look for the buy signal to occur at a support level.
☑Enter a long position at the next candle.
☑Place a stop loss order below the support level.
☑Take profit when the MACD line crosses below the signal line, or when the security reaches a resistance level.
⚡ Here is an example of how to use the indicator to identify a sell signal:
☑Add the indicator to your trading chart.
☑Look for a sell signal, when shorter moving average crosses under longer moving average.
☑Look for the sell signal to occur at a resistance level.
☑Enter a short position at the next candle.
☑Place a stop loss order above the resistance level.
☑Take profit when the MACD line crosses above the signal line, or when the security reaches a support level.
✅Things to consider while using the indicator:
📈Look for buy signals in an uptrend and sell signals in a downtrend. This will increase the likelihood of your trades being successful.
📈Place your stop losses below the previous swing low or support for buy signals and above the previous swing high or resistance for sell signals. This will help to limit your losses if the trade goes against you.
📈Consider taking profits at key resistance and support levels. This will help you to lock in your profits and avoid giving them back to the market.
Follow us for timely updates regarding indicators that we may publish in future and give it a like if you appreciate the indicator.
