Trail Blaze - (Multi Function Trailing Stop Loss) - [mutantdog]Shorter version:
As the title states, this is a 'Trailing Stop' type indicator, albeit one with a whole bunch of additional functionality, making it far more versatile and customisable than a standard trailing stop.
The main set of features includes:
Three independent trailing types each with their own +/- multipliers:
- Standard % change
- ATR (aka Supertrend)
- IQR (inter-quartile range)
These can be used in isolation or summed together. A subsequent pair of direction specific multipliers are also included.
Two separate custom source inputs are available, both feature the standard options alongside a selection of 'weighted inputs' and the option to use another indicator (selected via 'AUX'):
- 'Centre' determines the value about which the trailing sum will be added to define the stop level.
- 'Trigger' determines the value used for crossing of stops, initiating trend changes and triggering alerts.
A selection of optional filters and moving averages are available for both.
Furthermore there are various useful visualisation options available, including the underlying bands that govern the stop levels. Preset alerts for trend reversals are also included.
This is not really an 'out-of-the-box' indicator. Depending upon the market and timeframe some adjustments will be necessary for it to function in a useful manner, these can be as simple or complex as the feature-set allows. Basic settings are easy to dial in however and the default state is intended as a good starting point. Alternatively with some experimentation, a plethora of unique and creative configurations are possible, making this a great tool for tweaking. Below is a more detailed overview followed by a bunch of simple example settings.
------------------------
Lengthy Version :
DESIGN & CONCEPT
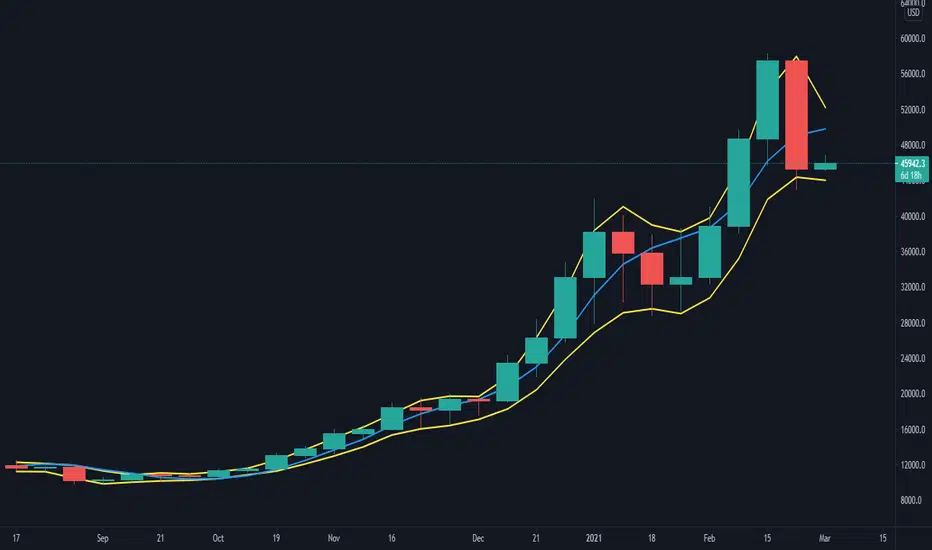
Before we start breaking this down, a little background. This started off as an attempt to improve upon the ever-popular Supertrend indicator. Of course there are many excellent user created variants available utilising some interesting methods to overcome the drawbacks of the basic version. To that end, rather than copying the work of others, the direction here shifted towards a hybrid trailing stop loss with a bunch of additional user customisation options. At some point, a completely different project involving IQR got morphed into this one. After sitting through months of sideways chop (where this proved to be of limited use), at the time of publication the market has began to form some near term trend direction and it appears to be performing well in many different timeframes.
And so with that out of the way...
INPUTS
The standard Supertrend (and most other variants) includes a single source input, as default set to 'hl2' (candle mid-range). This is the centre around which the atr bands are added/subtracted to govern the stop levels. This is not however the value which is used to trigger the trend reversal, that is usually hard-coded to 'close'. For this version both source values are adjustable: labelled 'centre' and 'trigger' respectively.
Each has custom input selectors including the usual options, a selection of 'weighted inputs' and the option to use another indicator (selected from the Aux input). The 'weighted inputs' are those introduced in Weight Gain 4000, for more details please refer to that listing. These should be treated as experimental, however may prove useful in certain configurations. In this case 'hl-oc2' can be considered an estimate of the candle median and may be a good alternative to the default 'centre' setting of 'hl2', in contrast 'cc-ohlc4' can tend to favour the extremes in the trend direction so could be useful as a faster 'trigger' than the default 'close'.
To cap them off both come with a selection of moving average filters (SMA, EMA, WMA, RMA, HMA, VWMA and a simple VWEMA - note: not elastic) aswell as median and mid-range. 'Centre' can also be set to the output of 'trigger' post-filter which can be useful if working with fast/slow crosses as the basis.
DYNAMICS
This is the main section, comprised of three separate factors: 'TSL', 'ATR' and 'IQR'. The first two should be fairly obvious, 'TSL' (trailing stop loss) is simply a percentage of the 'centre' value while 'ATR' (average true range) is the standard RMA-based version as used in Supertrend, Volatility Stop etc.
The third factor is less common however: 'IQR' (inter-quartile range). In case you are unfamiliar the principle here is, for a given dataset, the greatest 25% and smallest 25% of samples are removed. The remainder is then treated as a set and the range is calculated by highest - lowest. This is a commonly used method in statistical analysis, by removing the extremes it is less prone to influence by outliers and gives a good representation of the main dispersion around the median. In practise i have found it can be a good alternative to ATR, translating better across multiple time-frames due to it representing a fraction of the total range rather than an average of per-candle range like ATR. Used in combination with the others it can also add a factor more representative of longer-term/higher-timeframe trend. By discarding outliers it also benefits from not being impacted by brief pumps/volatility, instead responding only to more sustained changes in trend, such as rallies and parabolic moves. In order to give an accurate result the IQR is calculated using a dataset of high, low and hlcc4 values for all bars within the lookback length. Once calculated this value is then halved which, strictly speaking, makes it a semi-interquartile range.
All three of these components can be used individually or summed together to create a hybrid dynamics factor. Furthermore each multiplier can be set to both positive and negative values allowing for some interesting and creative possibilities. An optional smoothing filter can be applied to the sum, this is a basic SWMA-4 which is can reduce the impact of sudden changes but does incur a noticeable lag. Finally, a basic limiter condition has been hard-coded here to prevent the sum total from ever going below zero.
Capping off this section is a pair of direction multipliers. These simply take the prior dynamics sum and allow for further multiplication applied only to one side (uptrend/lo-stop and downtrend/hi-stop). To see why this is useful consider that markets often behave differently in each direction, we've all seen prices steadily climb over several weeks and then abruptly dump in the process of a day or two, shorter time frames are no stranger to this either. A lack of downside liquidity, a panicked market, aggressive shorts. All these things contribute to significant differences in downward price action. This function allows for tighter stops in one direction compared to the other to reflect this imbalance.
VISUALISATIONS
With all of these options and possibilities, some visual aids are useful. Beneath the dynamics' section are several visual options including both sources post-filter and the actual 'bands' created by the dynamics. These are what govern the stop levels and seeing them in full can help to better understand what our various configurations actually do. We can even hide the stop levels altogether and just use the bands, making this a kind of expanded Keltner Channel. Here we can also find colour and opacity settings for everything we've discussed.
EXAMPLES
The obvious first example here is the standard %-change trailing stop loss which, from my experience, tends to be the best suited for lower time frames. Filtering should probably minimal here. In both charts here we use the default config for source inputs, the top is a standard bi-directional setup with 1.5% tsl while the bottom uses a 2.5% tsl with the histop multiplier reduced to 0 resulting in an uptrend only stoploss.
Shown here in grey is the standard Supertrend which uses 'hl2' as centre and 'close' as trigger, ATR(10) multiplied by 3. On top we have the default filtered source config with ATR(8) multiplied by 2 which gives a different yet functionally similar result, below is the same source config instead using IQR(12) multiplied by 2. Notice here the more 'stepped' response from IQR following the central rally, holding back for a while before closing in on price and ultimately initiating reversal much sooner. Unlike ATR, the length parameter for IQR is absolute and can more significantly affect its responsiveness.
Next we focus on the visualisation options, on top we have the default source config with ATR(8) multiplied by 2 and IQR(12) multiplied by 1. Here we have activated the switch to show 'bands', from this we can see the actual summed dynamics and how it influences the stop levels. Below that we have an altogether different config utilising the included filters which are now visible. In this example we have created a basic 8/21 EMA cross and set a 1% TSL, notice the brief fakeout in the middle which ordinarily might indicate a buy signal. Here the TSL functions as an additional requirement which in this case is not met and thus no buy signal is given.
Finally we have a couple of more 'experimental' examples. On top we have Lazybear's 'Variable Moving Average' in white which has been assigned via 'aux' as the centre with no additional filtering, the default config for trigger is used here and a basic TSL of 1.5% added. It's a simple example but it shows how this can be applied to other indicators. At the bottom we return to the default source config, combining a TSL of 8% with IQR(24) multiplied by -2. Note here the negative IQR with greater length which causes the stop to close in on price following significant deviations while otherwise remaining fairly wide. Combining positive and negative multiples of each factor can yield mixed results, some more useful than others depending upon suitable market conditions.
Since this has been quite lengthy, i shall leave it there. Suffice to say that there are plenty more ways to use this besides these examples. Please feel free to share any of your own ideas in the comments below. Enjoy.
Cerca negli script per "imbalance"

coates moving averages (cma)This indicator uses three moving averages:
2 period low simple ma
2 period high simple ma
9 period least squares ma
The trend is determined by the angle of the moving averages, current close relative the the 9 least squares ma (lsm) and the current close relative to the prior two periods high and low.
When there are consecutive closes inside the prior two candles high and low then a range is signaled:
In ranges the buy zone is between the lowest low and the lowest close of the current range. The sell zone is between the highest high and the highest close. The zones are adjusted as long as the new close is within the prior two candles range:
When price closes above the 2 high ma and the 9 lsm then a bull trend is signaled if all moving averages are angled upward (as seen at #4 in the chart above and #1 the chart below ). If the 9 lsm and / or the 2 low ma continue to angle downward, following a close above the 2 high ma and 9 lsm, then a prolonged range or reversal is expected (#2 in the chart below):
During a bull trend the buy zone is between the 2 low ma and the 9 lsm. The profit target is the 2 high ma:
During dip buying opportunities price should resist closing below the 9 lsm. If there is one close below the 9 lsm then it is a canary in the coalmine that tells us to proceed with caution. This will often signal a range, based on the conditions outlined above. To avoid a prolonged range, or reversal, price needs to immediately react in the direction of the prevailing trend:
If the moving averages are angled down and the most recent close is below the 2 low ma and 9 lsm then trend is fully bearish:
During a bear trend the short zone is between the 2 high ma and 9 lsm. The profit target is the 2 low ma:
When the 2 high ma angles down and the 2 low ma angles up while price closes inside both mas then it indicates a cma squeeze:
Volatility is expected in the direction of the breakout following the squeeze. In this situation traps / shakeouts are common. If there is a wick outside the cma, with a close inside, then it indicates a trap / shakeout. If there is a close outside the 2 high / low ma then it signals a breakout.
A trend is considered balanced when the 9 lsm is roughly equidistant from the 2 low and 2 high mas. If the 9 lsm crosses the 2 high or 2 low ma then it signals exhaustion / imbalance.
For a stop loss I use the prior three periods low, for bull trends, and the prior three periods high for bear trends. I would expect other reliable stops, such as the parabolic sar or bill williams fractal, to be effective as well. The default moving averages should be very effective on all timeframes and assets classes, however this indicator was developed for bitcoin with a focus on higher timeframes such as the 4h, daily and weekly.
As with any other technical indicator there will be bad signals. Proceed with caution and never risk more than you are willing to lose.
ICT Fair Value Gap [KTY]ICT Fair Value Gap Indicator
Overview
This indicator automatically detects and displays Fair Value Gaps (FVG) based on ICT (Inner Circle Trader) methodology.
Fair Value Gaps are imbalances created when price moves rapidly across three candles, leaving a gap where no trading occurred. Price tends to return to these zones, making them valuable areas for potential entries.
Key Features
Multi-Timeframe Support
Display FVGs from two different timeframes simultaneously (LTF & HTF)
HTF Fair Value Gaps provide stronger, more reliable levels
Bullish & Bearish FVG
Bullish FVG: Forms during sharp up moves → Acts as support on pullbacks
Bearish FVG: Forms during sharp down moves → Acts as resistance on bounces
Centerline (CE)
Dashed line marking the 50% level of each FVG
Key reaction level for precise entries
Mitigation Tracking
FVGs are automatically removed when price fills the gap
Option to display mitigated FVGs for reference
Volume Analysis
Displays relative volume percentage at FVG formation
Higher percentage indicates stronger momentum behind the gap
How to Use
Identify the trend on higher timeframes
Wait for price to retrace into an FVG zone
Look for reaction at the FVG, especially at the centerline (CE)
Enter within the FVG, set stop loss beyond the FVG boundary
Pro Tips:
FVGs that overlap with Order Blocks have higher probability
Fresh (untested) FVGs tend to produce stronger reactions
The middle candle being the largest of the three increases reliability
HTF FVGs are more significant than LTF FVGs
Settings
SettingDescriptionLTF / HTFEnable and select timeframes for FVG detectionBullish FVG CountNumber of Bullish FVGs to displayBearish FVG CountNumber of Bearish FVGs to displayShow Mitigated FVGToggle display of filled/mitigated FVGsLabel ColorCustomize text color inside FVG boxes
Alerts
🟢 Bullish FVG Detected
🔴 Bearish FVG Detected
🟢 Bullish FVG Touched
🔴 Bearish FVG Touched
🟢 Bullish FVG Mitigated
🔴 Bearish FVG Mitigated
Notes
This indicator is designed for educational purposes
Always combine with proper risk management
Past performance does not guarantee future results
If you find this indicator helpful, please leave a like and follow for more ICT-based tools!

Gold Professional MacrosMacro Window Descriptions
London Opening Sweep (08:00 – 08:30 CET)
Purpose: The "Judas Swing" window. It captures the initial surge of European liquidity, often creating a false move to sweep Asian Session highs or lows before establishing the true London trend.
London LOD/HOD (09:30 – 10:00 CET)
Purpose: The "Maturity" window. This is where the morning trend often establishes its Low of Day (LOD) or High of Day (HOD) before entering a mid-day consolidation.
Pre-NY News Window (13:30 – 14:00 CET)
Purpose: The "High-Impact" window. Corresponds to 07:30–08:00 NY Time, aligning with major US economic data releases (CPI, Jobless Claims) that trigger immediate repricing in Gold.
NY Open Power Surge (15:15 – 15:45 CET)
Purpose: The "Volatility" window. Marks the official New York open. This is the prime time for ICT Silver Bullet setups as heavy institutional volume enters the market.
The Gold Fix Liquidation (16:00 – 16:30 CET)
Purpose: The Master Macro. This is the London Gold Fix. It is the most critical period for Gold, often resulting in massive reversals or final daily expansions as central banks and bullion dealers settle prices globally.
PM Reversal (19:30 – 20:00 CET)
Purpose: The "Correction" window. Often sees Gold retracing to fill Fair Value Gaps (FVG) or imbalances created during the violent NY morning session.
Key Features of the Script
Visual Time-Boxing: Color-coded background zones for instant recognition.
Automated Labeling: Clearly identifies each macro at the moment of inception.
Multi-Timeframe Compatible: Optimized for M1, M5, and M15 execution charts.
Timezone Synchronized: Hard-coded to Europe/Paris (CET) to align perfectly with European and US market overlaps.

ORB 369 - Opening Range Breakout The ORB 369 is a professional-grade momentum indicator designed to capture the volatility of the New York market open. While many Opening Range Breakout (ORB) scripts simply draw lines, this script integrates time-segmented price action with Supply and Demand (S/D) theory to filter out "fakeouts" and identify high-probability institutional entries.
💡 The Core Concept: Why 3-6-9?
The strategy is rooted in the "Market Open Volatility" principle. The first 15 minutes (9:30–9:45 AM EST) represent the period where institutional orders are processed and "price discovery" is most aggressive.
The Range: We define the 15-minute high and low as the "Battlefield."
The 369 Logic: This script focuses on the 3rd 5-minute candle of the session (completing the 15m range) and monitors the subsequent 5m and 15m cycles for a definitive trend shift.
🛠️ How It Works
The script utilizes Pine Script v6 high-precision time-tracking and state-handling to ensure accuracy even on historical data.
1. Dynamic Session Anchoring
Unlike static indicators, this script uses America/New_York timezone anchoring. It identifies the Opening Range (OR) regardless of your local time, ensuring you are aligned with the NYSE floor traders.
2. Supply & Demand Detection
The script doesn't just look at the high/low; it analyzes the micro-structure within that 15-minute window.
It identifies unmitigated zones (areas where price moved so fast it left "imbalances").
If a breakout occurs but price immediately hits an internal S/D zone, it warns the trader of a potential "Look Above and Fail" scenario.
3. Breakout Confirmation (5m Logic)
A common mistake is entering on a "wick." This script uses Closing Logic:
Bullish Signal: A 5-minute candle must close entirely above the 15m High.
Bearish Signal: A 5-minute candle must close entirely below the 15m Low.
The script then repaints the candle body (defaulting to Blue/Red) to provide an instant visual cue that the "Breakout is Confirmed."
📈 How to Use It
Wait for the Box: At 9:45 AM EST, the script will automatically lock in the High, Low, and Midpoint (Mean) of the range.
Monitor the Midpoint: The Midpoint acts as the "Line in the Sand." If a breakout occurs but price stays near the Midpoint, the trend is weak. If price stays in the upper half of the range, the Bullish bias is stronger.
The Entry: Wait for the Candle Color Change. A blue candle above the range suggests a long entry; a red candle below suggests a short.
Supply/Demand Zones: If the script highlights a "Demand Zone" at the bottom of the range and price bounces off it before breaking the top, this provides a "double-confluence" setup.
⚙️ Technical Features
Customizable Aesthetics: Use the Settings menu to change the breakout colors (Green/Blue/Red) to match your personal chart theme.
Smart Tooltips: Hover over the inputs in the settings to see detailed explanations of what each parameter does.
Alert Ready: Built-in alerts for "Bullish Breakout" and "Bearish Breakout" that can be sent directly to your phone or desktop via TradingView.

SMC Louis 4H-15M V6为了方便你将这个脚本分享到 TradingView 社区或私人收藏,我为你准备了一份中英文对照的专业描述。这份描述突出了脚本的技术核心——**Louis Trading 的 SMC 进场逻辑**。
---
## 📝 脚本描述 / Script Description
### 中文描述:SMC Louis 实战进场辅助工具 (V6版本)
**核心理念:**
本脚本根据 Louis Trading 的 SMC(Smart Money Concepts)交易教学编写,专注于 **4H 趋势过滤 + 15M 结构突破** 的高胜率进场逻辑。它通过自动化的绘图,将复杂的盘面观察简化为清晰的视觉信号。
**主要功能:**
* **多时段趋势追踪**:内置 200 EMA 动态过滤大周期方向,确保你始终顺势交易。
* **自动 BOS (结构突破) 检测**:实时标记市场结构的改变,识别潜在的反转或延续机会。
* **动态 0.715 进场参考线**:当 15M 级别发生 BOS 突破时,脚本自动根据波段高低点计算并绘制 Louis 教学中的 **0.715 黄金回撤位**,无需手动拉斐波那契线。
* **失衡区 (FVG) 视觉化**:自动高亮显示价格快速移动留下的真空区域,帮助识别高概率的订单回踩区。
* **实时仪表盘**:右上角直观显示当前大周期方向与行动建议(等待回踩或反弹)。
**使用说明:**
1. 建议在 **15分钟 (15M)** 周期下使用。
2. 观察仪表盘的趋势方向。
3. 当绿色 **BOS** 出现后,等待价格回踩 **黄色虚线 (0.715)** 且该线位于 **FVG** 区域内时考虑进场。
---
### English Description: SMC Louis Strategy Entry Assistant (V6)
**Core Concept:**
This script is meticulously designed based on the SMC (Smart Money Concepts) methodology taught by Louis Trading. It focuses on the high-probability **4H Trend Filter + 15M Market Structure Break (BOS)** execution workflow. It automates the complex manual charting process into clear, actionable visual cues.
**Key Features:**
* **MTF Trend Filtering**: Integrated 200 EMA helps you stay on the right side of the 4H higher-timeframe trend.
* **Automated BOS Detection**: Real-time identification of Market Structure Breaks (BOS), highlighting potential trend reversals or continuations.
* **Dynamic 0.715 Entry Level**: When a BOS occurs on the 15M timeframe, the script automatically calculates and plots the **0.715 Fibonacci retracement level**—a signature entry point from Louis's strategy.
* **Fair Value Gap (FVG) Visualization**: Automatically highlights price imbalances (FVGs), helping you spot where "Smart Money" is likely to mitigate orders.
* **Live Dashboard**: A clean UI in the top-right corner provides immediate context on trend direction and actionable advice.
**How to Use:**
1. Best used on the **15-Minute (15M)** timeframe.
2. Check the dashboard for the overall trend bias.
3. Wait for a **BOS** label; look for price to retracing into the **Yellow Dashed Line (0.715)**, especially if it aligns with a plotted **FVG box**.
---
### 💡 建议
如果你打算发布这个脚本,建议在 TradingView 的设置中将“15M 摆动回溯周期”默认设置为 **10-15**,这通常能最准确地过滤掉市场杂讯。
**你想让我为你生成一份专门针对“移动端使用”的简化版界面代码吗?(去掉了复杂的仪表盘,只保留核心线条,适合手机查看)**

True FVGs v2This script identifies and plots true Fair Value Gaps (FVGs) using a strict three-candle structure, distinguishing between two formation types while accounting for doji candles. It draws shaded boxes to represent untraded price imbalances, with Type A and Type B gaps defined by precise wick-to-body and body-to-body relationships that reflect institutional price displacement. The indicator allows the user to control how far each FVG extends and how many recent FVGs remain visible, keeping the chart clean and relevant. This is helpful because it highlights high-probability areas where price is likely to react, enabling more precise trade planning, entries, and risk management without visual clutter. It expands on the first script (True FVGs) and allows for a more controlled design fitting each trader's desires.

Baby ICT Simple Asia H/L + Sweeps + FVG + Alerts + Do-NothingBaby ICT Simple+ is a lightweight, rules-based TradingView indicator designed to help traders visualize key ICT-style concepts without complexity or signal-chasing. It focuses on Asia session liquidity, after, and fair value gapsto su
This tool is intentionally simple and is meant to be used alongside session timing, price action, and risk management — not as a buy/sell signal generator.
🔍 What This Indicator Displays
But
Automatically tracks and plots the Asia session high and low
Fully customizable line colors and width
These levels often act as liquidity pools before London and New York sessions
Liquidity Sweeps (Post-Asia)
Identifies the first time price takes liquidity above or below the Asia range
Sweep detection can be based on wicks or closes
Optional sweep labels help highlight potential stop-run behavior
Asia Break & Sweep Alerts
Alerts when price breaks the Asia high or low after the Asia session ends
Optional alerts for the first sweep only, helping traders focus on high-quality context
Fair Value Gaps (FVGs)
Detects classic 3-candle price imbalances on the active timeframe
Optional filter to show only FVGs that form after a liquidity sweep
Bullish and bearish FVGs are fully customizable with separate fill and border colors
“Do Nothing” Discipline Labels
Optional warning labels during a user-defined kill zone
Designed to discourage over-trading when:
No liquidity has been taken
Price is stuck mid-range
A sweep occurred but no clean displacement or fresh FVG followed
🧠 Intended Use
This indicator supports a “Baby ICT” approach, emphasizing:
Waiting for liquidity to be taken before looking for entries
Using Fair Value Gaps as entry zones, not signals
Avoiding mid-range and low-probability environments
Trading primarily during active sessions (London / New York)
Best used on:
5-minute charts
Index futures (ES, NQ) or liquid FX pairs
With session-based execution and strict risk control
🚫 What This Indicator Is NOT
❌ Not a buy/sell signal tool
❌ Not an automated trading strategy
❌ Not predictive or guaranteed
All trade decisions remain the responsibility of the trader.
⚠️ Risk Disclaimer
Trading involves risk. This indicator is provided for educational and informational purposes only and does not constitute financial advice. Always manage risk responsibly and test any tool thoroughly before using it in live markets.
✨ Final Notes
If you are looking for a clean, non-hype way to visualize:
Where liquidity is likely taken
Where price may rebalance
When it’s best to stand aside
Baby ICT Simple+ was built for that purpose.

Auto Supply and Demand and ICT ExecutionsAuto Supply and Demand and ICT Executions is a professional-grade technical analysis suite designed to automate the visualization of institutional market structure and "Smart Money" execution signals. By combining automated Supply/Demand zoning with key ICT (Inner Circle Trader) concepts, this indicator provides a complete roadmap for identifying high-probability reversal and continuation setups on any timeframe.
Core Features:
Auto Supply & Demand Zones:
Automatically identifies and plots active Supply (Red) and Demand (Green) zones based on significant market structure pivots.
Persistent Logic: Zones remain active on the chart until price "mitigates" (closes beyond) them, ensuring you never miss a retest of a key level.
ATR Clutter Filter: Uses an Average True Range (ATR) algorithm to prevent zones from overlapping, keeping your chart clean and readable.
ICT Execution Signals (MSS):
Market Structure Shifts (MSS): Automatically detects valid shifts in market structure when price breaks a key structural high or low following a liquidity sweep.
Instant Signal Labels: clearly labels breakout points with "MSS ↑" (Bullish) or "MSS ↓" (Bearish) tags.
Auto Risk/Reward Projections:
Upon detecting an MSS signal, the indicator instantly projects a Risk/Reward (R:R) Box (default 1:2) anchored to the breakout candle.
This provides immediate, visual Take Profit (Green) and Stop Loss (Red) targets, allowing for instant trade assessment without manual measuring.
Multi-Timeframe (MTF) Confluence:
Projects Higher Timeframe (HTF) Zones (default: 15-minute) directly onto your current chart.
This allows you to align your lower-timeframe entries (e.g., 1-minute) with the dominant institutional trend without switching screens.
Institutional Concepts:
Liquidity Sweeps: Highlights "Stop Hunt" pivots where price briefly breaches a recent swing high/low to trap traders before reversing.
Fair Value Gaps (FVG): Visualizes historical price imbalances (gaps) where aggressive institutional buying or selling occurred.
Silver Bullet Session: Automatically highlights the high-probability 10:00 AM - 11:00 AM NY trading window.
How to Trade with This Indicator:
Identify Structure: Wait for price to approach a Supply or Demand Zone (especially if it overlaps with an MTF Zone).
Confirm the Sweep: Look for the "Sweep" label, indicating liquidity has been grabbed.
Execute on Signal: Enter the trade when the "MSS" label appears, confirming the reversal.
Manage the Trade: Use the automated R:R Box to set your Stop Loss and Take Profit levels.

4MAs+5VWAPs+FVG+ Fractals4MAs + 5VWAPs + FVG + Fractals
All-in-one market structure indicator combining 4 moving averages, 5 VWAP timeframes, fair value gaps, fractals, and order blocks.
🔧 Features:
· 4 MAs - SMA/EMA, customizable lengths & colors
· 5 VWAPs - Daily, Weekly, Monthly, RTH, Custom sessions
· Fractals - Market structure with breakout lines & custom colors
· FVG/Imbalances - Bullish/bearish gap detection with alerts
· Order Blocks - Dynamic institutional levels
· Smart Labels - VWAP labels with color matching
⚙️ Quick Setup:
1. Toggle groups in Master Control Panel
2. Customize colors for each component
3. Set sessions for RTH/Custom VWAP
4. Adjust fractal periods (default: 2)
📈 Trading Use:
· Identify market structure with fractals
· Find confluence at VWAP + MA levels
· Trade FVG fills and order block reactions
· Multiple timeframe analysis with 5 VWAPs
Customizable • Color-Coordinated • Performance Optimized

CVD-MACD### CVD-MACD (Research)
The CVD-MACD is a research-oriented indicator that combines Cumulative Volume Delta (CVD) with the classic MACD framework to provide insights into market momentum and potential reversals. Unlike a standard MACD based on price, this version uses CVD (the running total of buy vs. sell volume delta) as its input source, offering a volume-driven perspective on trend strength and divergences.
Key Features:
- **CVD-Based MACD Calculation**: Computes MACD using CVD instead of price, highlighting volume imbalances that may precede price moves.
- **Dual Divergence Detection**: Identifies bullish/bearish divergences on both the MACD line and histogram, with configurable pivot lookbacks and filters (e.g., momentum decay and zero-side consistency).
- **Visual Flexibility**: Toggle divergences in the indicator pane or overlaid on the main chart, with optional raw CVD line for reference.
- **Alerts**: Built-in conditions for bullish and bearish divergences to notify users of potential setups.
###This indicator is designed for research and experimentation—it's not financial advice. It performs best on liquid assets with reliable volume data (e.g., stocks, futures). I've shared this to gather community feedback: please test it thoroughly and point out any bugs, inefficiencies, or improvements! For example, if you spot issues with divergence detection on certain timeframes or symbols, let me know in the comments. Your input will help refine it.
Inspired by volume analysis techniques; open to collaborations or forks.
## User Manual for CVD-MACD (Research)
### Overview
The CVD-MACD indicator transforms traditional MACD by using Cumulative Volume Delta (CVD) as the base input. CVD accumulates the net delta between estimated buy and sell volume per bar, providing a volume-centric view of momentum. The indicator plots a MACD line, signal line, and histogram, while also detecting divergences on both the MACD line and histogram for potential reversal signals.
This manual covers setup, interpretation, and troubleshooting.
Note: This is a research tool—backtest and validate on your own data before using in live trading.
### Installation and Setup
1. **Add to Chart**: Search for "CVD-MACD (Research)" in TradingView's indicator library or paste the script into the Pine Editor and add it to your chart.
2. **Compatibility**: Works on any timeframe and symbol with volume data. Best on daily/intraday charts for stocks, forex, or futures. Avoid illiquid symbols where volume may be unreliable.
3. **Customization**: All inputs are configurable via the indicator's settings panel. Defaults are optimized for general use but can be tuned based on asset volatility.
### Input Parameters
The inputs are grouped for ease of use:
#### MACD Settings
- **Fast EMA (CVD)** (default: 12): Length of the fast EMA applied to CVD. Shorter values make it more responsive to recent volume changes.
- **Slow EMA (CVD)** (default: 26): Length of the slow EMA on CVD. Longer values smooth out noise for trend identification.
- **Signal EMA** (default: 9): Smoothing period for the signal line (EMA of the MACD line).
#### Divergence Logic (MACD Line)
- **Pivot Lookback (MACD Line)** (default: 5): Bars to look left/right for detecting pivots on the MACD line. Higher values detect larger swings but may miss smaller divergences.
- **Max Lookback Range (MACD Line)** (default: 50): Maximum bars between two pivots to consider a divergence valid. Prevents detecting outdated signals.
- **Enable Momentum Decay Filter (Histogram)** (default: false): When enabled, requires the histogram to show decaying momentum (absolute value decreasing) for MACD-line divergences to trigger.
#### Histogram Divergence
- **Pivot Lookback (Histogram)** (default: 5): Similar to above, but for histogram pivots.
- **Max Lookback Range (Histogram)** (default: 50): Max bars for histogram divergence detection.
- **Show Histogram Divergences in Indicator Pane** (default: true): Displays dashed lines and "H" labels for histogram divergences in the sub-window.
- **Show Histogram Divergences on Main Chart** (default: true): Overlays histogram divergences on the price chart with semi-transparent lines and labels.
- **Require Histogram to Stay on Same Side of Zero** (default: true): Filters divergences to only those where the histogram doesn't cross zero between pivots, ensuring consistent momentum direction.
#### Visuals (Dual View)
- **Show MACD-Line Divergences (Indicator Pane)** (default: true): Draws solid lines and "L" labels for MACD-line divergences in the sub-window.
- **Show MACD-Line Divergences (Main Chart)** (default: true): Overlays MACD-line divergences on the price chart.
- **Show Raw CVD Line** (default: false): Plots the underlying CVD as a faint gray line for reference.
### How to Interpret the Indicator
1. **Core Plots**:
- **MACD Line** (blue): Difference between fast and slow CVD EMAs. Above zero indicates building buy volume momentum; below zero shows sell dominance.
- **Signal Line** (orange): EMA of the MACD line. Crossovers can signal potential entries/exits (e.g., MACD above signal = bullish).
- **Histogram** (columns): MACD minus signal. Green shades for positive/expanding bars (bullish momentum); red for negative/contracting (bearish). Fading colors indicate weakening momentum.
- **Zero Line** (gray horizontal): Reference for bullish (above) vs. bearish (below) territory.
- **Raw CVD** (optional gray line): The cumulative buy-sell delta. Rising = net buying; falling = net selling.
2. **Divergences**:
- **Bullish (Green Lines/Labels)**: Occur when price makes lower lows, but MACD line or histogram makes higher lows. Suggests weakening downside momentum and potential reversal up. Look for "L" (MACD line) or "H" (histogram) labels.
- **Bearish (Red Lines/Labels)**: Price higher highs vs. MACD/histogram lower highs. Indicates fading upside and possible downturn.
- **Dual View**: Divergences appear in the indicator pane (sub-window) for clean analysis and overlaid on the main chart for price context. Histogram divergences use dashed lines to distinguish from MACD-line (solid).
- **Filters**: Momentum decay ensures only "hidden" or weakening divergences trigger. Zero-side filter prevents false signals from oscillating histograms.
3. **Alerts**:
- **Bullish Divergence (L or H)**: Triggers on either MACD-line or histogram bullish divergence. Message: "CVD-MACD Bullish Divergence detected on {{ticker}}".
- **Bearish Divergence (L or H)**: Similar for bearish. Use TradingView's alert setup to notify via email/SMS/webhook.
- Tip: Combine with price action (e.g., support/resistance) for confirmation.
### Usage Tips and Strategies
- **Trend Confirmation**: Use in uptrends for bullish divergences (pullback buys) or downtrends for bearish (short entries).
- **Timeframe Selection**: Higher timeframes (e.g., daily) for swing trading; lower (e.g., 15-min) for intraday. Adjust pivot lookbacks accordingly (shorter for faster charts).
- **Combination Ideas**: Pair with RSI for overbought/oversold confirmation or VWAP for intraday volume context.
- **Risk Management**: Divergences are probabilistic—not guarantees. Always use stop-losses based on recent swings.
- **Performance Notes**: Backtest on historical data via TradingView's Strategy Tester. CVD relies on accurate volume; test on exchanges like NYSE/NASDAQ.
### Known Limitations and Troubleshooting
- **Volume Dependency**: CVD estimation assumes linear buy/sell distribution based on bar position—may be less accurate on thin markets or during gaps.
- **Repainting**: Pivots and divergences can repaint as new data arrives (common in pivot-based indicators). Use on closed bars for reliability.
- **Resource Usage**: High max_bars_back (5000) ensures deep history; reduce if chart loads slowly.
- **No Signals on Low-Volume Bars**: If CVD flatlines, check symbol volume—some crypto/forex pairs have inconsistent data.
- **Community Feedback**: If you encounter bugs (e.g., false divergences on specific symbols/timeframes), missing alerts, or calculation errors, please comment below with details like symbol, timeframe, and screenshots. Suggestions for enhancements (e.g., more filters or visuals) are welcome!
If you have questions or find issues, drop a comment—let's improve this together!

Clean SMC: Filtered OB + FVGHow does this indicator work?
Fair Value Gaps (FVG): It identifies price imbalances (gaps between the wick of candle 1 and candle 3). They appear as small, light-colored rectangles.
Order Blocks (OB): It marks "Smart Money" candles that precede a strong impulse. These areas are extended to the right because they often act as future support or resistance.
Signals (BUY/SELL): The indicator displays a signal when it detects a confluence (for example, a bullish OB appearing right after an FVG).
Some friendly trading tips:
Timeframe: This indicator works best on higher timeframes (15m, 1h, 4h) to avoid market "noise."
Confirmation: Don't take a "BUY" signal on its own. Check if the overall trend (on a higher timeframe) is also bullish.
Risk management: Always place your Stop Loss just below the identified Order Block.

SMC Pro : OB Longues + FVGHow does this indicator work?
Fair Value Gaps (FVG): It identifies price imbalances (gaps between the wick of candle 1 and candle 3). They appear as small, light-colored rectangles.
Order Blocks (OB): It marks "Smart Money" candles that precede a strong impulse. These areas are extended to the right because they often act as future support or resistance.
Signals (BUY/SELL): The indicator displays a signal when it detects a confluence (for example, a bullish OB appearing right after an FVG).
Some friendly trading tips:
Timeframe: This indicator works best on higher timeframes (15m, 1h, 4h) to avoid market "noise."
Confirmation: Don't take a "BUY" signal on its own. Check if the overall trend (on a higher timeframe) is also bullish.
Risk management: Always place your Stop Loss just below the identified Order Block.

Clean SMC: Filtered OB + FVGHow does this indicator work?
Fair Value Gaps (FVG): It identifies price imbalances (gaps between the wick of candle 1 and candle 3). They appear as small, light-colored rectangles.
Order Blocks (OB): It marks "Smart Money" candles that precede a strong impulse. These areas are extended to the right because they often act as future support or resistance.
Signals (BUY/SELL): The indicator displays a signal when it detects a confluence (for example, a bullish OB appearing right after an FVG).
Some friendly trading tips:
Timeframe: This indicator works best on higher timeframes (15m, 1h, 4h) to avoid market "noise."
Confirmation: Don't take a "BUY" signal on its own. Check if the overall trend (on a higher timeframe) is also bullish.
Risk management: Always place your Stop Loss just below the identified Order Block.

Clean SMC: Filtered OB + FVG Fair Value Gaps (FVG): This identifies price imbalances (gaps between the wick of candle 1 and candle 3). They appear as small, light-colored rectangles.
* Order Blocks (OB): This marks "Smart Money" candles that precede a strong impulse. These areas are extended to the right because they often act as future support or resistance.
* Signals (BUY/SELL): The indicator displays a signal when it detects a confluence (for example, a bullish OB appearing right after an FVG).
Some friendly trading tips:
* Timeframe: This indicator works best on higher timeframes (15m, 1h, 4h) to avoid market "noise."
* Confirmation: Don't take a "BUY" signal alone. Check if the overall trend (on a higher timeframe) is also bullish.
* Risk management: Always place your Stop Loss just below the identified Order Block.
Would you like me to add a specific feature, such as a notification on your phone or a trend filter (moving average) to refine the signals?

INSTITUTIONAL GHOST [Jorge's Algo]Here is the professional English translation for your TradingView publication. It uses the correct technical terminology (SMC, ICT, Order Flow) to attract serious traders.
Title: INSTITUTIONAL GHOST
Subtitle: The Institutional Footprint Algorithm: Liquidity, Structure, and Volume (CVD).
DESCRIPTION:
INSTITUTIONAL GHOST is not just an indicator; it is a complete vision system engineered to clear market noise and reveal only what matters: Where is the liquidity, and when are institutions entering?
Unlike conventional indicators that clutter your chart with colors and false signals, the Ghost Protocol operates on absolute minimalism. It only displays information when high-probability algorithmic conditions are met, based on Smart Money Concepts (SMC) and Cumulative Volume Delta (CVD).
🔥 KEY FEATURES:
1. LIQUIDITY DETECTOR (Lr): The algorithm automatically identifies Major Swing Points where retail Stop Losses reside.
"Lr" Lines: Minimalist projections that act as magnets for price.
2. POWER SWEEPS (The Institutional Trap): Forget signal spam on every candle. This system filters noise and only marks a "Power Sweep" (Cyan Diamond) when:
Price sweeps a major liquidity level.
IMMEDIATE REJECTION: The candle closes in the opposite direction of the breakout (e.g., breaks high but closes bearish).
This confirms a Stop Hunt and rapid distribution.
3. CVD DIVERGENCE (The Lie Detector): In the background, the script calculates the Cumulative Volume Delta.
If a small "D" label appears above a Sweep, it means price made a New High/Low, but the Order Flow (real money) did not support it.
Signal: Confirmed Divergence = High probability reversal.
4. FVG GHOST LINES: Identification of Fair Value Gaps (Imbalances) without intrusive boxes. Only fine vertical lines connecting the gap, maintaining a "Clean Chart" aesthetic.
5. ICT MIDNIGHT OPEN: A discrete marker at the New York Open (00:00 NY) to determine the Daily Bias (Premium vs. Discount).
📋 HOW TO TRADE THIS ALGORITHM (THE MECHANICAL PLAN):
WAIT: Let price approach a Liquidity Line (Lr). Do not chase the price.
OBSERVE: Look for the appearance of the Cyan Diamond (Power Sweep). This indicates liquidity has been taken and rejected.
CONFIRM: If the "D" (Divergence) appears, the signal is "institutionally validated" by volume.
EXECUTE: Enter at the close of the Sweep candle or on the retest of the nearest FVG.
AUTHOR'S NOTE: This script was designed under the philosophy of "Less is More." If the chart is empty, it is because there is nothing to do. Patience pays.
Recommended Settings: M15, H1, H4 (Forex, Gold, Indices). Style: Minimalist / Zen.

Gold/Silver Ratio with Supply ZonesGold/Silver Ratio with Supply Zones
Overview
Professional-grade indicator that tracks the Gold/Silver Ratio in real-time
Identifies potential market imbalances and rotation opportunities between precious metals
Features customizable threshold bands, moving averages, and automated trading signals
Built on Pine Script v6 for maximum stability and performance
Key Features
Real-Time Ratio Calculation : Automatically calculates Gold/Silver ratio using OANDA:XAUUSD and OANDA:XAGUSD price feeds
Dynamic Threshold Zones : Visual bands showing when silver or gold may be undervalued relative to each other
Moving Average Overlay : 20-period SMA to identify trend direction and momentum
Automated Buy Signals : Triangle markers appear when ratio reaches extreme levels
Live Information Table : Displays current ratio, moving average, individual metal prices, and market interpretation
Custom Alerts : Set notifications when ratio crosses your defined thresholds
Color-Coded Zones : Green zones indicate gold undervaluation, red zones indicate silver undervaluation
Trading Applications
Mean Reversion Strategy : Enter silver positions when ratio exceeds 90, enter gold when ratio falls below 70
Rotation Trading : Switch between metals based on relative value signals
Portfolio Rebalancing : Identify optimal times to adjust precious metals allocation
Divergence Analysis : Compare ratio behavior against individual metal price action
Default Settings
High Threshold : 90.0 (Silver undervalued zone)
Low Threshold : 70.0 (Gold undervalued zone)
Moving Average : 20-period SMA
Historical Reference : 80:1 ratio marked as long-term mean
How to Interpret
Ratio Above 90 : Silver is undervalued relative to gold - consider increasing silver exposure
Ratio Below 70 : Gold is undervalued relative to silver - consider increasing gold exposure
Ratio Between 70-90 : Neutral range - no clear relative value advantage
Rising Ratio : Gold outperforming silver
Falling Ratio : Silver outperforming gold
Signal Logic
Green Triangle (Bottom) : Ratio crosses above high threshold → Buy Silver Signal
Red Triangle (Top) : Ratio crosses below low threshold → Buy Gold Signal
MA Crossovers : Use 20-period MA for trend confirmation and entry timing
Visual Elements
Blue Line : Current gold/silver ratio value
Orange Line : 20-period moving average smoothing
Red Shaded Zone : Area where gold is relatively expensive
Green Shaded Zone : Area where gold is relatively cheap
Gray Dotted Line : Historical mean at 80:1
Info Table : Real-time statistics and market interpretation
Best Practices
Use on daily timeframe or higher for most reliable signals
Combine with volume analysis and individual metal technicals
Monitor Federal Reserve policy and USD strength as macro context
Consider industrial demand factors for silver (solar, EV, electronics)
Watch safe-haven flows during economic uncertainty for gold
Customization Options
Adjust threshold levels based on your preferred lookback period
Modify moving average length to suit your trading timeframe
Toggle bands on/off for cleaner chart visualization
Change data source tickers if using different brokers (FXCM, FOREXCOM, etc.)
Alert Conditions
Silver Undervalued Alert : Triggers when ratio crosses above your high threshold
Gold Undervalued Alert : Triggers when ratio crosses below your low threshold
Receive notifications via TradingView mobile app , email , or webhook
Who This Is For
Precious metals traders seeking relative value opportunities
Portfolio managers balancing gold and silver allocations
Macro traders using metals as inflation hedges
Swing traders capitalizing on mean reversion patterns
Long-term investors optimizing entry points
Important Notes
This indicator tracks price ratios , not physical supply data
COMEX warehouse stocks are not directly available in TradingView
Ratio analysis assumes historical mean reversion tendencies
Always combine with fundamental analysis and risk management
Past performance does not guarantee future results
Data Sources
Gold Price : OANDA:XAUUSD (spot gold in US dollars)
Silver Price : OANDA:XAGUSD (spot silver in US dollars)
Update Frequency : Real-time during market hours
Historical Data : Full TradingView historical coverage available

Teemo Volume Delta & Market HUDTeemo Volume Delta & Market HUD
Description:
Teemo Volume Delta goes beyond simple volume indicators to provide expert-level analysis of Buy and Sell pressure within the market. It visualizes supply/demand imbalances inside candles and provides an immediate grasp of market control via a real-time HUD.
With the v1.2.0 update, we have removed unnecessary overlays (like EMAs) to focus on Pure Delta Analysis and a flexible Smart Accumulation System, making the tool lighter and more powerful.
🚀 Key Features
1. Dual Calculation Modes Offers two calculation methods tailored to your trading environment and goals:
Estimation: Rapidly estimates buy/sell volume based on candle shape (OHLC) and price range. It features fast loading times and works instantly on all assets.
Intraday: Analyzes lower timeframe data (e.g., 1-minute bars) to calculate the precise delta of the current timeframe. (Loading time may vary depending on TradingView data limits.)
2. Smart Accumulation System Supports strategic analysis beyond simple summation with two distinct modes:
Time Based: Resets the Cumulative Delta to 0 at specific intervals (e.g., every 4 hours, Daily). This is optimized for session-based analysis or day trading.
Infinite: Continuously accumulates data without resetting, ideal for analyzing long-term Divergences between price and delta.
3. Intuitive HUD (Heads-Up Display) Displays critical market data on the chart for instant decision-making:
Delta Panel: Shows real-time Buy/Sell volume and Net Delta for the current candle.
Market HUD: Provides a comprehensive view of Trend Strength (ADX), Momentum (RSI), and the Cumulative Buy/Sell status for the current period.
4. Teemo Design System (v1.2) Provides optimized color themes for visual comfort during long trading sessions:
Teemo Neon: High-contrast Mint/Purple theme optimized for dark backgrounds.
Classic Soft: A calming Soft Green/Red theme designed to reduce eye strain (Recommended for all backgrounds).
⚙️ Settings Guide
Calculation Mode: Choose between Estimation (Speed) or Intraday (Precision).
Accumulation Mode: Choose Time Based (Periodic Reset) or Infinite (Continuous).
Reset Period: Set the reset interval for Time Based mode (e.g., 1D = Daily Reset).
Color Preset: Select between Teemo Neon or Classic Soft themes.
💡 Trading Tips
Delta Divergence: If the price makes a higher high but the Cumulative Delta (HUD) makes a lower high, it signals weakening buying pressure and a potential reversal.
Candle Coloring: A solid Mint (or Green) candle body indicates a price rise accompanied by strong actual buying volume, offering higher reliability than standard candles.
HUD Confluence: Consider trend-following entries when the ADX is above 25 and the Delta is heavily skewed in one direction.
This indicator is for informational purposes only and does not constitute financial advice. The Estimation mode provides approximations based on algorithms, and the Intraday mode's accuracy depends on the quality of the lower timeframe data provided by the exchange.
Developed by Teemo Trading Systems
------------------------------------------------------------------------
Teemo Volume Delta & Market HUD
설명 본문:
Teemo Volume Delta는 단순한 거래량 지표를 넘어, 시장 내부의 매수(Buy)와 매도(Sell) 압력을 정밀하게 분석하는 전문가용 도구입니다. 캔들 내부의 수급 불균형을 시각화하고, 실시간 HUD를 통해 시장의 주도권이 누구에게 있는지 즉각적으로 파악할 수 있도록 돕습니다.
v1.2.0 업데이트를 통해 불필요한 보조지표(EMA)를 제거하고, 순수한 델타 분석과 유연한 누적(Accumulation) 시스템에 집중하여 더욱 가볍고 강력해졌습니다.
🚀 주요 기능 (Key Features)
1. 듀얼 계산 모드 (Dual Calculation Modes) 사용자의 환경과 목적에 맞춰 두 가지 계산 방식을 제공합니다.
Estimation (추정 모드): 캔들의 형태(OHLC)와 가격 변동폭을 기반으로 매수/매도 볼륨을 빠르게 추정합니다. 로딩 속도가 빠르며 모든 자산에 즉시 적용 가능합니다.
Intraday (정밀 분석 모드): 하위 타임프레임(예: 1분봉)의 데이터를 분석하여 상위 타임프레임의 델타를 정밀하게 계산합니다. (TradingView 데이터 제한에 따라 로딩 시간이 소요될 수 있습니다.)
2. 스마트 누적 시스템 (Smart Accumulation) 단순 누적을 넘어, 전략적 분석을 위한 두 가지 모드를 지원합니다.
Time Based: 지정한 주기(예: 4시간, 1일)마다 누적 델타를 **0으로 초기화(Reset)**합니다. 세션별 수급 분석이나 데이 트레이딩에 최적화되어 있습니다.
Infinite: 초기화 없이 데이터를 계속 누적하여, 장기적인 가격과 델타의 **다이버전스(Divergence)**를 분석하는 데 유용합니다.
3. 직관적인 HUD (Heads-Up Display) 차트 우측과 좌측에 핵심 정보를 요약하여 보여줍니다.
Delta Panel: 현재 캔들의 매수/매도 거래량과 순매수(Net Delta) 상태를 실시간으로 표시합니다.
Market HUD: ADX(추세 강도), RSI(모멘텀), 그리고 현재 구간의 누적 매수/매도 현황을 한눈에 볼 수 있습니다.
4. Teemo Design System (v1.2) 장시간 차트를 보는 트레이더를 위해 시인성이 뛰어난 컬러 테마를 제공합니다.
Teemo Neon: 어두운 배경에 최적화된 고대비 민트/퍼플 테마.
Classic Soft: 눈의 피로를 줄여주는 차분한 그린/레드 테마 (밝은/어두운 배경 모두 추천).
⚙️ 설정 가이드 (Settings)
Calculation Mode: Estimation(속도 중심) 또는 Intraday(정확도 중심) 중 선택.
Accumulation Mode: Time Based(주기별 리셋) 또는 Infinite(무한 누적) 선택.
Reset Period: Time Based 모드 사용 시 리셋할 주기 설정 (예: 1D = 매일 리셋).
Color Preset: Teemo Neon 또는 Classic Soft 테마 선택.
💡 활용 팁 (Trading Tips)
델타 다이버전스: 가격은 신고가를 갱신하지만 누적 델타(Cum Delta)는 낮아진다면, 매수세가 약화되고 있다는 강력한 반전 신호입니다.
캔들 컬러링: 캔들의 몸통 색상이 짙은 민트색(또는 그린)이라면 강력한 매수세가 동반된 상승을 의미하며, 신뢰도가 높습니다.
HUD 활용: ADX가 25 이상이면서 델타가 한쪽 방향으로 쏠릴 때 추세 매매를 고려하세요.
이 지표는 정보 제공의 목적으로만 사용되며, 재정적 조언이 아닙니다. Estimation 모드는 근사치를 제공하며, Intraday 모드는 거래소에서 제공하는 하위 데이터의 품질에 따라 정확도가 달라질 수 있습니다.

Apex Wallet - Ultimate Trading Suite: All-In-One Overlay & SignaOverview The Apex Wallet All-In-One is a comprehensive professional trading toolkit designed to centralize every essential technical analysis tool directly onto your main price chart. Instead of cluttering your workspace with dozens of separate indicators, this script integrates trend analysis, volatility bands, automated chart patterns, and a multi-indicator signal engine into a single, cohesive interface.
Key Modular Features:
Trend Core: Features dynamic trend curves, cloud fills for momentum visualization, and a multi-timeframe dashboard (1m to 4h) to ensure you are always trading with the higher-timeframe bias.
Automated Chart Structures: Automatically detects and plots Support/Resistance levels, Standard Pivot Points, Market Gaps, and Fair Value Gaps (Imbalances).
Volatility & Volume: Includes professional-grade VWAP with standard deviation bands, Bollinger Bands, and a built-in Volume Delta (Raw/Net) tracker.
Signal Engine: A powerful cross-logic system that generates entry signals based on RSI (QQE), MACD (Zero-cross & Relance), Stochastic, TDI, and the Andean Oscillator.
Predictive Projections: A unique feature that projects current indicator slopes into future candles to help anticipate potential trend continuations or reversals.
Adaptability The script includes three core presets—Scalping, Day-Trading, and Swing-Trading—which automatically adjust all internal periods (Moving Averages, Bollinger, RSI, etc.) to match your specific market speed.
Visual Cleanliness Every feature is toggleable. You can display a "clean" chart with just the Trend Cloud or a "complete" workstation with signals, patterns (Doji, Engulfing), and pivot levels

SMC Alpha Engine [PhenLabs]📊 SMC Alpha Engine
Version: PineScript™ v6
📌 Description
The SMC Alpha Engine is a comprehensive Smart Money Concepts indicator that automates institutional trading pattern recognition. Built for traders who understand that confluence is king, this indicator stacks multiple SMC elements together and scores them in real-time, allowing you to focus exclusively on high-probability setups.
Rather than manually tracking HTF bias, market structure, liquidity levels, order blocks, and fair value gaps separately, the SMC Alpha Engine consolidates everything into a unified scoring system. When enough factors align, you get a signal. When they don’t, you wait. This systematic approach removes emotion and subjectivity from SMC trading.
The indicator is designed around one core principle: only trade when the probabilities are stacked in your favor. By requiring multiple confluence factors before generating signals, it filters out the noise and keeps you focused on setups that institutional traders actually care about.
🚀 Points of Innovation
Automated confluence scoring system that evaluates 6 distinct SMC factors in real-time
HTF-to-LTF bias alignment ensuring trades flow with institutional direction
Intelligent liquidity sweep detection using wick-ratio analysis for confirmation
ATR-based FVG quality filtering that eliminates noise and shows only significant imbalances
Anti-spam signal logic preventing overtrading during volatile market conditions
Session-aware killzone integration timing entries with institutional activity windows
🔧 Core Components
HTF Bias Engine: Analyzes higher timeframe swing structure to establish directional bias using pivot high/low comparisons
Market Structure Module: Detects BOS (Break of Structure) and CHoCH (Change of Character) with real-time confirmation
Premium/Discount Calculator: Dynamically maps price zones relative to recent swing range equilibrium
Liquidity Tracker: Monitors swing points as liquidity targets and identifies sweep events with rejection confirmation
POI Detector: Identifies valid Order Blocks with displacement requirements and Fair Value Gaps with ATR filtering
Confluence Scorer: Aggregates all factors into bull/bear scores displayed on real-time dashboard
🔥 Key Features
Multi-timeframe analysis combining HTF directional bias with LTF precision entries
Customizable confluence threshold from 1 (low filter) to 5 (sniper mode)
Three killzone sessions: London (02:00-05:00), NY AM (08:30-11:00), NY PM (13:30-16:00)
Flexible mitigation options for OBs and FVGs: Wick, Close, 50%, or None
Visual structure labeling for BOS and CHoCH events on chart
Real-time info dashboard showing all current market conditions and scores
Built-in alert conditions for BOS, liquidity sweeps, and high-confluence signals
🎨 Visualization
Premium Zone: Red-tinted box above equilibrium indicating sell-side interest areas
Discount Zone: Green-tinted box below equilibrium indicating buy-side interest areas
Equilibrium Line: Dotted gray line marking the 50% level of current range
Order Blocks: Color-coded boxes (green for bullish, red for bearish) showing institutional candles
Fair Value Gaps: Teal boxes for bullish FVGs, maroon boxes for bearish FVGs
Killzone Backgrounds: Blue (London), Orange (NY AM), Purple (NY PM) session highlighting
Info Table: Top-right dashboard displaying HTF bias, LTF trend, zone, killzone status, and scores
📖 Usage Guidelines
HTF Settings
HTF Timeframe - Default: 60 - Controls higher timeframe for directional bias
HTF Swing Length - Default: 10, Range: 3+ - Determines pivot sensitivity for HTF trend
Market Structure Settings
LTF Swing Length - Default: 3, Range: 1-10 - Controls swing detection sensitivity
Show BOS/CHoCH - Default: Off - Toggles structure labels on chart
Show Strong/Weak Points - Default: Off - Displays swing point classifications
POI Settings
Show Valid Order Blocks - Default: Off - Displays OBs that caused displacement
Show Unmitigated FVGs - Default: On - Shows active fair value gaps
Filter FVG by ATR - Default: On - Only shows FVGs larger than 0.5x ATR
OB Mitigation Type - Options: Wick, Close, None - Determines when OBs are invalidated
FVG Mitigation Type - Options: Wick, Close, 50%, None - Determines when FVGs are filled
Confluence Settings
Minimum Score for Signal - Default: 4, Range: 1-5 - Required confluence level for entries
Show Entry Signals - Default: On - Toggles LONG/SHORT labels on chart
✅ Best Use Cases
Trend continuation trades during active killzone sessions with HTF alignment
Discount zone entries on bullish HTF bias with recent liquidity sweep below
Premium zone shorts on bearish HTF bias after liquidity grab above recent highs
Reversal identification following CHoCH with POI confluence in optimal zone
Filtering existing strategy signals by requiring minimum confluence score
⚠️ Limitations
HTF bias detection requires sufficient price history for accurate pivot identification
Liquidity sweep detection depends on wick-ratio settings and may miss some events
Order blocks require displacement confirmation which may exclude some valid zones
Confluence scoring is probabilistic and does not guarantee profitable outcomes
Killzone times are based on EST/EDT and require timezone adjustment for other regions
Signal spam prevention may delay valid signals by up to 10 bars after previous signal
💡 What Makes This Unique
Unified SMC Framework: Combines all major SMC concepts into one cohesive indicator rather than requiring multiple tools
Objective Scoring System: Removes subjectivity by quantifying confluence into measurable scores
Institutional Timing Integration: Built-in killzone awareness ensures signals align with high-volume sessions
Quality Filtering: ATR-based FVG filtering and displacement-required OBs eliminate low-quality setups
Anti-Overtrading Logic: Smart signal spacing prevents emotional trading during choppy conditions
🔬 How It Works
Step 1: HTF Bias Determination
Analyzes higher timeframe pivot highs and lows
Compares consecutive pivots to identify HH/HL (bullish) or LH/LL (bearish) sequences
Establishes directional filter that all signals must respect
Step 2: LTF Structure Mapping
Detects swing points on execution timeframe
Identifies BOS when price closes beyond confirmed swing level
Recognizes CHoCH when structure break occurs against current trend
Step 3: Confluence Calculation
Awards +1 for HTF bias alignment
Awards +1 for active killzone timing
Awards +1 for optimal zone positioning (discount for longs, premium for shorts)
Awards +1 for price at unmitigated POI
Awards +1 for recent liquidity sweep in trade direction
Awards +1 for recent supportive structure break
Step 4: Signal Generation
Compares total score against user-defined minimum threshold
Requires candle confirmation (bullish close for longs, bearish close for shorts)
Applies 10-bar spacing filter to prevent signal clustering
💡 Note:
This indicator is designed for traders already familiar with Smart Money Concepts. While it automates detection and scoring, understanding why each factor matters will significantly improve your ability to filter signals and manage trades effectively. Use the minimum confluence setting to match your risk tolerance, higher values mean fewer but higher-quality signals.

SMC + Dual UT Bot buy and sell AlertsMise a jour avec un EMA 20/50 et vwap
his script is a composite indicator for TradingView (Pine Script v5) that merges Smart Money Concepts (SMC) with a Dual-instance UT Bot. It has been styled with a high-contrast "Neon Cyberpunk" theme (Cyan/Pink) and is fully compliant with the CC BY-NC-SA 4.0 license.
Here is a breakdown of its two main components:
1. Smart Money Concepts (SMC)
This portion, originally by LuxAlgo, is designed to identify institutional price levels and structural market shifts. It provides a detailed map of market structure rather than simple entry/exit signals.
Market Structure (BOS & CHoCH):
BOS (Break of Structure): Marks trend continuation (e.g., breaking a higher high in an uptrend).
CHoCH (Change of Character): Marks potential trend reversals (e.g., the first time a higher low is broken in an uptrend).
Order Blocks (OB):
Highlights specific candles where institutional buying or selling likely occurred. These act as high-probability support/resistance zones.
Neon Blue/Cyan for Bullish OBs.
Neon Pink for Bearish OBs.
Fair Value Gaps (FVG):
Identifies imbalances (gaps) in price action where the market often returns to "fill" orders.
Neon Mint for Bullish FVGs.
Neon Red for Bearish FVGs.
Premium/Discount Zones: Automatically plots the range equilibrium (50% level) to help you buy in "Discount" (low) and sell in "Premium" (high) areas.
Liquidity (EQH/EQL): Automatically detects "Equal Highs" and "Equal Lows," which are magnets for price as they represent liquidity pools (stop losses).
2. Dual UT Bot Alerts
This portion provides the actual Entry Signals. It runs two separate instances of the "UT Bot" strategy simultaneously with different sensitivity settings to filter noise.
Instance 1 (Buy Only):
Settings: Key Value = 4, ATR Period = 10 (Faster, more sensitive).
Visual: Plots a Neon Cyan "Buy" label.
Function: Looks for bullish reversals earlier to catch the start of a move.
Instance 2 (Sell Only):
Settings: Key Value = 7, ATR Period = 20 (Slower, smoother).
Visual: Plots a Neon Pink "Sell" label.
Function: Uses a wider ATR band to avoid getting shaken out of shorts too early, focusing on major downtrends.
How to Use It
The strength of this script is confluence.
Wait for a Signal: Look for a UT Bot "Buy" or "Sell" tag.
Confirm with SMC: Check if the signal aligns with SMC concepts.
Example Buy: Did the UT Bot give a "Buy" signal while price was bouncing off a Bullish Order Block?
Example Buy: Did price just sweep Liquidity (EQL) before the Buy signal?
Example Sell: Is the "Sell" signal happening inside a Premium Zone or a Bearish Fair Value Gap?
avant-hier
Notes de version
1. "Pro" Badge Buy/Sell Labels
The standard text signals have been replaced with modern, professional Badge Labels that provide more information at a glance.
Visuals: Instead of simple text, the script now uses label.new to create high-visibility badges.
BUY: A Neon Cyan badge with a Rocket icon (🚀).
SELL: A Neon Pink badge with a Chart icon (📉).
Price Details: Each badge displays the exact Entry Price directly on the label.
Tooltips: If you hover your mouse over a Buy or Sell badge, a tooltip will appear showing the exact Take Profit (TP) and Stop Loss (SL) prices calculated for that trade.
2. Dynamic Take Profit (TP)
The script now automatically calculates a profit target for every trade the moment a signal is generated.
Calculation: It measures the distance between your Entry Price and the initial Stop Loss (the ATR Trailing Stop).
Risk:Reward: It multiplies that distance by your chosen Risk:Reward Ratio (default is 1.5) to project a TP target.
Visual Line: A Green Line is drawn on the chart at the TP level. It remains active until price hits it or the stop loss.
3. Active Trailing Stop Loss (SL)
The Stop Loss is no longer static; it is now "alive" and manages the trade for you.
Trailing Logic: If Use Trailing SL? is enabled (default), the SL line will automatically move up (for longs) or move down (for shorts) as the trend continues in your favor. It locks in profit by following the UT Bot's ATR trailing band.
Visual Line: A Red Line is drawn at the SL level. You can see it physically step up or down on the chart as the trend progresses.
4. Real-Time Trade Simulation
The script now simulates the lifecycle of a trade directly on the chart:
Active State: When a trade is live, the TP and SL lines extend to the right of the current candle (bar_index + 1), showing you exactly where your exit points are in real-time.
Closed State: Once the price hits either the Green TP line or the Red SL line, the script detects the "Exit." The lines stop extending and turn dotted, indicating that the trade is closed and waiting for the next signal.
Summary of New Settings
You will find a new group in the settings panel called "UT Bot: Trade Management":
TP Risk:Reward Ratio: Adjust this to change how far the Green TP line is placed (e.g., set to 2.0 for 2x return).
Use Trailing SL?: Uncheck this if you want the Red SL line to stay fixed at the initial entry risk level.
avant-hier
Notes de version
1. Live Strategy Performance Dashboard (Backtester)
Since this is an indicator, TradingView does not automatically calculate PnL (Profit and Loss). I have built a custom Simulation Engine inside the script that tracks every UT Bot signal as if you had taken the trade.
Location: Bottom Right of your chart.
Win Rate: Displays the percentage of trades that hit the Take Profit target versus the Stop Loss.
Trades (W/L): Shows the total number of signals generated, broken down by Wins and Losses.
Net Profit (R): Calculates your theoretical profit in "R-Multiples" (Risk Units).
Example: If you set your Risk:Reward to 2.0, every win adds +2R, and every loss subtracts -1R.
Dynamic Colors: The Win Rate and Profit cells turn Neon Cyan if positive (>50% or >0R) and Neon Pink if negative.
2. Multi-Timeframe Trend Dashboard
A new panel at the Top Right gives you an instant "Market Bias" reading so you don't have to scan the whole chart.
SMC Trend: Reads the Smart Money structure (Break of Structure/Change of Character) to determine if the high-level timeframe is BULLISH or BEARISH.
UT Bot Status: Displays the current active signal state:
BUY (Active): You are currently in a Long trade.
SELL (Active): You are currently in a Short trade.
NEUTRAL: No active signal or the last trade hit TP/SL.
3. Integrated Alert System
I have connected the visual lines to the alert system. You can now set a single alert on this indicator, and it will trigger for:
Entry Signals: "UT Long Entry" / "UT Short Entry"
Exits: "Take Profit Hit" / "Stop Loss Hit"
4. Consolidated Settings
To make the script easier to manage, I organized the settings into clear groups:
Dashboards: Toggle the visibility of the new panels or move the Performance Panel to a different corner.
UT Bot: Trade Management: Quickly adjust your Risk:Reward Ratio (e.g., change from 1.5 to 2.0) to see how it affects your Win Rate in real-time on the dashboard.
avant-hier
Notes de version
1. Multi-Timeframe (MTF) Trend Scanner
I have replaced the basic "Market Bias" panel with a comprehensive MTF Trend Dashboard located at the Top Right of your chart.
What it tracks: It simultaneously monitors the trend direction on 5 distinct timeframes:
15 Minute
1 Hour
4 Hour
Daily
Weekly
How it works: It runs a background calculation (using UT Bot settings Key=5, ATR=15) on these higher timeframes without you needing to switch charts.
Visuals:
BULLISH: Highlighted in Neon Cyan.
BEARISH: Highlighted in Neon Pink.
2. Strategic Confluence (How to use it)
This new dashboard transforms the script from a simple "signal generator" into a complete trading system by allowing you to filter trades based on the bigger picture.
The "All-Green" Rule: If you are scalping on a 5-minute chart and you get a BUY signal, check the dashboard. If the 1H, 4H, and Daily are all Neon Cyan (Bullish), that trade has a significantly higher probability of success.
Avoid Counter-Trend Trades: If your main chart says BUY, but the dashboard shows the 4H and Daily are Neon Pink (Bearish), you are trading against the major trend. You might want to skip that trade or reduce your risk size.
3. Summary of Dashboards
You now have two professional-grade panels on your screen:
Bottom Right (Performance): Shows the past results of the strategy on your current timeframe (Win Rate, Profit Factor).
Top Right (Trend): Shows the current state of the market across all timeframes.

FVG by EVEV FVG is a clean and beginner-friendly Fair Value Gap indicator designed to help traders understand and visualize institutional price imbalances in a simple and intuitive way. It automatically detects high-quality bullish and bearish fair value gaps using a non-repainting three-candle structure, ensuring that all zones are confirmed and reliable in real-time trading.
The indicator focuses on clarity over complexity. Active fair value gaps are extended forward to act as potential areas of interest, while filled gaps are automatically frozen at the exact point where price completes them, preserving the historical context without cluttering the chart. Fully mitigated zones are visually muted and do not display labels, keeping attention on what is currently relevant.
To maintain a clean chart, distant gaps fade into outline-only mode, allowing traders to focus on the most actionable areas near price while still retaining broader market structure awareness. Sensitivity is controlled through a single preset selector, making the indicator suitable for beginners without requiring manual optimization or advanced configuration.
EV FVG Lite works on any market and timeframe and is designed to integrate naturally with price action, market structure, and liquidity-based trading approaches. It is intended as an educational and practical tool that helps traders build a solid understanding of fair value gaps without overwhelming them with settings or noise.
