Low-High Waves for NeowaveOpen your chart at daily and hide the symbol graphic. Now you can see the waves. It’s including limited data sorry for this but I’m not a programmer and TradingView have limitations. Indicatore Pine Script®di fatihoncellAggiornato 105
Bullish/Bearish Movement SumThis indicator calculates and displays the cumulative sum of bullish and bearish price movements over a specified period. Features: - Green line: Cumulative sum of all bullish movements - Red line: Cumulative sum of all bearish movements (absolute value) - Blue area: Net difference (bullish - bearish) - Information table showing current values and bull/bear ratio Settings: - Calculation Period: Choose rolling window size (default: 100 bars) or 0 for cumulative from start - Calculation Mode: Choose between "Points" (absolute price changes) or "Percentage" (% changes) Use Cases: - Identify market directional strength - Compare bullish vs bearish pressure - Spot divergences between price and directional momentum - Ratio > 1 indicates more bullish than bearish movement Developed with assistance from Claude (Anthropic)Indicatore Pine Script®di Philupup7
CS Trendline ProTitle: CS Trendline Pro Description: CS Trendline Pro is a comprehensive scalping and day-trading system designed to filter out noise and identify high-probability breakout setups. It combines the structural precision of Fractal Trendlines with a robust Dual-EMA Filter, visualized through an intuitive "Traffic Light" color system. This tool is specifically engineered for traders who want to trade Trendline Breakouts but need a safety mechanism to avoid false signals (fakeouts) and counter-trend traps. 🚦 How the "Traffic Light" Logic Works The core feature of this script is the dynamic coloring of the candles, which acts as a visual filter for your entries: 🟢 GREEN Zone (Safe Buy): Condition: A Bullish Trendline Breakout has occurred AND the price is holding ABOVE the EMA 30 (Yellow Line). Meaning: Momentum is bullish, and you are in a safe zone to look for Long entries. 🔴 RED Zone (Safe Sell): Condition: A Bearish Trendline Breakout has occurred AND the price is holding BELOW the EMA 30 (Yellow Line). Meaning: Momentum is bearish, and you are in a safe zone to look for Short entries. ⚪ GRAY Zone (No Trade / Wait): Condition: A breakout occurred, but the price is on the "wrong side" of the EMA 30. Meaning: Indecision. The market structure is conflicting with the immediate momentum. It is recommended to stay out until the color changes. 🛠️ Key Features ** automated Trendlines:** Automatically draws Support and Resistance dynamic trendlines based on pivot points (LuxAlgo engine). Dual EMA Filter: EMA 30 (Yellow): Acts as the immediate "Safe Zone" filter. EMA 200 (White): Displays the macro trend. (Pro Tip: Only take Green signals if price is above the White line). CS-BUY / CS-SELL Labels: Clear text markers appear exactly when a valid breakout occurs. Customizable: Adjustable sensitivity (Length), EMA periods, and Slope calculation methods (ATR, Stdev, Linreg). 📉 How to Trade with CS Trendline Pro For Scalping (5m / 15m): Identify the Main Trend: Look at the White EMA (200). If Price > EMA 200 → Focus on BUY signals. If Price < EMA 200 → Focus on SELL signals. Wait for the Signal: Wait for the candle to turn Teal (Green) or Red. Ensure the candle closes with the new color. Risk Management: Place Stop Loss below the recent swing low (for buys) or above the swing high (for sells). Target a 1.5 Risk/Reward ratio or trail your stop using the EMA 30. ⚠️ Important Note on Backpainting This indicator uses pivot points to draw trendlines. By nature, a pivot point can only be confirmed after a few bars have passed (Lag). Backpaint Setting (Default ON): Keeps your historical chart clean by connecting the exact pivot points in the past. Real-Time Behavior: In live trading, the trendline and signal will appear once the pivot is confirmed (based on your 'Length' setting). This is normal behavior for any trendline script. Settings Recommended: 5-Minute Chart: Length 10 or 14. 15-Minute Chart: Length 14. Enjoy trading with precision! ~ CS TradingIndicatore Pine Script®di edwardflores19452
JK Scalp - Nishith RajwarJK Scalp Nishith Rajwar Multi-Stochastic Rotation & Momentum Scalping Framework JK Scalp is a rule-based momentum and rotation oscillator designed for short-term scalping and intraday execution. It focuses on how momentum rotates across multiple stochastic speeds, instead of relying on a single oscillator or lagging averages. This is an execution aid, not a predictive indicator. 🧠 Concept & Originality Unlike standard stochastic tools, JK Scalp uses four synchronized stochastic layers: • Fast (9,3) → execution timing • Medium (14,3) → structure confirmation • Slow (44,3) → swing context • Trend (60,10,10) → dominant momentum regime The core idea is quad-rotation: High-probability trades occur when all momentum layers rotate together after reaching an extreme. This script combines: • Momentum rotation • Divergence logic • Flag continuation logic • Trend-state filtering into a single cohesive framework, not a simple indicator mashup. 📊 How to Use (Step-by-Step) 1️⃣ Best Timeframes • Scalping: 1m – 3m • Intraday: 5m – 15m • Avoid higher timeframes (not designed for swing holding) Works best on: • Index options • Index futures • Highly liquid stocks • Crypto majors 2️⃣ Understanding the Signals 🔁 Quad Rotation (Core Signal) A valid rotation requires: • Fast, Medium, Slow, and Trend stochastic moving in the same direction • Momentum exiting Overbought / Oversold zones • Trend stochastic supporting the move This filters out random oscillator noise. 3️⃣ Entry Conditions 🟢 LONG Setup • Bullish quad rotation • Either: – Bullish divergence OR – Bullish flag pullback • Fast stochastic turning up 🔴 SHORT Setup • Bearish quad rotation • Either: – Bearish divergence OR – Bearish flag pullback • Fast stochastic turning down ⚠️ Signals are confirmation-based, not anticipatory. 4️⃣ SUPER LONG / SUPER SHORT These appear only when: • Quad rotation • Divergence confirmation They represent high-confidence momentum inflection zones, not guaranteed reversals. 5️⃣ Stop-Loss Visualization Optional SL zones are plotted using: • Recent swing high / low • ATR-based buffer (configurable) This helps traders visualize risk, not automate exits. 🎨 Visual System (Why It Looks Different) • Multi-layer glow effects → momentum strength • Dynamic cloud → fast vs trend dominance • Color-shifting fast line → acceleration vs decay • Chart overlays → execution clarity without clutter Everything is designed for speed and readability during live trading. ⭐ Unique Selling Points (USP) ✅ Multi-speed stochastic rotation (not single-line signals) ✅ Context-first, not signal spam ✅ Built-in divergence + continuation logic ✅ Non-repainting logic ✅ Designed for scalpers, not hindsight analysis ✅ Works across indices, options, crypto, and futures ⚠️ Important Notes • Not a standalone trading system • Best combined with: – Market structure – Key levels – Session timing • Avoid low-liquidity or news-spike candles This indicator guides execution, it does not replace discretion. 👤 Who This Is For • Scalpers & intraday traders • Options traders needing precise timing • Traders who understand momentum & structure • Users who want fewer but higher-quality signals 🏁 Summary JK Scalp helps you trade momentum rotation, not overbought/oversold myths. Wait for alignment. Execute with discipline.Indicatore Pine Script®di nishith854411136
Harmonic Patterns (Experimental) [Kodexius]Harmonic Patterns (Experimental) is a multi pattern harmonic geometry scanner that automatically detects, validates, and draws classic harmonic structures directly on your chart. The script continuously builds a pivot map (swing highs and swing lows), then evaluates the most recent pivot sequence against a library of harmonic ratio templates such as Gartley, Bat, Deep Bat, Butterfly, Crab, Deep Crab, Cypher, Shark, Alt Shark, 5-0, AB=CD, and 3 Drives. Unlike simple “pattern exists / pattern doesn’t exist” indicators, this version scores candidates by accuracy . Each pattern includes “ideal” ratio targets, and the script computes a total error score by measuring how far the observed ratios deviate from the ideal. When multiple patterns could match the same pivot structure, the script selects the best match (lowest total error) and displays that one. This reduces clutter and makes the output more practical in real market conditions where many ratio ranges overlap. The end result is a clean, information rich visualization of harmonic opportunities that is: -Pivot based and swing aware -Ratio validated with configurable tolerance -Direction filtered (bullish, bearish, or both) -Ranked by accuracy to prefer higher quality matches Note: This is an experimental pattern engine intended for research, confluence and chart study. Harmonic patterns are probabilistic and can fail often. Always combine with your own risk management and confirmation tools. 🔹 Features 🔸Pivot Detection The script uses pivot functions to detect structural turning points: -Pivot Left Bars controls how many bars must exist on the left of the pivot -Pivot Right Bars controls confirmation delay on the right (smaller value reacts faster) Additionally, a Min Swing Distance (%) filter can ignore tiny swings to reduce noise. Pivots are stored separately for highs and lows and capped by Max Pivots to Store to keep the script efficient. 🔸Pattern Library (XABCD and Beyond) Supported structures include: -Gartley, Bat, Deep Bat, Butterfly, Crab, Deep Crab -Cypher (uses XC extension and CD retracement logic) -Shark and Alt Shark (0-X-A-B-C mapping) -5-0 (AB and BC extensions with CD retracement) -AB=CD (symmetry and proportionality checks) -3 Drives (6 point structure, drive and retracement ratios) Each pattern is defined by ratio ranges and also “ideal” ratio targets used for scoring. 🔸 Pattern Fibonacci Rules (Detailed Ratio Definitions) This script validates each harmonic template by measuring a small set of Fibonacci relationships between the legs of the pattern. All measurements are computed using absolute price distance (so the ratios are direction independent), and then a directional sanity check ensures the geometry is positioned correctly for bullish or bearish cases. How ratios are measured Most patterns in this script use the standard X A B C D harmonic structure. Four ratios are evaluated: 1) XB retracement of XA This measures how much price retraces from A back toward X when forming point B . xbRatio = |B - A| / |A - X| 2) AC retracement of AB This measures how much point C retraces the AB leg. acRatio = |C - B| / |B - A| 3) BD extension of BC This measures the “drive” from C into D relative to the BC leg. bdRatio = |D - C| / |C - B| 4) XD retracement of XA This is the most important “completion” ratio in many patterns. It measures where D lands relative to the original XA swing. xdRatio = |D - A| / |A - X| Important: the script applies a user defined Fibonacci Tolerance to each accepted range, meaning the pattern can still pass even if ratios are slightly off from the textbook values. 🔸 XABCD Pattern Ratio Templates Below are the exact ratio rules used by the templates in this script. Gartley -XB must be ~0.618 of XA -AC must be between 0.382 and 0.886 of AB -BD must be between 1.272 and 1.618 extension of BC -XD must be ~0.786 of XA In practice, Gartley is a “non extension” structure, meaning D usually remains inside the X boundary . Bat -XB between 0.382 and 0.50 of XA -AC between 0.382 and 0.886 of AB -BD between 1.618 and 2.618 of BC -XD ~0.886 of XA Bat patterns typically complete deeper than Gartley and often create a sharper reaction at D. Deep Bat -XB ~0.886 of XA -AC between 0.382 and 0.886 of AB -BD between 1.618 and 2.618 of BC -XD ~0.886 of XA Deep Bat uses the same completion zone as Bat, but requires a much deeper B point. Butterfly -XB ~0.786 of XA -AC between 0.382 and 0.886 of AB -BD between 1.618 and 2.618 of BC -XD between 1.272 and 1.618 of XA Butterfly is an extension pattern . That means D is expected to break beyond X (in the completion direction). Crab -XB between 0.382 and 0.618 of XA -AC between 0.382 and 0.886 of AB -BD between 2.24 and 3.618 of BC -XD ~1.618 of XA Crab is also an extension pattern . It often produces a very deep D completion and a strong reaction zone. Deep Crab -XB ~0.886 of XA -AC between 0.382 and 0.886 of AB -BD between 2.0 and 3.618 of BC -XD ~1.618 of XA Deep Crab combines a deep B point with a strong XA extension completion. 🔸 Cypher Fibonacci Rules (XC Based) Cypher is not validated with the same four ratios as XABCD patterns. Instead it uses an XC based completion model: 1) B as a retracement of XA xb = |B - A| / |A - X| // AB/XA Must be between 0.382 and 0.618 . 2) C as an extension from X relative to XA xc = |C - X| / |A - X| // XC/XA Must be between 1.272 and 1.414 . 3) D as a retracement of XC xd = |D - C| / |C - X| // CD/XC Must be ~ 0.786 . This makes Cypher structurally different: the “completion” is defined as a retracement of the entire XC leg, not XA. 🔸 Shark and Alt Shark Fibonacci Rules (0-X-A-B-C Mapping) Shark patterns are commonly defined as 0 X A B C . In this script the pivots are mapped like this: 0 = pX, X = pA, A = pB, B = pC, C = pD So the final pivot (stored as pD) is labeled as C on the chart. Three ratios are validated: 1) AB relative to XA ab_xa = |B - A| / |A - X| Must be between 1.13 and 1.618 . 2) BC relative to AB bc_ab = |C - B| / |B - A| Must be between 1.618 and 2.24 . 3) OC relative to OX oc_ox = |C - 0| / |X - 0| For Shark it must be between 0.886 and 1.13 . For Alt Shark it must be between 1.13 and 1.618 (a deeper / more extended completion). 🔸 5-0 Fibonacci Rules 5-0 is validated as a sequence of extensions and then a fixed retracement: 1) AB extension of XA ab_xa = |B - A| / |A - X| Must be between 1.13 and 1.618 . 2) BC extension of AB bc_ab = |C - B| / |B - A| Must be between 1.618 and 2.24 . 3) CD retracement of BC cd_bc = |D - C| / |C - B| Must be approximately 0.50 . Note that for 5-0 the script does not rely on an XA completion ratio like 0.786 or 1.618. The defining completion is the 0.5 retracement of BC. 🔸 AB=CD Fibonacci Rules AB=CD is a symmetry pattern and is treated differently from the harmonic templates: 1) AB and CD length symmetry The script checks if CD is approximately equal to AB within tolerance. 2) BC proportion BC/AB is expected to fall in a common Fibonacci retracement zone: -approximately 0.618 to 0.786 (with a looser tolerance in code) 3) CD/BC expansion CD/BC is expected to be an expansion ratio: -approximately 1.272 to 1.618 (also with a looser tolerance) This allows the script to capture both classic equal leg AB=CD and common “expanded” variations. 🔸 3 Drives Fibonacci Rules (6 Point Structure) 3 Drives is a 6 point structure and is validated using retracement ratios and extension ratios: Retracement rules Retracement 1 must be between 0.618 and 0.786 of Drive 1 Retracement 2 must be between 0.618 and 0.786 of Drive 2 Extension rules Drive 2 must be between 1.272 and 1.618 of Retracement 1 Drive 3 must be between 1.272 and 1.618 of Retracement 2 This pattern is meant to capture rhythm and proportional repetition rather than a single XA completion ratio. 🔸 Why the script can show “ratio labels” on legs If you enable Show Fibonacci Values on Legs , the script prints the measured ratios near the midpoint of each leg (or diagonal, depending on pattern type). This makes it easy to visually confirm: -Which ratios caused the pattern to pass -How close the structure is to ideal harmonic values -Why one template was preferred over another via the accuracy score 🔸 Fibonacci Tolerance Control All ratio checks use a single tolerance input (percentage). This tolerance expands or contracts the acceptable ratio ranges, letting you decide whether you want: -Tight, high precision matches (lower tolerance) -Broader, more frequent matches (higher tolerance) 🔸 Direction Filter (Bullish Only / Bearish Only / Both) You can restrict scanning to bullish patterns, bearish patterns, or allow both. This is useful if you are aligning with higher timeframe bias or only trading one side of the market. 🔸 Best Match Selection (Anti Clutter Logic) When a new pivot confirms, the script evaluates all enabled patterns against the latest pivot sequence and keeps the one with the smallest total error score. This is especially helpful because many harmonic templates overlap in real time. Instead of drawing multiple conflicting labels, you get one “most accurate” candidate. 🔸 Clean Visual Rendering and Optional Details The drawing system can display: -Main structure lines (X-A-B-C-D or special mappings) -Dashed diagonals for geometric context (XB, AC, BD, XD) -Pattern fill to visually highlight the structure zone -Point labels (X,A,B,C,D or 0..5 for 3 Drives, 0-X-A-B-C for Shark) -Leg Fibonacci labels placed around midpoints for fast ratio reading All colors (bullish and bearish line and fill) are configurable. 🔸 Pattern Spacing and Display Limits To keep charts readable, the script includes: -Max Patterns to Display to limit on-chart drawings -Min Bars Between Patterns to avoid repeated signals too close together in the same direction Older patterns are automatically deleted once the display limit is exceeded. 🔸 Alerts When enabled, alerts trigger on new confirmed detections: -Bullish Pattern Detected -Bearish Pattern Detected Alerts fire once per bar when a new pattern is confirmed by a fresh pivot. 🔹 Calculations This section summarizes the core logic used under the hood. 1) Pivot Detection and Swing Filtering The script confirms pivots using right side confirmation, then optionally filters them by minimum swing distance relative to the last opposite pivot. // Pivot detection float pHigh = ta.pivothigh(high, pivotLeftBars, pivotRightBars) float pLow = ta.pivotlow(low, pivotLeftBars, pivotRightBars) // Example swing distance filter (conceptual) abs(newPivot - lastOppPivot) / lastOppPivot >= minSwingPercent Pivots are stored in capped arrays (high pivots and low pivots), ensuring performance and stable memory usage. 2) Ratio Measurements (Retracement and Extension) The engine measures harmonic ratios using two core helpers: Retracement measures how much the third point retraces the previous leg. Extension measures how much the next leg extends relative to the previous leg. // Retracement: (p3 - p2) compared to (p2 - p1) calcRetracement(p1, p2, p3) => float leg = math.abs(p2.price - p1.price) float retr = math.abs(p3.price - p2.price) leg != 0 ? retr / leg : na // Extension: (p4 - p3) compared to (p3 - p2) calcExtension(p2, p3, p4) => float leg = math.abs(p3.price - p2.price) float ext = math.abs(p4.price - p3.price) leg != 0 ? ext / leg : na For a standard XABCD pattern the script evaluates: -XB retracement of XA -AC retracement of AB -BD extension of BC -XD retracement of XA 3) Tolerance Based Range Check Ratio validation uses a flexible range check that expands min and max by the tolerance percent: isInRange(value, minVal, maxVal, tolerance) => float tolMin = minVal * (1.0 - tolerance) float tolMax = maxVal * (1.0 + tolerance) value >= tolMin and value <= tolMax This means even “fixed” ratios (like 0.786) still allow a user controlled deviation. 4) Positional Sanity Check for D (Beyond X or Not) Some harmonic patterns require D to remain within X (non extension patterns), while others require D to break beyond X (extension patterns). The script enforces that using a boolean flag in each template. Conceptually: -If the pattern is an extension type, D should cross beyond X in the expected direction -If the pattern is not extension type, D should stay on the correct side of X This prevents visually incorrect “ratio matches” that violate the intended geometry. 5) Template Definitions (Ranges + Ideal Targets) Every pattern includes ratio ranges plus ideal values. The ideal values are used only for scoring quality, not for pass/fail. Example concept: -Ranges determine validity -Ideal targets determine ranking 6) Accuracy Scoring (Total Error) When a candidate passes all validity checks, the script computes an accuracy score by summing absolute deviations from ideal ratios: calcError(value, ideal) => math.abs(value - ideal) // Total error is the sum of the four leg errors (as available for the pattern) totalError = calcError(xbRatio, xbIdeal) + calcError(acRatio, acIdeal) + calcError(bdRatio, bdIdeal) + calcError(xdRatio, xdIdeal) Lower score means closer to the “textbook” harmonic proportions. 7) Best Match Resolution (Choosing One Winner) When multiple enabled patterns match the same pivot structure, the script selects the one with the lowest totalError: updateBest(currentBest, newCandidate) => result = currentBest if not na(newCandidate) if na(currentBest) or newCandidate.totalError < currentBest.totalError result := newCandidate result This is a major practical feature because it reduces clutter and highlights the highest quality interpretation. 8) Bullish and Bearish Scanning Logic The scanner runs when pivots confirm: -Bullish patterns are evaluated on a newly confirmed pivot low (potential D) -Bearish patterns are evaluated on a newly confirmed pivot high (potential D) From that D pivot, the script searches backward through stored pivots to build a valid pivot sequence (X,A,B,C,D). If 3 Drives is enabled, it also attempts to find the extra preceding point needed for the 6 point structure. 9) Rendering: Lines, Fill, Labels, and Leg Fib Text After detection the script draws: -Primary legs with thicker lines -Geometric diagonals with dashed lines (for XABCD types) -Optional fill between selected legs to emphasize the structure area -A summary label showing direction, pattern name, and ratios -Optional point labels and leg ratio labels placed near midpoints To avoid overlapping with candles, the script offsets labels using ATR: float yOff = math.max(ta.atr(14) * 0.15, syminfo.mintick * 10) 10) Pattern Lifecycle and Cleanup To respect chart limits and keep visuals clean, the script deletes old drawings once the maximum visible patterns threshold is exceeded. This includes lines, fills, and labels.Indicatore Pine Script®di UnknownUnicorn113699460Aggiornato 56
Dynamic MAs Zscore | Lyro RSThe Dynamic MAs Zscore is an adaptive momentum and valuation oscillator built around advanced moving averages and statistical Z-Score normalization. By combining a wide selection of moving average types with dynamic deviation bands, this indicator delivers clear insights into trend strength , directional bias , and relative valuation — all in a clean, visually intuitive format. ━━━━━━━━━━━━━━━ Key Features ━━━━━━━━━━━━━━━ Dynamic Moving Average Engine Applies one of 12 selectable moving average types (SMA, EMA, WMA, VWMA, HMA, ALMA, TEMA, etc.) to the chosen source. This allows fine-tuning between responsiveness and smoothness depending on market conditions. Z-Score Normalization Transforms the selected moving average into a standardized Z-Score: (MA − mean) / standard deviation This normalization makes momentum strength comparable across assets and timeframes. Adaptive Deviation Bands Upper and lower bands are derived from the rolling standard deviation of the Z-Score: Custom band length Independent positive and negative multipliers These bands dynamically expand and contract with volatility. Dual Signal Modes Trend Mode – Focuses on directional continuation. Color changes and signals occur when Z-Score breaks above or below deviation bands. Valuation Mode – Highlights relative overvaluation and undervaluation using a gradient color scale and predefined value zones. Advanced Visual System Includes bold layered plots, gradient fills, background shading, and candle/bar coloring to clearly reflect current market state. Custom Color Palettes Choose from multiple preset themes (Classic, Mystic, Accented, Royal) or define your own bullish and bearish colors. ━━━━━━━━━━━━━━━ How It Works ━━━━━━━━━━━━━━━ MA Calculation – The selected moving average type is applied to the chosen price source. Z-Score Computation – The MA is normalized over a user-defined lookback period to quantify deviation from its mean. Band Construction – Standard deviation of the Z-Score is calculated over the band length and scaled by positive/negative multipliers. Mode-Dependent Logic Trend Mode – Breaks above the upper band signal bullish momentum; breaks below the lower band signal bearish momentum. Valuation Mode – A gradient reflects relative valuation from undervalued to overvalued, with background highlights at extreme Z-Score levels. ━━━━━━━━━━━━━━━ Signal Interpretation ━━━━━━━━━━━━━━━ Trend Confirmation In Trend Mode, sustained moves beyond deviation bands indicate strong directional bias. Momentum Strength The distance of the Z-Score from zero reflects the intensity of trend momentum. Relative Valuation In Valuation Mode, deep negative Z-Scores suggest undervaluation, while high positive Z-Scores suggest overvaluation. Visual Clarity Bar and candle coloring aligned with oscillator state allows for rapid assessment of market conditions. ━━━━━━━━━━━━━━━ Customization ━━━━━━━━━━━━━━━ Adjust MA type and length to balance speed vs. smoothness. Modify Z-Score length to control sensitivity. Tune band length and multipliers for volatility adaptation. Switch between Trend and Valuation modes depending on strategy. Personalize visuals using preset or custom color palettes. ━━━━━━━━━━━━━━━ Alerts ━━━━━━━━━━━━━━━ Bullish condition when Z-Score > 0 Bearish condition when Z-Score < 0 Overvalued and undervalued valuation alerts ⚠️ Disclaimer This indicator is intended for technical analysis and educational purposes only. It does not guarantee profitable outcomes and should be used alongside other tools, confirmation methods, and sound risk management. The author is not responsible for any financial decisions made using this indicator.Indicatore Pine Script®di LyroRS117
Structure Pivot (LL-HL / HH-LH)Structure Pivot (LL-HL / HH-LH) - Indicator Guide This indicator scans for market structure pivot patterns—specifically the bullish Higher Low (LL–HL) and the bearish Lower High (HH–LH) —across multiple lengths simultaneously. It automatically selects the most optimal pattern based on a "Priority Mode" and plots the structure and breakout/breakdown levels on the chart. 1. Basic Calculation Method The indicator builds upon TradingView’s ta.pivotlow and ta.pivothigh functions to identify structural points. Bullish Structure (LL–HL) 1.LL (Lowest Low): A standard Pivot Low is identified. 2.HL (Higher Low): A subsequent Pivot Low forms higher than the previous LL. This completes the setup. 3.Pivot Line (Resistance): The indicator finds the highest price (High) that occurred between the LL and the HL. This level becomes the breakout trigger. Bearish Structure (HH–LH) 1.HH (Highest High): A standard Pivot High is identified. 2.LH (Lower High): A subsequent Pivot High forms lower than the previous HH. This completes the setup. 3.Pivot Line (Support): The indicator finds the lowest price (Low) that occurred between the HH and the LH. This level becomes the breakdown trigger. 2. Multi-Length Scanning Unlike standard indicators that use a single fixed length (e.g., Length = 5), this indicator scans a range of lengths simultaneously. ・Settings: Defined by Min Length and Max Length. ・Mechanism: If set to Min=2 and Max=10, the indicator internally runs 9 separate calculations (Length 2 through 10) in parallel. This allows it to capture everything from small, short-term pullbacks to larger, significant structural pivots without manual adjustment. 3. Priority Mode System Since multiple lengths are scanned, multiple valid patterns may appear at the same time. The Priority Mode determines which single pattern is the "winner" and gets displayed. A. Tightest Structure (Default) ・For Bullish (Long): Selects the pattern with the lowest Pivot Line (Resistance). ・For Bearish (Short): Selects the pattern with the highest Pivot Line (Support). ・Advantage: It finds the "tightest" contraction (like a VCP). This offers the entry point closest to the stop-loss level, providing the best Risk/Reward ratio. B. Longest Length ・Selects the pattern detected by the longest length setting. ・Advantage: Focuses on major structural points, filtering out short-term noise. Best for trend confirmation. C. Shortest Length ・Selects the pattern detected by the shortest length setting. ・Advantage: Extremely sensitive. Best for scalping or catching immediate micro-pullbacks. 4. Real-Time Logic & Features Structure Invalidation (Failure) ・Bullish: If the current price drops below the HL (the support of the structure), the setup is considered failed. ・Bearish: If the current price rises above the LH (the resistance of the structure), the setup is considered failed. ・Result: All lines and labels for that structure are immediately deleted to keep the chart clean. Pivot Line Extension ・As long as the structure remains valid (price hasn't violated the HL or LH), the Pivot Line extends to the right, acting as a live reference for breakouts or breakdowns. Alerts ・Bullish Breakout: Triggered when the Close price crosses over the Pivot Line. ・Bearish Breakdown: Triggered when the Close price crosses under the Pivot Line.Indicatore Pine Script®di oratnekAggiornato 55 1.5 K
FxAST Trend Force [ALLDYN]Attribution This indicator is based on the original Trend Speed Analyzer created by Zeiierman . FxAST Trend Force is a modified and simplified derivative that preserves the core methodology while focusing on clarity, usability, and practical trend interpretation . This indicator is intended for educational and analytical use. Derivative works must retain attribution and license terms. __________________________________________________________________________________ FxAST Trend Force Overview FxAST Trend Force is a directional pressure indicator designed to show who is in control of the market and how strong that control is, in real time. Instead of measuring raw price speed or traditional momentum, this tool focuses on trend force — the sustained push of price relative to a dynamic trend baseline. The result is a clean, intuitive view of trend direction, strength, and condition without complex math or hard-to-interpret ratios. This indicator is best used as a trend confirmation and trade management tool , not a standalone signal generator. _________________________________________________________________________________ How It Works FxAST Trend Force uses a Dynamic Moving Average (DMA) that adapts to changing market conditions. Price behavior relative to this adaptive trend line determines the current trend regime. While price remains on one side of the trend: Directional pressure accumulates Strength builds or weakens The regime resets only when price decisively crosses the trend This creates a clear visual representation of trend persistence vs exhaustion , rather than short-term noise. __________________________________________________________________________________ Core Concepts (Plain English) Trend Shows the current directional bias: Bull → price above the dynamic trend Bear → price below the dynamic trend This answers: “Which side is currently in control?” __________________________________________________________________________________ Strength Displays how strong the current trend pressure is on a 0–100 scale , normalized to recent market conditions. Strength is shown both as: A simple label: Weak / Normal / Strong A visual meter for quick interpretation This answers: “Is this move weak, average, or meaningful?” __________________________________________________________________________________ State Indicates whether trend force is: Building → pressure increasing Fading → pressure weakening This answers: “Is the trend gaining energy or losing it?” __________________________________________________________________________________ Visual Meter A compact bar at the bottom of the table represents trend force intensity at a glance. Longer bar → stronger sustained pressure Shorter bar → weaker or stalling trend No ratios. No multipliers. Just visual clarity. __________________________________________________________________________________ How to Use Trend Confirmation Favor longs when Trend = Bull and Strength = Normal/Strong Favor shorts when Trend = Bear and Strength = Normal/Strong __________________________________________________________________________________ Trade Management Building state supports continuation Fading state warns of exhaustion, consolidation, or potential reversal __________________________________________________________________________________ Filtering Noise Weak strength often signals chop or low-quality conditions Strong force helps filter false breakouts __________________________________________________________________________________ Settings (Simplified) Maximum Length Controls how smooth or responsive the dynamic trend is. Accelerator Multiplier Adjusts how quickly the trend adapts to price changes. Lookback Period Defines the window used to normalize trend force. Enable Candles Colors price candles by trend force for visual clarity. Show Simple Table Toggles the Trend / Strength / State display. __________________________________________________________________________________ Philosophy FxAST Trend Force is intentionally not a signal-spamming indicator. It is designed to reduce cognitive load , not increase it. If you need: exact entries → use price action exact exits → use structure context and confirmation → use Trend Force __________________________________________________________________________________ Disclaimer This indicator is provided for educational purposes only and does not constitute financial advice. Trading involves risk, and users are responsible for their own decisions. Indicatore Pine Script®di alldyn_pip_kingAggiornato 43
Previous Day Week Month Highs & Lows [MHA Finverse]Previous Day Week Month Highs & Lows is a comprehensive multi-timeframe indicator that automatically plots previous period highs and lows across Daily, Weekly, Monthly, 4-Hour, and 8-Hour timeframes. Perfect for identifying key support and resistance levels that often act as magnets for price action. How It Works The indicator retrieves the highest high and lowest low from the previous completed period for each selected timeframe. Lines extend forward into current price action, allowing you to see when price approaches or breaks these critical levels in real-time. The indicator tracks the exact bar where each high and low occurred, ensuring accurate historical placement. --- Key Features Multi-Timeframe Levels: • Current Daily, Previous Daily, 4H, 8H, Weekly, and Monthly highs/lows • Fully customizable colors and line styles (Solid, Dashed, Dotted) • Adjustable line width and extension length Visual Enhancements: • Price labels showing exact level values • Range position percentage (distance from high/low) • Optional period boxes highlighting timeframe ranges • Day and date labels for reference Trading Tools: • Breakout markers when price crosses key levels • Touch count tracking (how many times price tested each level) • Time at level display (consolidation detection) • Customizable thresholds for touch and time analysis Alert System: • Individual alerts for each timeframe: Daily High/Low Break, 4H High/Low Break, 8H High/Low Break, Weekly High/Low Break, Monthly High/Low Break • Toggle switches to enable/disable alerts per timeframe • Clear messages showing which level was broken and at what price --- How to Use Setup: 1. Enable your preferred timeframes in "Highs & Lows MTF" settings 2. Customize colors and styles to match your chart 3. Turn on visual features like price labels and range percentages 4. Set up alerts by creating specific alert conditions or using toggle switches Trading Applications: Breakout Trading: Watch for strong momentum when price breaks above previous highs or below previous lows Support/Resistance: Use these levels as potential reversal points for entry/exit signals Range Trading: Trade between previous highs and lows using the range position indicator Stop Loss Placement: Place stops just beyond previous highs (shorts) or lows (longs) Multiple Timeframe Confirmation: Combine timeframes for stronger signals (e.g., Daily near Weekly support) --- Best Practices • Use Weekly/Monthly for swing trading, Daily/4H/8H for day trading • Combine with volume or momentum indicators for confirmation • Multiple timeframe levels clustering together create high-probability zones • The more touches a level has, the more significant it becomes --- Disclaimer This indicator is a technical analysis tool for identifying price levels based on historical data. It does not guarantee profits or predict future movements. Trading involves substantial risk. Always use proper risk management and never risk more than you can afford to lose.Indicatore Pine Script®di humayunmha4499
LL-HL PivotThis indicator scans for the bullish structure known as a Higher Low (HL) across multiple lengths simultaneously, automatically selects the most suitable pattern, and plots it on the chart. Below is a detailed explanation of how it works. 1. Basic Calculation Method (Definition of LL and HL) This indicator is built on TradingView’s ta.pivotlow function. Detecting Pivot Lows For a given length, a Pivot Low is identified as the lowest point among the candles within the specified range to the left and right. LL and HL Determination LL (Lowest Low): The most recent Pivot Low is treated as the previous low. HL (Higher Low): When a new Pivot Low forms above the previous LL, it is recognized as an HL, and the setup is considered “complete.” Identifying the Pivot Line During the LL–HL structure, the highest high between them is identified and used as the breakout level (Pivot Line / resistance), where a horizontal line is drawn. 2. Multi-Length Scanning Unlike standard indicators that use only one length (e.g., Length = 5), this indicator evaluates a full range of lengths. Min Length to Max Length Example: Min = 2, Max = 10 Internally, it functions as if nine separate indicators (Length 2, 3, 4 … 10) are running simultaneously. This allows the indicator to capture: Small waves (short-term pullbacks) Larger waves (broader structural moves) 3. Priority Mode System Because multiple lengths are calculated at the same time, different LL–HL patterns may appear simultaneously.Priority Mode determines which setup is selected and displayed. A. Lowest LH Selects the pattern with the lowest pivot line (intermediate high). Advantages: Produces the lowest possible entry price B. Longest Length Selects the pattern with the longest length. Advantages: Focuses on larger structures and broader waves Filters out noise C. Shortest Length Selects the pattern with the shortest length. Advantages: Reacts quickly to small moves Useful for scalping or fast trend-following Captures very short-term pullbacks 4. Additional Behavior and Features Real-Time Invalidation If price breaks below the confirmed HL, the structure is immediately considered invalid. All previously drawn lines and labels are removed instantly, preventing outdated structures from remaining on the chart. Pivot Line Extension As long as the HL remains intact, the Pivot Line (breakout level) continues extending to the right. Alerts An alert can be triggered the moment price breaks above the Pivot Line on a closing basis.Indicatore Pine Script®di oratnek22670
Elliott Wave Full Fractal System v2.0Elliott Wave Full Fractal System v2.0 – Q.C. FINAL (Guaranteed R/R) Elliott Wave Full Fractal System is a multi-timeframe wave engine that automatically labels Elliott impulses and ABC corrections, then builds a rule-based, ATR-driven risk/reward framework around the “W3–W4–W5” leg. “Guaranteed R/R” here means every order is placed with a predefined stop-loss and take-profit that respect a minimum Reward:Risk ratio – it does not mean guaranteed profits. Core Idea This strategy turns a full fractal Elliott Wave labelling engine into a systematic trading model. It scans fractal pivots on three wave degrees (Primary, Intermediate, Minor) to detect 5-wave impulses and ABC corrections. A separate “Trading Degree” pivot stream, filtered by a 200-EMA trend filter and ATR-based dynamic pivots, is then used to find W4 pullback entries with a minimum, user-defined Reward:Risk ratio. Default Properties & Risk Assumptions The backtest uses realistic but conservative defaults: // Default properties used for backtesting strategy( "Elliott Wave Full Fractal System - Q.C. FINAL (Guaranteed R/R)", overlay = true, initial_capital = 10000, // realistic account size default_qty_type = strategy.percent_of_equity, default_qty_value = 1, // 1% risk per trade commission_type = strategy.commission.cash_per_contract, commission_value = 0.005, // example stock commission slippage = 0 // see notes below ) Account size: 10,000 (can be changed to match your own account). Position sizing: 1% of equity per trade to keep risk per idea sustainable and aligned with TradingView’s recommendations. Commission: 0.005 cash per contract/share as a realistic example for stock trading. Slippage: set to 0 in code for clarity of “pure logic” backtesting. Real-life trading will experience slippage, so users should adjust this according to their market and broker. Always re-run the backtest after changing any of these values, and avoid using high risk fractions (5–10%+) as that is rarely sustainable. 1. Full Fractal Wave Engine The script builds and maintains four pivot streams using ATR-adaptive fractals: Primary Degree (Macro Trend): Captures the large swings that define the major trend. Labels ①–⑤ and ⒶⒷⒸ using blue “Circle” labels and thicker lines. Intermediate Degree (Trading Degree): Captures the medium swings (swing-trading horizon). Uses teal labels ( (1)…(5), (A)(B)(C) ). Minor Degree (Micro Structure): Tracks short-term swings inside the larger waves. Uses red roman numerals (i…v, a b c). ABC Corrections (Optional): When enabled, the engine tries to detect standard A–B–C corrective structures that follow a completed 5-wave impulse and plots them with dashed lines. Each degree uses a dynamic pivot lookback that expands when ATR is above its EMA, so the system naturally requires “stronger” pivots in volatile environments and reacts faster in quiet conditions. 2. Theory Rules & Strict Mode Normal Mode: More permissive detection. Designed to show more wave structures for educational / exploratory use. Strict Mode: Enforces key Elliott constraints: Wave 3 not shorter than waves 1 and 5. No invalid W4 overlap with W1 (for standard impulses). ABC Logic: After a confirmed bullish impulse, the script expects a down-up-down corrective pattern (A,B,C). After a bearish impulse, it looks for up-down-up. 3. Trend Filter & Pivots EMA Trend Filter: A configurable EMA (default 200) is used as a non-wave trend filter. Price above EMA → Only long setups are considered. Price below EMA → Only short setups are considered. ATR-Adaptive Pivots: The pivot engine scales its left/right bars based on current ATR vs ATR EMA, making waves and trading pivots more robust in volatile regimes. 4. Dynamic Risk Management (Guaranteed R/R Engine) The trading engine is designed around risk, not just pattern recognition: ATR-Based Stop: Stop-loss is placed at: Entry ± ATR × Multiplier (user-configurable, default 2.0). This anchors risk to current volatility. Minimum Reward:Risk Ratio: For each setup, the script: Computes the distance from entry to stop (risk). Projects a take-profit target at risk × min_rr_ratio away from entry. Only accepts the setup if risk is positive and the required R:R ratio is achievable. Result: Every order is created with both TP and SL at a predefined distance, so each trade starts with a known, minimum Reward:Risk profile by design. “Guaranteed R/R” refers exclusively to this order placement logic (TP/SL geometry), not to win-rate or profitability. 5. Trading Logic – W3–W4–W5 Pattern The Trading pivot stream (separate from visual wave degrees) looks for a simple but powerful pattern: Bullish structure: Sequence of pivots forms a higher-high / higher-low pattern. Price is above the EMA trend filter. A strong “W3” leg is confirmed with structure rules (optionally stricter in Strict mode). Entry (Long – W4 Pullback): The “height” of W3 is measured. Entry is placed at a configurable Fibonacci pullback (default 50%) inside that leg. ATR-based stop is placed below entry. Take-profit is projected to satisfy min Reward:Risk. Bearish structure: Mirrored logic (lower highs/lows, price below EMA, W3 down, W4 retrace up, W5 continuation down). Once a valid setup is found, the script draws a colored box around the entry zone and a label describing the type of signal (“LONG SETUP” or “SHORT SETUP”) with the suggested limit price. 6. Orders & Execution Entry Orders: The strategy uses limit orders at the computed W4 level (“Sniper Long” or “Sniper Short”). Exits: A single strategy.exit() is attached to each entry with: Take-profit at the projected minimum R:R target. Stop-loss at ATR-based level. One Trade at a Time: New setups are only used when there is no open position (strategy.opentrades == 0) to keep the logic clear and risk contained. 7. Visual Guide on the Chart Wave Labels: Primary: ①,②,③,④,⑤, ⒶⒷⒸ Intermediate: (1)…(5), (A)(B)(C) Minor: i…v, a b c Trend EMA: Single blue EMA showing the dominant trend. Setup Boxes: Green transparent box → long entry zone. Red transparent box → short entry zone. Labels: “LONG SETUP / SHORT SETUP” labels mark the proposed limit entry with price. 8. How to Use This Strategy Attach the strategy to your chart Choose your market (stocks, indices, FX, crypto, futures, etc.) and timeframe (for example 1h, 4h, or Daily). Then add the strategy to the chart from your Scripts list. Start with the default settings Leave all inputs on their defaults first. This lets you see the “intended” behaviour and the exact properties used for the published backtest (account size, 1% risk, commission, etc.). Study the wave map Zoom in and out and look at the three wave degrees: Blue circles → Primary degree (big picture trend). Teal (1)…(5) → Intermediate degree (swing structure). Red i…v → Minor degree (micro waves). Use this to understand how the engine is interpreting the Elliott structure on your symbol. Watch for valid setups Look for the coloured boxes and labels: Green box + “LONG SETUP” label → potential W4 pullback long in an uptrend. Red box + “SHORT SETUP” label → potential W4 pullback short in a downtrend. Only trades in the direction of the EMA trend filter are allowed by the strategy. Check the Reward:Risk of each idea For each setup, inspect: Limit entry price. ATR-based stop level. Projected take-profit level. Make sure the minimum Reward:Risk ratio matches your own rules before you consider trading it. Backtest and evaluate Open the Strategy Tester: Verify you have a decent sample size (ideally 100+ trades). Check drawdowns, average trade, win-rate and R:R distribution. Change markets and timeframes to see where the logic behaves best. Adapt to your own risk profile If you plan to use it live: Set Initial Capital to your real account size. Adjust default_qty_value to a risk level you are comfortable with (often 0.5–2% per trade). Set commission and slippage to realistic broker values. Re-run the backtest after every major change. Use as a framework, not a signal machine Treat this as a structured Elliott/R:R framework: Filter signals by higher-timeframe trend, major S/R, volume, or fundamentals. Optionally hide some wave degrees or ABC labels if you want a cleaner chart. Combine the system’s structure with your own trade management and discretion. Best Practices & Limitations This is an approximate Elliott Wave engine based on fractal pivots. It does not replace a full discretionary Elliott analysis. All wave counts are algorithmic and can differ from a manual analyst’s interpretation. Like any backtest, results depend heavily on: Symbol and timeframe. Sample size (more trades are better). Realistic commission/slippage settings. The 0-slippage default is chosen only to show the “raw logic”. In real markets, slippage can significantly impact performance. No strategy wins all the time. Losing streaks and drawdowns will still occur even with a strict R:R framework. Disclaimer This script is for educational and research purposes only and does not constitute financial advice or a recommendation to buy or sell any security. Past performance, whether real or simulated, is not indicative of future results. Always test on multiple symbols/timeframes, use conservative risk, and consult your financial advisor before trading live capital. Strategia Pine Script®di mbedaiwi251
FOMC Federal Fund Rate Tracker [MHA Finverse]The FOMC Rate Tracker is a comprehensive indicator that visualizes Federal Reserve interest rate decisions and tracks market behavior during FOMC meeting periods. This tool helps traders analyze historical rate changes and anticipate market movements around Federal Open Market Committee announcements. Key Features: • Visual FOMC Periods - Automatically highlights each FOMC meeting period with colored boxes spanning from announcement to the next meeting • Complete Rate Data - Displays actual rates, forecasts, previous rates, and rate differences for every meeting from 2021-2026 • Multiple Color Modes - Choose between cycle colors for visual distinction or rate difference colors (green for hikes, red for cuts, gray for holds) • Smart Filtering - Filter periods by rate hikes only, cuts only, no change, or surprise moves to focus on specific market conditions • Performance Metrics - Track average returns during rate hikes, cuts, and holds to identify historical patterns • Volatility Analysis - Measure and compare price volatility across different FOMC periods • Statistical Dashboard - View total hikes, cuts, holds, surprises, and longest hold streaks at a glance • Built-in Alerts - Get notified 1 day before FOMC meetings, on meeting day, or when rates change How It Works: The indicator divides your chart into distinct periods between FOMC meetings, with each period showing a labeled box containing the meeting date, actual rate, forecast, previous rate, and rate difference. Future meetings are marked as "UPCOMING" to help you prepare for scheduled announcements. Use Cases: - Analyze how markets typically react to rate hikes vs. cuts - Identify volatility patterns around FOMC announcements - Backtest strategies based on monetary policy cycles - Plan trades around upcoming Federal Reserve meetings - Study the impact of surprise rate decisions on price action Customization Options: - Adjustable box transparency and outlines - Customizable label sizes and colors - Toggle individual dashboards on/off - Filter specific types of rate decisions - Configure alert preferences This indicator is ideal for traders who incorporate fundamental analysis and monetary policy into their trading decisions. The historical data provides context for understanding market reactions to Federal Reserve actions.Indicatore Pine Script®di humayunmha1128
FluxPulse Momentum [JOAT]FluxPulse Momentum - Adaptive Multi-Component Oscillator FluxPulse Momentum is a composite oscillator that blends three distinct momentum components into a single, smoothed signal line. Rather than relying on a single indicator, it synthesizes adaptive RSI, normalized rate of change, and a Kaufman-style efficiency ratio to provide a multi-dimensional view of momentum. What This Indicator Does Combines RSI, Rate of Change (ROC), and Efficiency Ratio into one weighted composite Applies EMA smoothing to reduce noise while preserving responsiveness Displays overbought/oversold zones with optional background highlighting Generates buy/sell signals when the oscillator crosses its signal line in favorable zones Provides a real-time dashboard showing current state, momentum direction, and efficiency Core Components Adaptive RSI (50% weight) — Standard RSI calculation normalized around the 50 level Normalized ROC (30% weight) — Rate of change scaled relative to its recent maximum range Efficiency Ratio (20% weight) — Measures directional movement efficiency, inspired by Kaufman's adaptive concepts The final composite is smoothed twice using EMA to create both a fast line and a signal line. Signal Logic // Buy signal: crossover in lower half buySignal = ta.crossover(qmo, qmoSmooth) and qmo < 50 // Sell signal: crossunder in upper half sellSignal = ta.crossunder(qmo, qmoSmooth) and qmo > 50 Signals are generated only when the oscillator is positioned favorably—buy signals occur below the 50 midline, sell signals occur above it. Dashboard Information The on-chart table displays: Current oscillator value with gradient coloring Momentum state (Overbought, Oversold, Bullish, Bearish, Neutral) Momentum direction and acceleration Efficiency ratio percentage Active signal status Inputs Overview RSI Length — Period for RSI calculation (default: 14) ROC Length — Period for rate of change (default: 10) Smoothing Length — EMA smoothing period (default: 3) Overbought/Oversold Levels — Threshold levels for zone detection Await Bar Confirmation — Wait for bar close before triggering alerts How to Use It Watch for crossovers between the main line and signal line Use overbought/oversold zones to identify potential reversal areas Monitor the histogram for momentum acceleration or deceleration Combine with price action analysis for confirmation Alerts Buy Signal — Bullish crossover in the lower zone Sell Signal — Bearish crossunder in the upper zone Overbought/Oversold Crosses — Level threshold crossings This indicator is provided for educational purposes. It does not constitute financial advice. Always conduct your own analysis before making trading decisions. — Made with passion by officialjackofalltradesIndicatore Pine Script®di officialjackofalltrades27
Linechart + Wicks - by SupersonicFXThis is a simple indicator that shows the highs and lows (wicks) on the linechart. You can vary the colors. Nothing more to say. Hope some of you find it useful. Indicatore Pine Script®di SupersonicFX1984Aggiornato 8
ChronoPulse MS-MACD Resonance StrategyChronoPulse MS-MACD Resonance Strategy A systematic trading strategy that combines higher-timeframe market structure analysis with dual MACD momentum confirmation, ATR-based risk management, and real-time quality assurance monitoring. Core Principles The strategy operates on the principle of multi-timeframe confluence, requiring agreement between: Market structure breaks (CHOCH/BOS) on a higher timeframe Dual MACD momentum confirmation (classic and crypto-tuned profiles) Trend alignment via directional EMAs Volatility and volume filters Quality score composite threshold Strategy Components Market Structure Engine : Detects Break of Structure (BOS) and Change of Character (CHOCH) events using confirmed pivots on a configurable higher timeframe. Default structure timeframe is 240 minutes (4H). Dual MACD Fusion : Requires agreement between two MACD configurations: Classic MACD: 12/26/9 (default) Fusion MACD: 8/21/5 (default, optimized for crypto volatility) Both must agree on direction before trade execution. This can be disabled to use single MACD confirmation. Trend Alignment : Uses two EMAs for directional bias: Directional EMA: 55 periods (default) Execution Trend Guide: 34 periods (default) Both must align with trade direction. ATR Risk Management : All risk parameters are expressed in ATR multiples: Stop Loss: 1.5 × ATR (default) Take Profit: 3.0 × ATR (default) Trail Activation: 1.0 × ATR profit required (default) Trail Distance: 1.5 × ATR behind price (default) Volume Surge Filter : Optional gate requiring current volume to exceed a multiple of the volume SMA. Default threshold is 1.4× the 20-period volume SMA. Quality Score Gate : Composite score (0-1) combining: Structure alignment (0.0-1.0) Momentum strength (0.0-1.0) Trend alignment (0.0-1.0) ATR volatility score (0.0-1.0) Volume intensity (0.0-1.0) Default threshold: 0.62. Trades only execute when quality score exceeds this threshold. Execution Discipline : Trade budgeting system: Maximum trades per session: 6 (default) Cooldown bars between entries: 5 (default) Quality Assurance Console : Real-time monitoring panel displaying: Structure status (pass/fail) Momentum confirmation (pass/fail) Volatility readiness (pass/fail) Quality score (pass/fail) Discipline compliance (pass/fail) Performance metrics (win rate, profit factor) Net PnL Certification requires: Win Rate ≥ 40%, Profit Factor ≥ 1.4, Minimum 25 closed trades, and positive net profit. Integrity Suite : Optional validation panel that audits: Configuration sanity checks ATR data readiness EMA hierarchy validity Performance realism checks Strategy Settings strategy( title="ChronoPulse MS-MACD Resonance Strategy", shorttitle="ChronPulse", overlay=true, max_labels_count=500, max_lines_count=500, initial_capital=100000, currency=currency.USD, pyramiding=0, commission_type=strategy.commission.percent, commission_value=0.015, slippage=2, default_qty_type=strategy.percent_of_equity, default_qty_value=2.0, calc_on_order_fills=true, calc_on_every_tick=true, process_orders_on_close=true ) Key Input Parameters Structure Timeframe : 240 (4H) - Higher timeframe for structure analysis Structure Pivot Left/Right : 3/3 - Pivot confirmation periods Structure Break Buffer : 0.15% - Buffer for structure break confirmation MACD Fast/Slow/Signal : 12/26/9 - Classic MACD parameters Fusion MACD Fast/Slow/Signal : 8/21/5 - Crypto-tuned MACD parameters Directional EMA Length : 55 - Primary trend filter Execution Trend Guide : 34 - Secondary trend filter ATR Length : 14 - ATR calculation period ATR Stop Multiplier : 1.5 - Stop loss in ATR units ATR Target Multiplier : 3.0 - Take profit in ATR units Trail Activation : 1.0 ATR - Profit required before trailing Trail Distance : 1.5 ATR - Distance behind price Volume Threshold : 1.4× - Volume surge multiplier Quality Threshold : 0.62 - Minimum quality score (0-1) Max Trades Per Session : 6 - Daily trade limit Cooldown Bars : 5 - Bars between entries Win-Rate Target : 40% - Minimum for QA certification Profit Factor Target : 1.4 - Minimum for QA certification Minimum Trades for QA : 25 - Required closed trades Signal Generation Logic A trade signal is generated when ALL of the following conditions are met: Higher timeframe structure shows bullish (CHOCH/BOS) or bearish structure break Both MACD profiles agree on direction (if fusion enabled) Price is above both EMAs for longs (below for shorts) ATR data is ready and above minimum threshold Volume exceeds threshold × SMA (if volume gate enabled) Quality score ≥ quality threshold Trade budget available (under max trades per day) Cooldown period satisfied Risk Management Stop loss and take profit are set immediately on entry Trailing stop activates after 1.0 ATR of profit Trailing stop maintains 1.5 ATR distance behind highest profit point Position sizing uses 2% of equity per trade (default) No pyramiding (single position per direction) Limitations and Considerations The strategy requires sufficient historical data for higher timeframe structure analysis Quality gate may filter out many potential trades, reducing trade frequency Performance metrics are based on historical backtesting and do not guarantee future results Commission and slippage assumptions (0.015% + 2 ticks) may vary by broker The strategy is optimized for trending markets with clear structure breaks Choppy or ranging markets may produce false signals Crypto markets may require different parameter tuning than traditional assets Optimization Notes The strategy includes several parameters that can be tuned for different market conditions: Quality Threshold : Lower values (0.50-0.60) allow more trades but may reduce average quality. Higher values (0.70+) are more selective but may miss opportunities. Structure Timeframe : Use 240 (4H) for intraday trading, Daily for swing trading, Weekly for position trading Volume Gate : Disable for low-liquidity pairs or when volume data is unreliable Dual MACD Fusion : Disable for mean-reverting markets where single MACD may be more responsive Trade Discipline : Adjust max trades and cooldown based on your risk tolerance and market volatility Non-Repainting Guarantee All higher timeframe data requests use lookahead=barmerge.lookahead_off to prevent repainting. Pivot detection waits for full confirmation before registering structure breaks. All visual elements (tables, labels) update only on closed bars. Alerts Three alert conditions are available: ChronoPulse Long Setup : Fires when all long entry conditions are met ChronoPulse Short Setup : Fires when all short entry conditions are met ChronoPulse QA Certification : Fires when Quality Assurance console reaches CERTIFIED status Configure alerts with "Once Per Bar Close" delivery to match the non-repainting design. Visual Elements Structure Labels : CHOCH↑, CHOCH↓, BOS↑, BOS↓ markers on structure breaks Directional EMA : Orange line showing trend bias Trailing Stop Lines : Green (long) and red (short) trailing stop levels Dashboard Panel : Real-time status display (structure, MACD, ATR, quality, PnL) QA Console : Quality assurance monitoring panel Integrity Suite Panel : Optional validation status display Recommended Usage Forward test with paper trading before live deployment Monitor the QA console until it reaches CERTIFIED status Adjust parameters based on your specific market and timeframe Respect the trade discipline limits to avoid over-trading Review quality scores and adjust threshold if needed Use appropriate commission and slippage settings for your broker Technical Implementation The strategy uses Pine Script v6 with the following key features: Multi-timeframe data requests with lookahead protection Confirmed pivot detection for structure analysis Dynamic trailing stop management Real-time quality score calculation Trade budgeting and cooldown enforcement Comprehensive dashboard and monitoring panels All source code is open and available for review and modification. Disclaimer This script is for educational and informational purposes only. It is not intended as financial, investment, or trading advice. Past performance does not guarantee future results. Trading involves substantial risk of loss and is not suitable for all investors. Always conduct your own research and consult with a qualified financial advisor before making any trading decisions. The author and TradingView are not responsible for any losses incurred from using this strategy. Strategia Pine Script®di officialjackofalltrades74
SuperWaveTrendWaveTrend with Crosses + HyperWave + Confluence Zones + Thresholds SuperWaveTrend — Advanced Momentum System Integrating WaveTrend, HyperWave, Confluence Zones & Threshold Filters SuperWaveTrend is an enhanced momentum indicator built upon the classic WaveTrend (WT) framework. It integrates HyperWave extreme zones, top/bottom Confluence Zones, trend hesitation Threshold regions, WT crossover reversal signals, and more. This indicator is suitable for: • Trend following • Swing trading • Reversal spotting • Overbought/oversold structure analysis • Extreme market sentiment detection Whether you’re scalping or planning swing entries, SuperWaveTrend offers a more precise and visually intuitive momentum structure. Key Features 1. WaveTrend Core Structure (WT1 / WT2) • WT1: Primary momentum line • WT2: Signal line • Momentum Spread Area (WT1 − WT2) visualization highlights shifts in trend strength 2. HyperWave Extreme Momentum Zones Background highlight automatically appears during extreme momentum conditions: • Purple-red: Extreme bullish zone • Orange: Extreme bearish zone Helps identify: • Blow-off tops • Panic sell-offs • Extreme trend continuation phases 3. Confluence Zones (Top/Bottom Resonance) Combines overbought/oversold signals with momentum structure to mark: • Gold top zones → weakening bullish momentum • Blue bottom zones → weakening bearish momentum Useful for detecting: • Bearish divergence tops • Reversal bounces • High-level exhaustion / low-level capitulation 4. Threshold Hesitation Zone (Gray) When WT1 and WT2 converge tightly, a gray background highlights: • Unclear direction • Trend weakening • Higher risk of false signals Generally not recommended for new entries. 5. WT Crossover Signals (Cross Signals) WT1 and WT2 crossovers are marked with color-coded dots: • Green: Bullish cross • Red: Bearish cross A core signal for capturing reversal shifts. ⚠️ Creator’s Disclaimer & Usage Insights ***WARNING*** SuperWaveTrend is not designed for extremely strong one-sided trends. During highly impulsive markets, signals may become delayed or less reliable. Optimal Timeframes Based on extensive backtesting, In swing-trading environments, the indicator performs most effectively on the 1H–4H timeframes, where momentum cycles form cleanly and Confluence Zones provide high-probability setups. Trading Insights • In swing-trading environments, Confluence Zones often coincide with excellent long/short opportunities, especially when momentum exhaustion is confirmed. • When paired with a Bollinger Bands framework, the system exhibits significantly improved accuracy and structure clarity. Have fun, BigTrunksIndicatore Pine Script®di BigTrunks25
ATR ZigZag BreakoutATR ZigZag Breakout This strategy uses my ATR ZigZag indicator (powered by the ZigZagCore library) to scalp breakouts at volatility-filtered highs and lows. Everyone knows stops cluster around clear swing highs and lows. Breakout traders often pile in there, too. These levels are predictable areas where aggressive orders hit the tape. The idea here is simple: → Let ATR ZigZag define clean, volatility-filtered pivots → Arm a stop market order at those pivots → Join the breakout when the crowd hits the level The key to greater success in this simple strategy lies in the ZigZag. Because the pivots are filtered by ATR instead of fixed bar counts or fractals, the levels tend to be more meaningful and less noisy. This approach is especially suited for intraday trading on volatile instruments (e.g., NQ, GC, liquid crypto pairs). How It Works 1. Pivot detection The ATR ZigZag uses an ATR-based threshold to confirm swing highs and lows. Only when price has moved far enough in the opposite direction does a pivot become “official.” 2. Candidate breakout level When a new swing direction is detected and the most recent high/low has not yet been broken in the current leg, the strategy arms a stop market order at that pivot. • Long candidate → most recent swing high • Short candidate → most recent swing low These “candidate trades” are shown as dotted lines. 3. Entry, SL, and TP If price breaks through the level, the stop order is filled and a bracket is placed: • Stop loss = ATR × SL multiplier • Take profit = SL distance × RR multiplier Once a level has traded, it is not reused in the same swing leg. 4. Cancel & rotate If the market reverses and forms a new swing in the opposite direction before the level is hit, the pending order is cancelled and a new candidate is considered in the new direction. Additional Features • Optional session filter for backtesting specific trading hoursStrategia Pine Script®di ReflexSignals11168
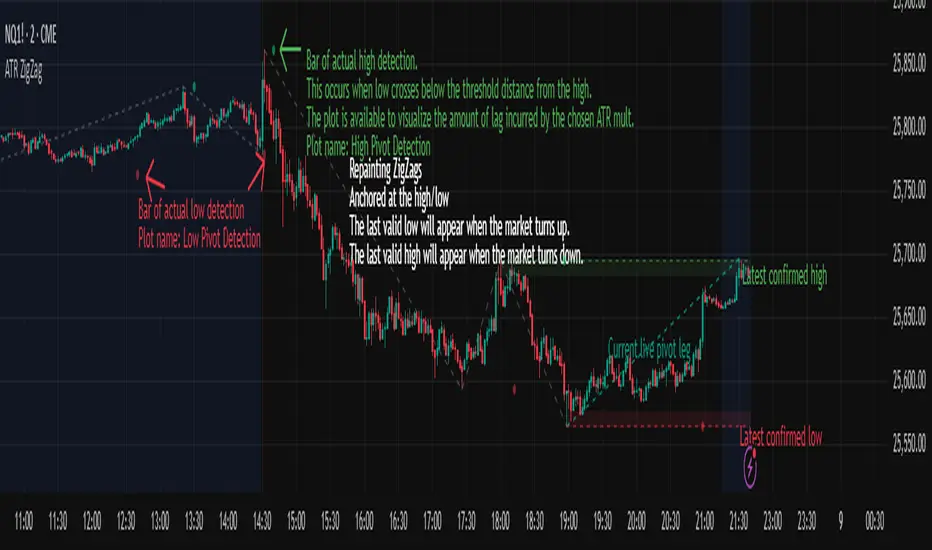
ATR ZigZag - Volatility-Filtered Market StructureDescription This indicator draws ZigZags using an ATR based threshold for direction switching to identify major swing highs and lows. Instead of relying on fractals or fixed bar-count swings, pivots are confirmed only when price moves beyond the prior extreme by: threshold = ATR(length) × ATR_mult This filters noise, enforces valid swing structure (high → low → high), and adapts automatically to volatility. The ATR ZigZag is ideal for traders who want a clean, objective view of swing structure without noise. This has many uses, including mapping swing structure, drawing chart patterns, and trading around extremes. Lag and Repainting Pivots are confirmed only after price moves sufficiently in the opposite direction. This creates necessary lag. The ZigZag is drawn when this occurs, and will anchor to the high/low in the past. Optional detection dot plots show exactly when confirmation occurred. What You See ZigZag: dashed gray line, repainted to anchor at the confirmed highs and lows Latest Pivot Levels: Dashed horizontal lines at the most recent confirmed high/low. Optional Live Swing Leg: A real-time line from the last confirmed pivot to the current swing extreme, updating until a new pivot forms. Optional ATR Boxes: 1×ATR shaded zones around the latest pivot for structural context. Optional Pivot Confirmation Dots: Markers show the bar where the threshold is crossed and a swing is officially confirmed. This is to understand the lag and see when the ZigZag repainted. Indicatore Pine Script®di ReflexSignals201
ZigZagCoreZigZagCore ZigZagCore is a generic ZigZag engine that works with any user-defined threshold (ATR-based, volatility-based, fixed ticks, etc.). API import ReflexSignals/ZigZagCore/ as zz var zz.ZzState state = zz.zz_new() float thr = ... // your threshold in price units state := zz.zz_update(state, thr) zz_update(state, thr) Parameters: state (ZzState) thr (float) ZzState Fields: dir (series int) highSinceLow (series float) lowSinceHigh (series float) lastHighLevel (series float) lastLowLevel (series float) lastHighIndex (series int) lastLowIndex (series int) highSinceLowIndex (series int) lowSinceHighIndex (series int) isNewHigh (series bool) isNewLow (series bool) Directional State dir = 1 → market is in an upswing dir = -1 → market is in a downswing dir = na → initial undecided state Live Swing Tracking (Unconfirmed Leg) Continuously updated swing extremes: highSinceLow — highest price since the last confirmed low lowSinceHigh — lowest price since the last confirmed high Their corresponding bar indices These fields describe the current active swing leg, which updates every bar until a pivot is confirmed. Pivot Detection A pivot confirms only when price moves beyond the prior swing extreme by more than threshold. When this occurs, the library sets: isNewHigh = true (on the detection bar only) and updates lastHighLevel, lastHighIndex isNewLow = true and updates lastLowLevel, lastLowIndexLibreria Pine Script®di ReflexSignalsAggiornato 113
3 EMA vs 30 EMA Crossover [RRTG]self made under trail, use with confirmation from other Indicatore Pine Script®di rahulmechanical2439
Sniper 50: The Trend Master [Pure Signal]Overview Sometimes, the simplest strategies are the deadliest. This indicator brings the legendary "EMA 50 Strategy" to your chart in its purest form. It is designed to capture major market trends and reversals immediately as they happen, stripping away complex filters that often cause lag. Why the EMA 50? The 50-period Exponential Moving Average is widely regarded by institutional traders as the primary divider between bullish and bearish territory. This tool automates the monitoring of this key level. How It Works The logic is raw and direct: BUY Signal: Triggered immediately when the candle closes ABOVE the EMA 50. SELL Signal: Triggered immediately when the candle closes BELOW the EMA 50. Key Features Zero Noise Technology: Includes a built-in state machine that prevents repetitive signals. You will receive exactly ONE signal when the trend flips, and silence until the next reversal. Dynamic Visuals: The EMA line changes color (Green for Bullish, Red for Bearish) to give you instant context. Lag-Free: unlike other tools that wait for multiple confirmations, this tool prioritizes speed to catch sharp moves (like sudden crashes or rallies). Best For Trend Following Swing Trading (Crypto & Stocks) Catching rapid reversals that complex indicators might miss.Indicatore Pine Script®di GiladKatz22 1.5 K
Range Lattice## RangeLattice RangeLattice constructs a higher-timeframe scaffolding on any intraday chart, locking in structural highs/lows, mid/quarter grids, VWAP confluence, and live acceptance/break analytics. It provides a non-repainting overlay that turns range management into a disciplined process. HOW IT WORKS Structure Harvesting – Using request.security() , the script samples highs/lows from a user-selected timeframe (default 240 minutes) over a configurable lookback to establish the dominant range. Grid Construction – Midpoint and quarter levels are derived mathematically, mirroring how institutional traders map distribution/accumulation zones. Acceptance Detection – Consecutive closes inside the range flip an acceptance flag and darken the cloud, signaling balanced auction conditions. Break Confirmation – Multi-bar closes outside the structure raise break labels and alerts, filtering the countless fake-outs that plague breakout traders. VWAP Fan Overlay – Session VWAP plus ATR-based bands provide a live measure of flow centering relative to the lattice. HOW TO USE IT Range Plays : Fade taps of the outer rails only when acceptance is active and VWAP sits inside the grid—this is where mean-reversion works best. Breakout Plays : Wait for confirmed break labels before entering expansion trades; the dashboard's Width/ATR metric tells you if the expansion has enough fuel. Market Prep : Carry the same lattice from pre-market into regular trading hours by keeping the structure timeframe fixed; alerts keep you notified even when managing multiple tickers. VISUAL FEATURES Range Tap and Mid Pivot markers provide a tape-reading breadcrumb trail for journaling. Cloud fill opacity tightens when acceptance persists, visually signaling balance compressions ready to break. Dashboard displays absolute width, ATR-normalized width, and current state (Balanced vs Transitional) so you can glance across charts quickly. Acceptance Flag toggle: Keep the repeated acceptance squares hidden until you need to audit balance. PARAMETERS Structure Timeframe (default: 240): Choose the timeframe whose ranges matter most (4H for indices, Daily for stocks). Structure Lookback (default: 60): Bars sampled on the structure timeframe. Acceptance Bars (default: 8): How many consecutive bars inside the range confirm balance. Break Confirmation Bars (default: 3): Bars required outside the range to validate a breakout. ATR Reference (default: 14): ATR period for width normalization. Show Midpoint Grid (default: enabled): Display the midpoint and quarter levels. Show Adaptive VWAP Fan (default: enabled): Toggle the VWAP channel for assets where volume distribution matters most. Show Acceptance Flags (default: disabled): Turn the acceptance markers on/off for maximum visual control. Show Range Dashboard (default: enabled): Disable if screen space is limited, re-enable during prep sessions. ALERTS The indicator includes five alert conditions: Range High Tap: Price interacted with the RangeLattice high Range Low Tap: Price interacted with the RangeLattice low Range Mid Tap: Price interacted with the RangeLattice mid Range Break Up: Confirmed upside breakout Range Break Down: Confirmed downside breakout Where it works best This indicator works best on liquid instruments with clear structural levels. On very low timeframes (1-minute and below), the structure may update too frequently to be useful. The acceptance/break confirmation system requires patience—faster traders may find the multi-bar confirmation too slow for scalping. The VWAP fan is session-based and resets daily, which may not suit all trading styles. Indicatore Pine Script®di officialjackofalltrades20
OBV + WaveTrend Volume Scalper [GratefulFutures]This script is a combination script of three different strategies that provides buy and sell signals based on the change of volume with momentum confirmations. Sources used: This script relies on the outstanding scripts of the great script writer LazyBear: LazyBear The following scripts were used in this publication: 1. A modified "On-Balance Volume Oscillator" modified from LazyBear's original script: 2. Wavetrend Oscillator with crosses, Author: LazyBear 3. Squeeze Momentum Oscillator, Author: LazyBear This script functions based on the following criteria being true: 1. On balance volume oscillator turning from negative to positive (buy) or positive to negative (sell) 2. Squeeze Momentum value is increasing (buy) or decreasing (sell) 3. Wavetrend 1 (wt1) is greater than wavetrend 2 (wt2) (buy)/ Wavetrend 1 (wt1) is less than wavetrend 2 (wt2) (sell) By combining these factors the indicator is able to signal exactly when net buying turns to net selling (OBV) and when this change is most advantageous to continue based on the momentum and price action of the underlying asset (SQMOMO and Wavetrend). This allows you to pair volume and price action for a powerful tool to identify where price will reverse or continue providing exceptional entries for short term trades, especially when combined with other aspects such as support and resistance, or volume profile. How to use: Simply adjust the settings to your preference and read the given signals as generated. Settings There are multiple ways to tune the signals generated. It is set standard for my preferred use on a 1 minute chart. OBV Oscillator Settings The first 4 dropdowns in the Inputs section tune the On Balance Volume Oscillator (OBVO) portion of the indicator. You can choose if you want it to calculate based on close, open, high, low, or other value. The most impactful in the entire settings is going to be the length and smoothing of the OBVO EMA. Making this number lower increasing the sensitivity to changes in volume, making the signals come quicker but is more susceptible to quick fluctuations. A value of between (5-20) is reasonable for the OBVO EMA length. There is a separate smoothing factor titled OBV Smoothing Length and below that, OBV Smoothing Type , a value of (2) is standard with "SMA" for smoothing type with a value of between 2-10 being reasonable. You may also play with these values to see what you like for your trading style. Wavetrend Settings The next 3 options are to modify the wavetrend portion of the indicator. I do not modify these from standard, and feel that they work appropriately on all time frames at the following values: n1 length (10), n2 length (20), Wavetrend Signal SMA length (4) Squeeze Momentum Settings The following 5 options through the end modify the Squeeze momentum portion of the indicator. The only one that modifies the signals generated is the KC Length , Making this number lower increasing the sensitivity to changes in price action, making the signals come quicker but is more susceptible to quick fluctuations. A value of between (18-25) is reasonable for KC Length . Style Setting You may select if you want to see the buy and sell signals. The following 5 options Raw OBV Osc through Squeeze Momentum allow you to see where each specific requirement was met, posted as a vertical line, but for live use it is recommended to turn all of these vertical lines off and only use the buy and sell signals. Time Frames: While this script is most effective on shorter time frames (1 minute for scalping and daytrading) it is also viable to use it on longer timeframes, due to the nature of its components being independent of time frame. Examples of use - (Green and red vertical lines are for visualization purpose and are not part of the script) SPY 1 Minute (Factory Settings): SPX 15 minutes (Factory Settings): Considerations This script is meant primarily for short term trading, trades on the basis of seconds to minutes primarily. While they can be a good indication of volume lining up with momentum, it is always wise to use them in combination with other factors such as support, resistance, market structure, volume levels, or the many other techniques out there... As Always... Happy Trading. -Not_A_Mad_Scientist (GreatfulFutures Trade University)Indicatore Pine Script®di not_a_mad_scientist54