Updated Price Action Insights:
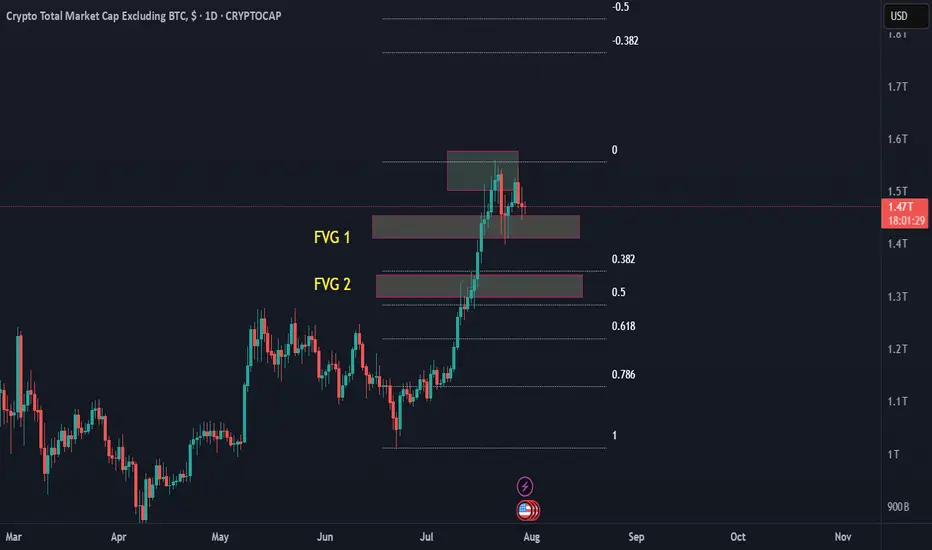
Price rejected cleanly from the upper FVG near 1.55T (still acting as dominant resistance).
Now consolidating / weakening under FVG 1, after briefly testing it.
Lower highs are forming, and price is struggling to reclaim key levels = signs of bearish structure development.
FVG 2 is still untouched = clean liquidity pocket + aligned with the 0.5 Fibonacci retracement (~1.35T).
🧠 Interpretation:
✅ Yes — this looks like a developing short-term downtrend, with the most probable target being FVG 2.
Here’s why:
Factor Observation
Market Structure Forming lower highs and lower closes — early signs of a bearish wave.
Liquidity Targets FVG 2 is clean and unfilled — ideal magnet for smart money correction.
FVG 1 Reaction Weak bounce; no strong bullish continuation = likely to give way.
Fib Confluence 0.5 level is classic corrective support + matches with FVG 2.
🔽 Breakdown Path Projection:
Step 1: Lower highs continue forming
↓
Step 2: Breakdown below FVG 1 (~1.42–1.40T zone)
↓
Step 3: Liquidity sweep / test into FVG 2 (~1.35T)
↓
Step 4: Watch for bullish reversal structure (engulfing, pin bar, volume)
🎯 Trading Bias:
Short-term bias: Bearish
Primary liquidity target: FVG 2
Reversal trigger zone: Around 1.35T, with confirmation
📌 Strategy Tip:
If you're planning a trade:
Avoid buying in FVG 1 unless it flips with conviction and volume.
Ideal long entries would be in FVG 2 with clear confirmation (price action or RSI divergence).
Use the high of the last lower high (above FVG 1) as a stop-loss anchor for any countertrend longs from FVG 2.
Declinazione di responsabilità
Le informazioni ed i contenuti pubblicati non costituiscono in alcun modo una sollecitazione ad investire o ad operare nei mercati finanziari. Non sono inoltre fornite o supportate da TradingView. Maggiori dettagli nelle Condizioni d'uso.
Declinazione di responsabilità
Le informazioni ed i contenuti pubblicati non costituiscono in alcun modo una sollecitazione ad investire o ad operare nei mercati finanziari. Non sono inoltre fornite o supportate da TradingView. Maggiori dettagli nelle Condizioni d'uso.