OPEN-SOURCE SCRIPT
Breakout/Buy/Sell v6.5
Break Buy Sell Indicator v6.5 — Publish Description
What it is
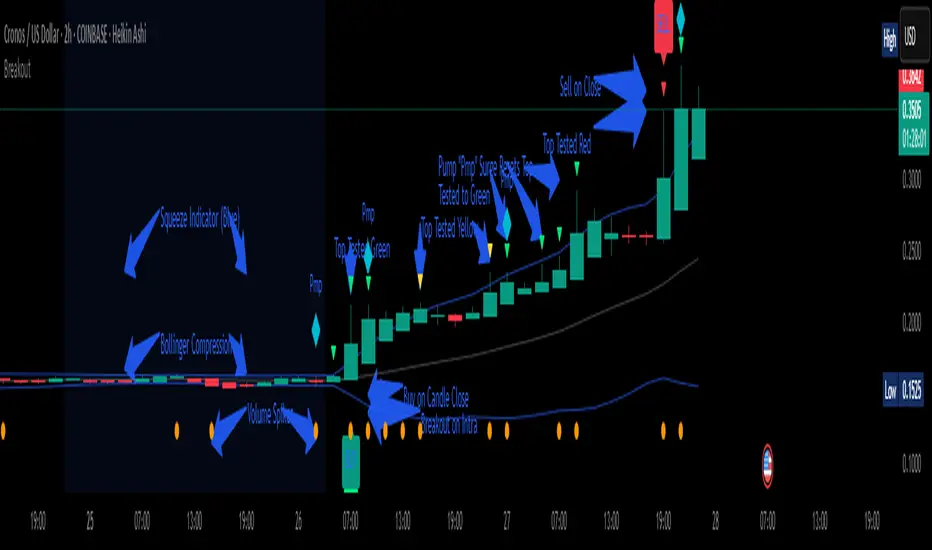
A Heikin Ashi breakout event marker that runs a simple, sequential playbook:
BRK (intrabar) → BUY (bar close) → SELL (first Red Top-Test close).
Not a swing-high/low tool and not a full strategy—this is a breakout event detector.
How it works
A BRK prints intrabar only when core breakout confluence is present on the current bar:
Squeeze: Bollinger Band width below its lookback average × factor.
Break: High/close pushes beyond the lookback high (Early/Strict modes).
Volume: Volume > SMA(volume) × multiplier (mode-dependent).
Candle quality: Close in the top of the bar’s range (mode-dependent).
Adaptive override (optional): Close > prior high + k·ATR and body ≥ k·ATR.
After a BRK:
BUY prints on bar close (confirmation of that breakout bar).
A Top-Test Ladder (tiny triangles above bars) tracks “pressure” via spacing:
green → yellow → red (defaults: Yellow=2, Red=4).
SELL prints on the first red top-test bar close.
Notes:
Built and tuned on Heikin Ashi; use HA for matching placements.
Replay shows BRK & BUY on the same bar (no intrabar simulation). Live: they are staggered.
Inputs
Core Conditions:
BB Length • BB Mult • Squeeze Lookback • Squeeze Factor • Breakout Lookback
Volume SMA Length • Volume Mult (Early/Strict) • Candle Close-in-Range %
Mode: Early (high may break) / Strict (close must break)
Adaptive Override (ATR): Enable • ATR Length • k (break) • k (body)
Top-Test Ladder: Bars gap for Yellow • Bars gap for Red (≥)
Trade Signals: Enable Buy/Sell • Suppress extra BRK while in trade • Plot labels
Visuals: Debug paints (squeeze bg, Pmp diamonds, volume dots, ladder marks)
Signals & Alerts
BRK (intrabar): triangle below bar
BUY (on close): label below bar
SELL (Red Top-Test, on close): label above bar
Create these alerts (exactly three):
Breakout — Once Per Bar
BUY — Once Per Bar Close
SELL (Red Top-Test) — Once Per Bar Close
How to use
Wait for BRK intrabar (attention).
BUY at the close of that bar.
Ride through green/yellow ladder; SELL on the first red top-test close.
Optional: keep “Suppress extra BRK” ON to avoid spam during the trade.
Suggested settings
Chart: Heikin Ashi
Defaults to match screenshots:
Mode Early • BB 20/2.0 • Squeeze 0.60 • Breakout Lookback 20
Volume SMA 20 • Early mult 1.5
Adaptive ON (ATR 14, break/body 0.5)
Ladder Yellow=2, Red=4
Enable Buy/Sell ON • Suppress extra BRK ON • Debug paints ON
Timeframes: 15–45m, 2–4h, 1D (1–5m = advanced/noisier)
What it does NOT do
Not a full strategy, risk model, or trade manager.
Not a swing high/low system.
No multi-timeframe logic; it runs on the chart timeframe.
Tips & Notes
If yellow rarely appears, that’s normal—Pmp thrusts reset the ladder to green.
Keep alerts exactly as listed to avoid duplicates (don’t also use “Any alert() function call”).
Switching off HA will shift BUY/SELL timing (different OHLC basis).
Changelog
v6.5 — BRK intrabar retained; BUY on bar close; SELL on first Red Top-Test close; cleaner 3-alert workflow; ladder defaults tuned (Yellow=2, Red=4).
Disclaimer
Educational only. Not financial advice. Backtest and size risk before live use.
Script open-source
In pieno spirito TradingView, il creatore di questo script lo ha reso open-source, in modo che i trader possano esaminarlo e verificarne la funzionalità. Complimenti all'autore! Sebbene sia possibile utilizzarlo gratuitamente, ricorda che la ripubblicazione del codice è soggetta al nostro Regolamento.
It be Me
Declinazione di responsabilità
Le informazioni ed i contenuti pubblicati non costituiscono in alcun modo una sollecitazione ad investire o ad operare nei mercati finanziari. Non sono inoltre fornite o supportate da TradingView. Maggiori dettagli nelle Condizioni d'uso.