OPEN-SOURCE SCRIPT
Aggiornato ATR+CCI Monetary Risk Tool - TP/SL
⚙️ ATR+CCI Monetary Risk Tool — Volatility-aware TP/SL & Position Sizing
Exact prices (no rounding), ATR-percentile dynamic stops, and risk-budget sizing for consistent execution.
🧠 What this indicator is
A risk-first planning tool. It doesn’t generate orders; it gives you clean, objective levels (Entry, SL, TP) and position size derived from your risk budget. It shows only the latest setup to keep charts readable, and a compact on-chart table summarizing the numbers you actually act on.
✨ What makes it different
🔧 How to use (quick start)
Add to chart and pick your timeframe and symbol.
In settings:
Read the labels (Entry/TP/SL) and the table (SL Distance, Position Size, Max USD Risk, ATR Percentile, effective SL Mult).
Combine with your entry trigger (price action, levels, momentum, etc.). This indicator handles risk & targets.
📐 How levels are computed
📊 What you’ll see on chart
🧪 Practical examples
🧭 Why traders should use it
🔧 Input guide (practical defaults)
💡 Best practices
⚠️ Notes & limitations
📎 Disclaimer
For educational purposes only. Not financial advice. Markets involve risk. Test thoroughly before trading live.
Exact prices (no rounding), ATR-percentile dynamic stops, and risk-budget sizing for consistent execution.
🧠 What this indicator is
A risk-first planning tool. It doesn’t generate orders; it gives you clean, objective levels (Entry, SL, TP) and position size derived from your risk budget. It shows only the latest setup to keep charts readable, and a compact on-chart table summarizing the numbers you actually act on.
✨ What makes it different
- Dynamic SL by regime (ATR percentile): Instead of a fixed multiple, the SL multiplier adapts to the current volatility percentile (low / medium / high). That helps avoid tight stops in noisy markets and over-wide stops in quiet markets.
- Risk budgeting, not guesswork: Size is computed from Account Balance × Max Risk % divided by SL distance × point value. You risk the same dollars across assets/timeframes.
- Precision that matches your instrument: Entry, TP, SL, and SL Distance are displayed as exact prices (no rounding), truncated to syminfo.mintick so they align with broker/exchange precision.
- Symbol-aware point value: Uses syminfo.pointvalue so you don’t maintain tick tables.
- Non-repaint option: Work from closed bars to keep the plan stable.
🔧 How to use (quick start)
Add to chart and pick your timeframe and symbol.
In settings:
Set Account Balance (USD) and Max Risk per Trade (%).
Choose R:R (1:1 … 1:5).
Pick ATR Period and CCI Period (defaults are sensible).
Keep Dynamic ATR ON to adapt SL by regime.
Keep Use closed-bar values ON to avoid repaint when planning.
Read the labels (Entry/TP/SL) and the table (SL Distance, Position Size, Max USD Risk, ATR Percentile, effective SL Mult).
Combine with your entry trigger (price action, levels, momentum, etc.). This indicator handles risk & targets.
📐 How levels are computed
- Bias: CCI ≥ 0 ⇒ long, otherwise short.
- ATR Percentile: Percent rank of ATR(atrPeriod) over a lookback window.
- Effective SL Mult:If percentile < Low threshold ⇒ use Low SL Mult (tighter).
If between thresholds ⇒ use Base SL Mult.
If percentile > High threshold ⇒ use High SL Mult (wider). - Stop-Loss: SL = Entry ± ATR × SL_Mult (minus for long, plus for short).
- Take-Profit: TP = Entry ± (Entry − SL) × R (R from the R:R dropdown).
- Position Size:USD Risk = Balance × Risk%
Contracts = USD Risk ÷ (|Entry − SL| × PointValue)
For futures, quantity is floored to whole contracts. - Exact prices: Entry/TP/SL and SL Distance are not rounded; they’re truncated to mintick so what you see matches valid price increments.
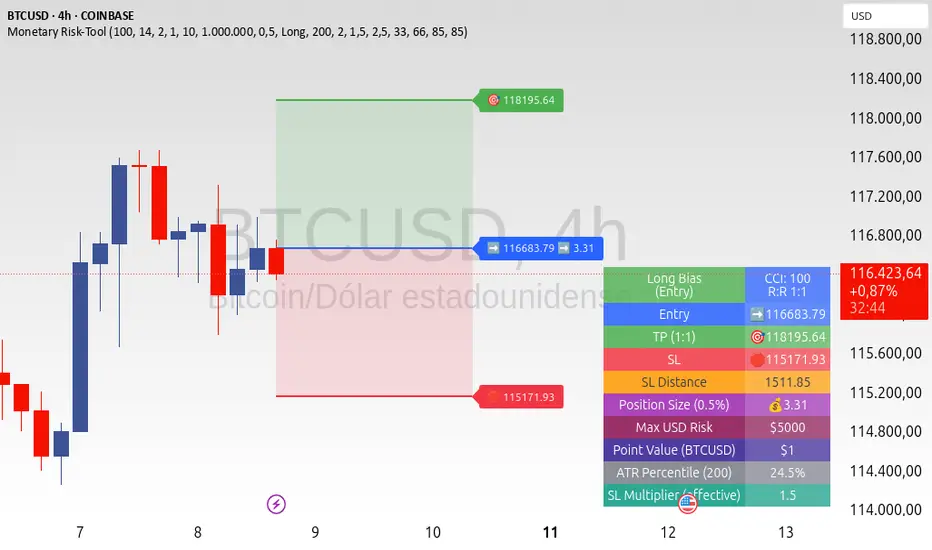
📊 What you’ll see on chart
- Latest Entry (blue), TP (green), SL (red) with labels (optional emojis: ➡️ 🎯 🛑).
- Info Table with:
- Bias, Entry, TP, SL (exact, truncated to mintick)
- SL Distance (exact, truncated)
- Position Size (contracts/units)
- Max USD Risk
- Point Value
- ATR Percentile and effective SL Mult
- Bias, Entry, TP, SL (exact, truncated to mintick)
🧪 Practical examples
- High-volatility session (e.g., XAUUSD, 1H): ATR percentile is high ⇒ wider SL, smaller size. Reduces churn from normal noise during macro events.
- Range-bound market (e.g., EURUSD, 4H): ATR percentile low ⇒ tighter SL, better R:R. Helps you avoid carrying unnecessary risk.
- Index swing planning (e.g., ES1!, Daily): Non-repaint levels + risk budgeting = consistent sizing across days/weeks, easier to review and journal.
🧭 Why traders should use it
- Consistency: Same dollar risk regardless of instrument or volatility regime.
- Clarity: One-trade view forces focus; you see the numbers that matter.
- Adaptivity: Stops calibrated to the market’s current behavior, not last month’s.
- Discipline: A visible checklist (SL distance, size, USD risk) before you hit buy/sell.
🔧 Input guide (practical defaults)
- CCI Period: 100 by default; use as a bias filter, not an entry signal.
- ATR Period: 14 by default; raise for smoother, lower for more reactive.
- ATR Percentile Lookback: 200 by default (stable regime detection).
- Percentile thresholds: 33/66 by default; widen the gap to change how often regimes switch.
- SL Mults: Start ~1.5 / 2.0 / 2.5 (low/base/high). Tune by asset.
- Risk % per trade: Common pro ranges are 0.25–1.0%; adjust to your risk tolerance.
- R:R: Start with 1:2 or 1:3 for balanced skew; adapt to strategy edge.
- Closed-bar values: Keep ON for planning/live; turn OFF only for exploration.
💡 Best practices
- Combine with your entry logic (structure, momentum, liquidity levels).
- Review ATR percentile and effective SL Mult across sessions so you understand regime shifts.
- For futures, remember size is floored to whole contracts—safer by design.
- Journal trades with the table snapshot to improve risk discipline over time.
⚠️ Notes & limitations
This is not a strategy; it does not place orders or alerts.
No slippage/commissions modeled here; build a strategy() version for backtests that mirror your broker/exchange.
Displayed non-price metrics use two decimals; prices and SL Distance are exact (truncated to mintick).
📎 Disclaimer
For educational purposes only. Not financial advice. Markets involve risk. Test thoroughly before trading live.
Note di rilascio
📢 Update: UnBiased Mode – Manual Direction🆕 New Feature:
You can now enable UnBiased Mode to ignore CCI and manually choose Long or Short.
• TP, SL, distance, and position size adjust to your chosen direction.
• Info table shows an [color=orange]orange warning header[/color] with your selected side.
💡 Why Use It:
Perfect for discretionary trading, quick simulations, or testing scenarios without CCI conditions.
📈 How to Use:
1. Enable UnBiased Mode in settings.
2. Select Long or Short.
3. All calculations and labels update instantly for your chosen bias.
Note di rilascio
Two new features added: 1️⃣ Custom Risk/Reward – Now you can type any numeric value for your R:R (e.g. 1 = 1:1, 2 = 2:1, 0.5 = 1:2).
2️⃣ Shaded Zones – The chart now shows a translucent area between [color=green]Entry ↔ TP[/color] and [color=red]Entry ↔ SL[/color] for quick visual reference.
How to use:
• Set your desired R:R number in the new input.
• Enable/disable dynamic ATR adaptation as needed.
• Enjoy a cleaner view of targets and stops with shaded risk/reward areas.
Perfect for traders who want fast, precise visual management of trades.
Script open-source
Nello spirito di TradingView, l'autore di questo script lo ha reso open source, in modo che i trader possano esaminarne e verificarne la funzionalità. Complimenti all'autore! Sebbene sia possibile utilizzarlo gratuitamente, ricordiamo che la ripubblicazione del codice è soggetta al nostro Regolamento.
Declinazione di responsabilità
Le informazioni e le pubblicazioni non sono intese come, e non costituiscono, consulenza o raccomandazioni finanziarie, di investimento, di trading o di altro tipo fornite o approvate da TradingView. Per ulteriori informazioni, consultare i Termini di utilizzo.