OPEN-SOURCE SCRIPT
EMA Trend Recognition
EMA Trend Recognition — “Double-Vision Trend Glasses” 👓⚡
In short:
Your chart gets two voices — the Major trend (EMA50 vs EMA200) for the big picture, and the Minor trend (EMA9 vs EMA20) for the short-term mood.
When both sing the same tune, you get a STRONG signal.
When they argue, it’s a WEAK one. Simple. Clean. Effective.
🧭 What this indicator does
Major Trend (Long-Term):
EMA50 above EMA200 → Bullish.
EMA50 below EMA200 → Bearish.
This tells you where the market really wants to go.
Minor Trend (Short-Term):
EMA9 above EMA20 → Bullish.
EMA9 below EMA20 → Bearish.
This shows you what the market feels like right now.
Trend Combinations (The Magic):
🟢 STRONG BUY: Major ↑ + Minor ↑ → full alignment, go with the flow.
🔴 STRONG SELL: Major ↓ + Minor ↓ → both down, no mercy.
🟡 WEAK BUY: Major ↑, Minor ↓ → pullback zone? early dip? maybe.
🟠 WEAK SELL: Major ↓, Minor ↑ → short-term bounce inside a downtrend.
🎨 Background Colors & Info Panel
Bright Green: STRONG BUY
Bright Red: STRONG SELL
Faded Green/Red: WEAK signals (trend disagreement)
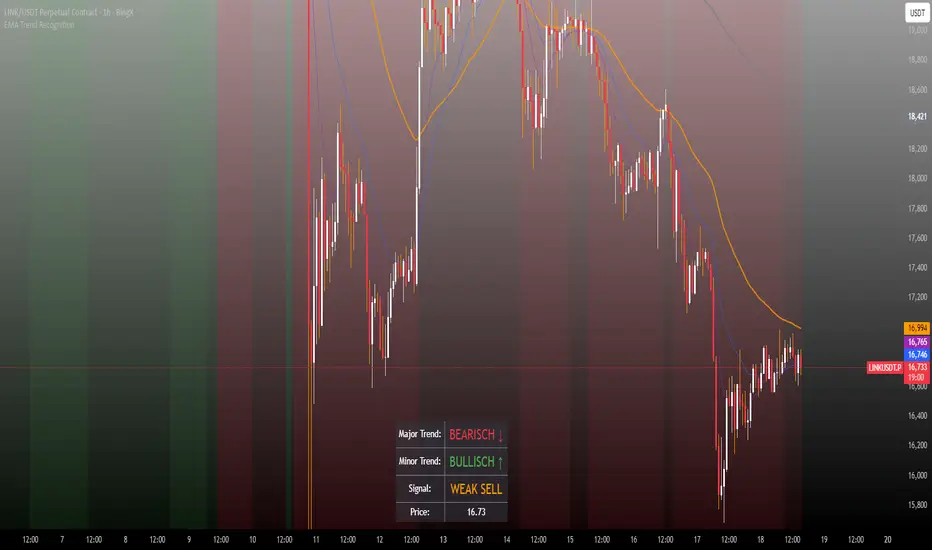
Bottom Info Table:
Major Trend: “BULLISH ↑” or “BEARISH ↓”
Minor Trend: same logic, faster tempo
Signal: shows STRONG/WEAK/NEUTRAL status
Price: latest close price (because yes, we all check that)
🔔 Alerts (so you don’t stare all day)
MAJOR TREND CHANGE: “Now Bullish!” or “Now Bearish!”
MINOR TREND CHANGE: quicker reversals
STRONG BUY/SELL: when both trends line up perfectly
(Alerts trigger only on bar close — no disco flicker alerts.)
🧠 Visuals — Simple but Smart
EMA 200 & 50: thick lines = your market highway
EMA 20 & 9: thin lines = your turn signals
Muted colors, so your eyes survive long trading sessions
🚀 Why it’s useful
Trend Trading: Filter out noise, ride the momentum.
Pullback Entries: WEAK signals often mark “turning back in” moments.
System Building: Use “STRONG” as a market bias filter, “MINOR” flips as entry triggers.
⚙️ Pro Tips
Timeframes: EMAs are fixed, but meaning scales with TF.
On 1H or 4H, they often reflect daily/weekly momentum.
Context: Combine with structure (HH/HL/LH/LL), zones (OB/FVG), or volume.
Risk Management: Signal ≠ free money. Always define SL/TP and RR.
⚠️ Disclaimer
No financial advice, no crystal ball.
This indicator helps you see — but you still decide when to act.
Backtest and paper-trade before going live.
Short Pitch (for the top “Summary” line on TradingView):
“Two EMA pairs, one clear trend compass — Major shows direction, Minor sets the rhythm. When both agree, it’s STRONG. When they argue, it’s WEAK. Clean, fast, and easy to read.” ✅
Feel free to commend and if u have inspirations to add something, let me know, cheers :D
In short:
Your chart gets two voices — the Major trend (EMA50 vs EMA200) for the big picture, and the Minor trend (EMA9 vs EMA20) for the short-term mood.
When both sing the same tune, you get a STRONG signal.
When they argue, it’s a WEAK one. Simple. Clean. Effective.
🧭 What this indicator does
Major Trend (Long-Term):
EMA50 above EMA200 → Bullish.
EMA50 below EMA200 → Bearish.
This tells you where the market really wants to go.
Minor Trend (Short-Term):
EMA9 above EMA20 → Bullish.
EMA9 below EMA20 → Bearish.
This shows you what the market feels like right now.
Trend Combinations (The Magic):
🟢 STRONG BUY: Major ↑ + Minor ↑ → full alignment, go with the flow.
🔴 STRONG SELL: Major ↓ + Minor ↓ → both down, no mercy.
🟡 WEAK BUY: Major ↑, Minor ↓ → pullback zone? early dip? maybe.
🟠 WEAK SELL: Major ↓, Minor ↑ → short-term bounce inside a downtrend.
🎨 Background Colors & Info Panel
Bright Green: STRONG BUY
Bright Red: STRONG SELL
Faded Green/Red: WEAK signals (trend disagreement)
Bottom Info Table:
Major Trend: “BULLISH ↑” or “BEARISH ↓”
Minor Trend: same logic, faster tempo
Signal: shows STRONG/WEAK/NEUTRAL status
Price: latest close price (because yes, we all check that)
🔔 Alerts (so you don’t stare all day)
MAJOR TREND CHANGE: “Now Bullish!” or “Now Bearish!”
MINOR TREND CHANGE: quicker reversals
STRONG BUY/SELL: when both trends line up perfectly
(Alerts trigger only on bar close — no disco flicker alerts.)
🧠 Visuals — Simple but Smart
EMA 200 & 50: thick lines = your market highway
EMA 20 & 9: thin lines = your turn signals
Muted colors, so your eyes survive long trading sessions
🚀 Why it’s useful
Trend Trading: Filter out noise, ride the momentum.
Pullback Entries: WEAK signals often mark “turning back in” moments.
System Building: Use “STRONG” as a market bias filter, “MINOR” flips as entry triggers.
⚙️ Pro Tips
Timeframes: EMAs are fixed, but meaning scales with TF.
On 1H or 4H, they often reflect daily/weekly momentum.
Context: Combine with structure (HH/HL/LH/LL), zones (OB/FVG), or volume.
Risk Management: Signal ≠ free money. Always define SL/TP and RR.
⚠️ Disclaimer
No financial advice, no crystal ball.
This indicator helps you see — but you still decide when to act.
Backtest and paper-trade before going live.
Short Pitch (for the top “Summary” line on TradingView):
“Two EMA pairs, one clear trend compass — Major shows direction, Minor sets the rhythm. When both agree, it’s STRONG. When they argue, it’s WEAK. Clean, fast, and easy to read.” ✅
Feel free to commend and if u have inspirations to add something, let me know, cheers :D
Script open-source
In pieno spirito TradingView, il creatore di questo script lo ha reso open-source, in modo che i trader possano esaminarlo e verificarne la funzionalità. Complimenti all'autore! Sebbene sia possibile utilizzarlo gratuitamente, ricorda che la ripubblicazione del codice è soggetta al nostro Regolamento.
Declinazione di responsabilità
Le informazioni ed i contenuti pubblicati non costituiscono in alcun modo una sollecitazione ad investire o ad operare nei mercati finanziari. Non sono inoltre fornite o supportate da TradingView. Maggiori dettagli nelle Condizioni d'uso.