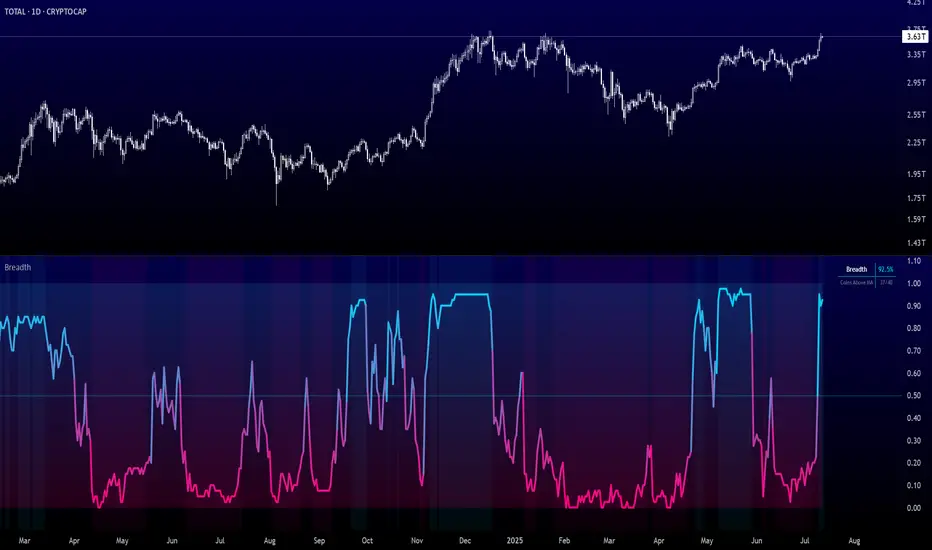
Breadth Topping SyndromeThis indicator plots a normalized breadth deterioration score in a separate pane and fires a discrete topping signal when several independent NYSE internal breadth conditions assemble while the market is still rising. The thesis is that major tops are a syndrome, not a single event: internal bifurcation, weakening participation and fading leadership tend to appear together near distributive peaks, and their conjunction inside an uptrend carries more information than any one of them alone.
█ OVERVIEW
Breadth Topping Syndrome (BTS) condenses four warning conditions into one framework:
- C1: a Miekka style divergence, where NYSE new 52 week highs and new 52 week lows are
simultaneously elevated as a percentage of advances plus declines.
- C2: Norman Fosback's High Low Logic Index at a high percentile of its own trailing history.
- C3: weak S&P 500 participation (percentage of constituents above their 200 day moving
average) while the trend reference index is in an uptrend.
- C4: a weighted deterioration score built from the same normalized components exceeding
a threshold.
When a configurable minimum number of these conditions has been observed within a short synchronization span and the trend gate is up, a trigger fires and opens a signal window. Inside the window the syndrome is Active only while the McClellan Oscillator is negative. Repeated triggers within a trailing lookback are counted as a cluster.
█ HISTORY / BACKGROUND
The components have documented lineages. The simultaneous new highs and new lows divergence condition follows James R. Miekka's Hindenburg Omen specification (1995), itself derived from work by Martin Zweig and Norman Fosback: both extremes elevated at once, measured against advances plus declines, valid only in an uptrend, with the McClellan Oscillator acting as an activation gate inside a fixed window rather than as a co equal trigger. The High Low Logic Index is Fosback's, published in 1976: the minimum of new highs and new lows relative to total issues isolates the disagreement component of breadth. Percentage of stocks above the 200 day moving average is a standard participation measure. The McClellan Oscillator is the 19/39 period EMA differential of net advances, per Sherman and Marian McClellan.
The syndrome architecture that combines them is novel and is described in full below. The conceptual basis is that each component captures a different failure mode of an advance, so requiring several to appear near simultaneously filters the false positives that any single measure produces on its own.
█ HOW IT WORKS
The script requests seven external series at the chart timeframe: NYSE advancing issues, declining issues, new 52 week highs, new 52 week lows, a trend reference index, and a primary plus fallback participation symbol. All requests use ignore_invalid_symbol, and a data integrity gate suppresses every signal when any core feed returns no value.
On each bar the script computes:
- The Miekka ratios: new highs and new lows each divided by advances plus declines, times 100.
C1 is true when both meet the threshold.
- The High Low Logic Index: the minimum of new highs and new lows divided by advances plus
declines, times 100, smoothed with an EMA, then converted to a percentile rank over the
normalization lookback. C2 is true when the percentile meets the warning level.
- The participation percentile: the participation series (gap filled with its last valid value so feed
gaps do not distort the distribution) percentile ranked over the same lookback. C3 is true when
the percentile is at or below the warning level while the trend reference index is above its close
a configurable number of bars ago. This is the divergence conjunction: price rising, participation
weak relative to its own recent history.
- The leadership share: new highs divided by new highs plus new lows, times 100, percentile
ranked and inverted.
- The deterioration score: the weighted average of the HLLI percentile, the inverted participation
percentile and the inverted leadership percentile, scaled 0 to 100. If both participation symbols
fail to resolve, the score reweights automatically over the two remaining components. C4 is true
when the score meets its threshold.
Each condition contributes to the syndrome if it was true on any bar within the synchronization span. When the count of contributing conditions reaches the required minimum while the uptrend gate is true, a trigger fires on the first such bar (edge triggered, so a persisting syndrome does not retrigger). The trigger opens a signal window measured in trading days. Within the window, the syndrome is Active while the McClellan Oscillator, computed as the fast EMA minus the slow EMA of net advances, is below zero, and deactivates when it turns positive without closing the window. The cluster count is the number of triggers within the trailing cluster lookback.
█ HOW TO USE
The script is designed for the 1D timeframe. The breadth feeds are daily series, the window and cluster inputs are specified in trading days, and the Miekka and McClellan parameters are daily conventions, so daily resolution matches the granularity of the logic.
- Blue score line: current breadth deterioration, 0 to 100, against a dashed threshold line and a
dotted midline at 50. The line turns orange above the threshold and red while the syndrome
is Active. Gray indicates missing core data.
- Faint purple line: the HLLI percentile, shown separately because it is the slowest moving and
most historically studied component.
- Red triangle at the top of the pane: a syndrome trigger fired on that bar.
- Small maroon diamond: the Miekka condition alone was true on that bar without a full trigger,
useful for tracking the classical signal inside the broader framework.
- Maroon background: syndrome Active (inside a signal window with the McClellan Oscillator
negative). Orange background: window open but the oscillator is positive, so the syndrome is
temporarily deactivated and will reactivate if the oscillator turns negative before the window
expires.
- Status table (top right): overall state, each condition's current value and contribution, the
syndrome count, the oscillator value, bars remaining in the window, and the cluster count.
A single trigger is a caution flag. Two or more triggers within the cluster lookback have historically been the more serious configuration for divergence based breadth signals, and the script exposes a dedicated alert for that case. Four alerts are provided: trigger fired, syndrome turned Active, clustered trigger, and score crossing above its threshold.
█ SETTINGS
- Conditions Required (N of 4): syndrome count needed to trigger. Default 3.
- Condition Sync Span: bars within which a condition still counts toward the syndrome. Default 5.
- Signal Window: trading days a trigger keeps the window open. Default 30.
- Cluster Lookback: trailing trading days over which triggers are counted. Default 60.
- C1 Miekka NH/NL Threshold: minimum percent of advances plus declines for both new highs
and new lows. Default 2.8.
- C2 HLLI Warning Percentile: percentile of the smoothed HLLI that flags bifurcation. Default 90.
- C3 Participation Warning Percentile: participation percentile at or below which weakness is
flagged in an uptrend. Default 25.
- C4 Deterioration Score Threshold: score level that flags composite weakness. Default 75.
- Uptrend Lookback: bars over which the trend reference must have risen. Default 50.
- HLLI EMA Length: smoothing applied to the raw HLLI ratio. Default 50.
- Percentile Rank Lookback: window for all percentile ranks. Default 252.
- Score weights for the bifurcation, participation and leadership components. Default 33.3 each.
- MCO Fast EMA and Slow EMA: McClellan Oscillator periods. Defaults 19 and 39.
- Data Symbols: all seven feeds are exposed as string inputs and can be substituted.
- Show Status Table: toggles the table. Default on.
█ WHAT MAKES IT ORIGINAL
The individual components are public domain methods. What this script does differently is the combination architecture. First, every component is percentile ranked against its own trailing distribution before use, so the warning levels adapt to the prevailing breadth regime instead of relying on fixed absolute thresholds calibrated to a decades old NYSE universe. Second, the conditions are fused through an N of M syndrome count with a synchronization span, not a same bar AND, which acknowledges that breadth deterioration components rarely align to the exact day. Third, the trigger inherits the two phase Miekka mechanism but generalizes it: the syndrome, not a single divergence, opens the window, and the McClellan Oscillator gates activation inside it. Fourth, trigger clustering is quantified directly on the chart rather than left to visual inspection. This conjunction of adaptive normalization, tolerant multi condition assembly, windowed gating and cluster counting does not correspond to any single published method and is the substance of the script.
█ NOTES / LIMITATIONS
- The breadth feeds have limited historical depth. No signals can exist before the feeds begin,
and because every percentile rank requires the full normalization lookback (default 252 bars),
the first year of available feed history produces unreliable ranks and should be disregarded.
- The logic is designed for daily resolution. On other timeframes the external series return
whatever the feeds report at that resolution, and the day denominated windows lose their
intended meaning.
- All values on the developing realtime bar update until the bar closes. Signals should be
evaluated on closed bars. The script uses same timeframe requests with lookahead off and
does not reference future data.
- If neither participation symbol resolves, condition C3 can never contribute. With the default
requirement of 3 of 4, all three remaining conditions must then assemble, which makes
triggers strictly rarer. The table marks participation as N/A in that state.
- Data is pulled from fixed external symbols regardless of the chart symbol. The chart symbol
only determines the bar grid, so the indicator belongs on a US equity index chart at 1D.
- Breadth divergence signals of this family have a documented false positive history. This tool
flags conditions that have accompanied past tops. It is a risk assessment input, not a
standalone trading signal, and no claim is made about future results. Indicatore

Composite Valuation Standard Score█ OVERVIEW
Composite Valuation Standard Score (CVSS) plots a single 0 to 100 line that measures how expensive the broad US equity market is against its own entire recorded history, by combining up to six valuation ratios through point-in-time statistics. The thesis: one valuation metric can mislead in isolation, but the average anchored z-score of several independent lenses (earnings, cyclically adjusted earnings, book value, sales, output, replacement cost) gives a robust reading of how uniformly stretched or depressed valuations are, without using any future data at any bar.
█ HISTORY / BACKGROUND
Averaging the historical percentile of many valuation ratios into one composite is a long-standing practice in institutional market research. The individual components carry their own lineage: the cyclically adjusted price to earnings ratio was developed by Robert Shiller, the market capitalization to GDP ratio is widely associated with Warren Buffett, and the ratio of corporate equity value to corporate net worth descends from James Tobin's Q. The specific construction used here, an expanding winsorized z-score per component with a minimum-history admission gate and a composite-level percentile mapping, is a novel method built for this script. Its conceptual basis is that every observation should be judged only against the history that existed when it printed, and that a metric making new all-time highs should keep conveying magnitude instead of freezing at the top of a percentile scale.
█ HOW IT WORKS
All series are sampled once per calendar month through request.security at the 1M timeframe with lookahead off. Two of the six components are ratios computed from a numerator and denominator symbol: Market Cap / GDP (a total market index divided by nominal GDP) and the Q Ratio proxy (nonfinancial corporate equities at market value divided by nonfinancial corporate net worth). Because every series is immediately transformed to ranks and z-scores, absolute units and level calibration are irrelevant; only the shape of each series matters.
The algorithm, step by step:
1. On each new monthly bar, each enabled component's value is inserted into that component's
sorted history array. The arrays only ever grow; nothing is discarded.
2. A component becomes "live" once its array holds at least the minimum-history gate
(default 120 monthly observations). Before that it accumulates data but does not
contribute, which prevents thin early samples from producing meaningless statistics.
3. Each live component's current value is converted to an anchored z-score against the
expanding mean and standard deviation of its own array, then winsorized by clamping
to plus or minus 3 (adjustable).
4. The composite z is the equal-weight average of all live winsorized z-scores, computed
whenever at least the minimum number of components (default 2) is live.
5. The composite z is itself inserted into an expanding array and converted to its own
expanding percentile rank. That rank is the 0 to 100 headline line.
6. Separately, each live component's expanding percentile rank is compared with the
extreme threshold (default 90). The share of live components above the threshold
is plotted as the extremes-breadth columns.
An optional Excess CAPE Yield series (100 divided by CAPE, minus the 10-year Treasury yield) can be plotted and is always available in the table when enabled.
█ HOW TO USE
Apply the script on a Monthly chart of a symbol with deep monthly history. The chart symbol only supplies the time axis; the valuation data comes from the configured feeds. Charting the trailing P/E series itself, or a long-history index, exposes the full record back to the late 19th century. On a short-history chart symbol the statistics rank against a short window and the reading is not comparable.
Reading the pane is simple:
• The teal line is the market's expensiveness rank from 0 to 100. A reading of 96 means
the current composite valuation is richer than 96 percent of everything that came
before it. A reading of 5 means cheaper than 95 percent of prior history.
• Above the dotted 90 line with a red background: valuations are in their most expensive
historical decile. Below the dotted 10 line with a green background: cheapest decile.
• The orange columns show agreement. At 100, every live metric is simultaneously in its
own extreme zone; at 0, none is. High teal with low orange means the composite is
stretched but the stretch is concentrated in few metrics.
• The table in the top right shows each component's status (off, gated with progress,
or live), its current percentile, and its z-score, plus the composite row and the
Excess CAPE Yield row.
This is a slow macro positioning gauge, not a timing signal. Elevated readings can persist for years. Its practical use is context: sizing long-term risk, framing regime, and flagging when many independent valuation lenses agree at an extreme.
█ SETTINGS
• Components group: six on/off toggles, each with editable symbol fields. Trailing P/E
(default on), Shiller CAPE (default on), Price / Book (default on), Price / Sales
(default on), Market Cap / GDP with numerator and denominator symbols (default on),
Q Ratio proxy with numerator and denominator symbols (default on).
• Minimum-history gate: monthly observations a component needs before it contributes.
Default 120.
• Winsorize z at +/-: clamp magnitude for component z-scores. Default 3.
• Minimum live components: fewest live components required for the composite to plot.
Default 2.
• Extreme threshold (percentile): level defining the expensive zone for the background,
and the per-component extreme used by the breadth columns. Default 90.
• Cheap threshold (percentile): level defining the cheap zone for the background.
Default 10.
• Plot Excess CAPE Yield: adds the ECY series in percent to the pane and status line.
Default off. Its 10-year yield symbol is editable.
• Show component table: toggles the status table. Default on.
█ WHAT MAKES IT ORIGINAL
Published valuation scripts overwhelmingly track a single ratio, and existing multi-series composites in other domains rank each input over a fixed rolling window or against full-sample statistics. This script differs in four specific, verifiable ways. First, every statistic is point-in-time: each bar is ranked and scored only against observations that existed at that bar, so no early reading benefits from data that had not yet occurred. Second, the primary transform is a winsorized anchored z-score rather than a percentile, so a component that breaks above all prior history continues to register increasing magnitude up to the clamp instead of pinning at 100 and going silent. Third, a minimum-history admission gate handles the unequal start dates of the underlying feeds explicitly: short-history components accumulate until they are statistically meaningful, and the effective composition of the composite changes transparently over time, disclosed live in the table. Fourth, the extremes-breadth columns quantify cross-metric agreement, separating a composite driven by one distorted ratio from one where independent valuation lenses are stretched simultaneously.
█ NOTES / LIMITATIONS
• Sample depth is bounded by the chart symbol's bar history, because expanding statistics
can only accumulate on bars that exist on the chart. Use a deep-history monthly chart.
• The effective component set varies by era. Only the two earnings-based series reach the
19th century; book value and sales feeds begin near 2000, and the market cap and Q feeds
clear the gate later still. Early readings are a two-component composite. The table
always shows which components are live.
• Components whose feeds return no data stay gated and are excluded; the composite
requires the configured minimum of live components or it plots na.
• The value on the developing monthly bar updates until that bar closes. On timeframes
below monthly the current month's reading evolves intraperiod. No lookahead is used
and completed bars do not repaint from the script's side.
• The underlying economic feeds are revised at the source. National accounts and flow of
funds series can be restated historically, which changes past values of the affected
components when the data provider updates them.
• Quarterly feeds repeat their value across the months of a quarter, which mildly smooths
the expanding distributions.
• This indicator describes valuation rank relative to history. It makes no claim about
future returns or the timing of any reversal. Indicatore

Index Peak Dispersion█ OVERVIEW
Index Peak Dispersion plots, in a separate pane, two normalized series computed across a configurable universe of up to twelve equity indexes: the calendar-day dispersion of their all-time-high dates, expressed as a percent of a topping window, and the share of indexes that printed a fresh all-time high within a short recent window. The thesis is that healthy advances register all-time highs across indexes nearly simultaneously, while major distributive tops fragment, spreading index peak dates across weeks or months.
█ HISTORY / BACKGROUND
The concept descends from the non-confirmation principle of Dow Theory as developed by Charles Dow, William Hamilton and Robert Rhea, in which a new high in one average unaccompanied by a new high in another warns that the trend is losing sponsorship. Classic non-confirmation is measured in the price domain: one index fails to exceed its prior peak while another does.
Market historians and technicians, including Robert Prechter, have documented a related phenomenon in the time domain: at major tops, the final all-time highs of the major indexes scatter across the calendar rather than clustering. At the 2000 top, the Dow Industrials peaked in January, the S&P 500 and NASDAQ Composite in March, and the NYSE Composite in September. At the 2007 top, the Dow Jones Composite peaked in July while the Dow Industrials and S&P 500 peaked in October. This script converts that qualitative observation into a mechanical, reproducible statistic.
█ HOW IT WORKS
The script performs the following steps on each bar:
• For each of up to twelve enabled symbols, one same-timeframe request.security() call evaluates a function inside the requested symbol's context. The function maintains a running maximum of closing prices over the symbol's loaded history and records the timestamp of the bar on which that maximum was last exceeded. This running maximum is point-in-time by construction: no future data enters the calculation, and lookahead is off.
• On the chart symbol, each recorded timestamp is converted to an age in calendar days: current bar time minus the all-time-high time, divided by the number of milliseconds in a day.
• Each enabled index with data is classified. An age at or below the fresh window makes it Fresh. An age at or below the topping window makes it part of the in-window set. An age beyond the topping window makes it Stale.
• When the in-window set contains at least the minimum required count of indexes, the dispersion span equals the maximum in-window age minus the minimum in-window age, in calendar days. The plotted dispersion value is that span divided by the topping window length, times 100. When the in-window count is below the minimum, the dispersion plot returns na.
• The participation value equals the count of Fresh indexes divided by the count of enabled indexes with data, times 100, plotted as columns.
• The fractured top condition is true when the dispersion value is at or above the warning threshold while at least one index is Fresh. The pane background is shaded on those bars, and an alert fires on the first bar of each new occurrence. A second alert fires when every enabled index with data is simultaneously Fresh, which marks a synchronized advance, the opposite condition.
• On the last bar, an optional table lists each index with its all-time-high date, age in days and classification, plus summary counts and the raw span in days.
█ HOW TO USE
The script is designed for the 1D timeframe. The running all-time high is intended to operate on daily closes, and both windows are specified in calendar days, so daily resolution matches the granularity of the logic.
In plain terms, the blue columns answer one question: how many of the enabled indexes hit a record high this week? The red line answers another: how spread out in time are everyone's record highs? In a strong market, the indexes peak together, so the columns are tall and the line stays low. At major tops, the market tends to fall apart in slow motion: one index peaks, then months later another, and by the time the last index prints its final record, several others stopped making records long ago. Each new high is carried by fewer indexes, so the columns thin out while the line climbs. The shaded background marks the combination of both: the market is still printing record highs, but the set of indexes confirming them has been shrinking for months. That is the structure documented at the 2000 and 2007 tops. The same combination also appears during rotation phases that resolve higher, so treat it as a statement that conditions resemble past major tops, not as an instruction to act.
Read the two plotted series together. Low dispersion with high participation describes a synchronized advance in which the enabled indexes are registering highs together. Rising dispersion while some indexes continue to print fresh highs describes fragmentation: leadership is narrowing and earlier leaders have stopped confirming. The shaded background marks bars on which the dispersion value is at or above the dashed threshold line while at least one fresh high exists, the specific combination in which fragmentation is present at a live high rather than in an established downtrend.
The table gives the attribution behind the numbers: which indexes are Fresh, which remain inside the topping window, and which have gone Stale, along with each all-time-high date. Stale entries are non-confirmations older than the topping window and are deliberately excluded from the span so that a single long-dormant index does not saturate the statistic.
The condition is a warning context, not a timing trigger. It identifies an environment consistent with historical distributive tops. It does not predict the date or the existence of a decline.
█ SETTINGS
• Index universe, twelve slots, each with an enable checkbox and a symbol field. Defaults: DJI, DJT, DJU, DJA, SPX, NDX, IXIC, NYA, RUT, SOX, MID, SPXEW. All twelve are enabled by default. Any slot can be repointed to another symbol or disabled.
• Fresh high window, calendar days. Default 7. An index whose all-time high printed within this many days counts as Fresh.
• Topping window, calendar days. Default 378. An index whose all-time high printed within this many days participates in the dispersion span. Older highs are classified Stale.
• Dispersion warning threshold, percent of topping window. Default 25. The dashed reference line and the threshold for the fractured top condition.
• Minimum in-window index count for a valid span. Default 4. Below this count the dispersion plot returns na, which prevents a span computed from too few indexes.
• Show status table. Default on.
• Table position. Default Top right.
█ WHAT MAKES IT ORIGINAL
Breadth and non-confirmation tools on this platform generally measure the price domain: divergences between an index and an internal line, counts of components above a moving average, or new-high and new-low tallies within one exchange universe. This script instead measures the time domain across whole indexes. It reduces the peak-date scatter of a user-defined index universe to a single bounded statistic, the in-window span of all-time-high ages, and pairs it with a participation series so that fragmentation is only flagged while a high is live. The classification into Fresh, in-window and Stale, with the Stale exclusion and the minimum-count validity gate, is what allows the scatter of a historical topping process to be plotted as one continuous, comparable series across eras.
█ NOTES / LIMITATIONS
• The running all-time high is computed only over the bars loaded for each requested symbol. Symbols with short available history, and the early portion of any chart, understate the true age of the all-time high. Treat the plot as reliable only after all enabled symbols have substantial loaded history.
• The logic is designed for the 1D timeframe. On intraday charts the running maximum operates on intraday closes and the calendar-day windows lose their intended granularity. On weekly or monthly charts a fresh window shorter than one bar cannot register.
• All request.security() calls run on the chart timeframe with lookahead off. Values on the developing bar update until the bar closes and do not repaint afterward.
• The script issues twelve security calls. A symbol slot that fails to resolve or returns no data is excluded from every count and appears in the table as No data.
• Ages and spans are measured in calendar days, not trading days, so weekends and holidays are included in the counts.
• The warning threshold is expressed as a percent of the topping window. Changing the topping window changes the day-equivalent of the same percent threshold.
• The dispersion plot returns na whenever fewer than the minimum required indexes have an all-time high inside the topping window.
• The status table renders on the last bar only. Indicatore

Margin Debt Expansion vs Contraction Indicator█ OVERVIEW
This indicator plots the year over year percentage change in a quarterly measure of U.S. margin debt in a separate pane, classifies that rate of change into an expansion regime and a contraction regime, and marks the quarters in which the rate of change turns while inside either regime. The thesis is that the second derivative of speculative leverage, rather than its absolute level, is what distinguishes one phase of a market cycle from another.
█ HISTORY / BACKGROUND
Aggregate customer margin debt has been reported for U.S. brokerage accounts for many decades. The NYSE compiled and published the series historically. FINRA later assumed responsibility for aggregating and distributing margin statistics from its member firms, on a monthly basis. The Federal Reserve publishes a closely related quarterly aggregate as part of the Z.1 Financial Accounts under the heading "Security Brokers and Dealers; Receivables Due from Customers (Margin Loans and Other Receivables); Asset, Level."
The observation that leverage growth accelerates into cycle peaks and contracts violently during forced deleveraging is long standing and not proprietary to any single author. The absolute level of margin debt trends upward with nominal market capitalisation and with the size of the brokerage system, which makes level comparisons across decades of limited use. Expressing the series as a year over year rate of change removes that trend and puts every cycle on a comparable scale. This script implements that transform and adds a regime classification and turn detection layer on top of it.
█ HOW IT WORKS
• The script issues two requests against FRED:BOGZ1FL663067003Q at the 3M resolution, both with gaps off and lookahead off. The first returns the current quarterly value. The second returns the same series offset by four quarters.
• The year over year rate of change is computed as (current minus prior year) divided by prior year, multiplied by 100. The calculation is skipped and the plot returns na when either request is na or when the prior year value is zero.
• Because the source is quarterly and the chart is not, the resulting series is a step function. It holds a constant value across every chart bar inside a quarter and changes only on the first chart bar after a new quarterly value becomes available.
• Two regimes are derived from the rate of change. The expansion regime is active when the reading is at or above the Red Zone Lower input. The contraction regime is active when the reading is at or below the Green Zone Upper input. The Red Zone Upper and Green Zone Lower inputs define the outer edge of the shaded bands and do not participate in regime classification, so a reading that jumps past the outer edge still registers.
• A threshold cross is flagged on the first bar on which a regime becomes active after not being active on the prior bar. A triangle marker prints at the value of the line.
• A rollover is flagged when the regime is active and the current reading is below the prior bar reading while the prior bar reading was at or above the reading before it. On a step function this resolves to the first chart bar of any quarter whose value moved against the direction of the regime. The contraction rollover is the mirror condition. A circle marker prints at the value of the line.
• The line is coloured red while the expansion regime is active, green while the contraction regime is active, and neutral otherwise.
█ HOW TO USE
Use this on a daily or weekly chart. The underlying data is quarterly, so a daily chart gives enough resolution to see each quarterly step clearly while still covering a multi decade span on one screen. Intraday timeframes add no information because the value cannot change intraday. Timeframes at or above 3M collapse the step structure and are not useful.
The chart symbol does not enter the calculation. The output is identical on every symbol. Load it beneath a broad U.S. equity index if you want visual correspondence between the leverage cycle and the price cycle, but understand that the indicator is not reading the chart.
Reading the output:
• The line is the year over year rate of change of margin debt in percent. Zero means leverage is flat against the same quarter one year earlier.
• The red band spans the expansion thresholds. A reading inside or above it means leverage is growing at a pace that has historically clustered in the later stages of an advance.
• The green band spans the contraction thresholds. A reading inside or below it means leverage is shrinking at a pace that has historically clustered around and after deep declines.
• Triangle markers mark the quarter in which a regime first became active.
• Circle markers mark a quarter in which the rate of change moved against the direction of the active regime. These can print more than once inside a single regime episode, since any adverse quarter qualifies. Treat a run of consecutive circles as more informative than a single one.
The measure is coincident to lagging with respect to price. It describes the state of leverage rather than anticipating price. Read it alongside independent inputs such as breadth, credit spreads and the yield curve.
█ SETTINGS
Zone Thresholds
• Red Zone Upper (%) , default 55. Outer edge of the expansion band. Shading only.
• Red Zone Lower (%) , default 40. Expansion threshold. Regime classification, marker logic and line colour key off this level.
• Green Zone Upper (%) , default -20. Contraction threshold. Regime classification, marker logic and line colour key off this level.
• Green Zone Lower (%) , default -40. Outer edge of the contraction band. Shading only.
Display
• Show Zone Markers , default on. Toggles the triangle and circle markers. The line, bands and alert conditions are unaffected by this input.
█ WHAT MAKES IT ORIGINAL
Plotting margin debt, or its rate of change, is not itself novel. What this script does differently is separate three things that are usually collapsed into one threshold test.
First, regime membership is defined by a single inner threshold per side rather than by band membership, so the classification does not fail when the series gaps past the outer edge of the shaded band. The band remains a visual reference for how far into the regime the reading sits.
Second, turn detection is evaluated only conditionally, inside an active regime. An adverse quarter in the middle of the range carries no signal and produces no marker. The same adverse quarter above the expansion threshold is the event the script is built to isolate.
Third, the turn test is written for a step function rather than a continuous series. It fires on the first chart bar carrying a new quarterly value that moved against the regime, which is the only bar on which new information actually arrived, rather than repeating across the plateau.
The combination of a one sided regime gate with a step aware turn test applied to a quarterly macro leverage series is what distinguishes this from a threshold crossing plot of the same data.
█ NOTES / LIMITATIONS
• Quarterly source. FRED:BOGZ1FL663067003Q is published quarterly. FINRA's monthly margin debt series is not available natively on this platform. Every regime change and every marker resolves to quarterly granularity. A turn that a monthly series would show in month one will not appear here until the quarter closes.
• Publication lag. The Z.1 Financial Accounts are released roughly ten weeks after the quarter they cover. The script positions each quarterly value at the close of the quarter it describes, which is earlier than the date on which that value became publicly known. Historical marker placement is therefore ahead of real world availability by approximately one quarter. This is inherent to charting a macro release against calendar time and cannot be corrected inside the script.
• Revisions. The Z.1 series is revised. Historical values, and therefore historical markers, can change when the source data is revised.
• No lookahead. Both requests use barmerge.lookahead_off, so a quarterly value is not shown on chart bars that precede the close of its own quarter. The most recent quarter updates as new data arrives, in the normal way for any real time series.
• History dependence. The rate of change requires five quarterly observations before it can be computed, and the plot returns na until they exist. On charts whose own history is shorter than the available FRED history, the line only covers the bars the chart has. Applying the script to a recently listed symbol will truncate the visible record accordingly.
• Symbol independence. The output does not depend on the chart symbol and will be identical on any instrument. It is a U.S. aggregate leverage measure and carries no meaning with respect to the price series it is displayed against.
• Timeframe sensitivity. Intraday resolutions cannot resolve the source data and produce a flat line across long stretches. Resolutions at or above 3M compress the step structure to the point of illegibility. Daily or weekly is the intended range.
• Threshold provenance. The default threshold values are round numbers chosen to sit near the extremes observed in the available history. The number of complete leverage cycles contained in the series is small, so the thresholds should be treated as adjustable reference levels rather than as fixed boundaries with statistical support.
• Repeated rollover markers. The rollover test flags any adverse quarter inside an active regime, not only the first or the extreme one. Multiple circles inside a single regime episode are expected behaviour, not a defect. Indicatore

Indicatore

Indicatore

Indicatore

Liquidity Sweep & Reversal Map//@version=6
indicator("Liquidity Sweep & Reversal Map", "LSRM", overlay = true, max_labels_count = 300, max_lines_count = 60)
//------------------------------------------------------------------------------
// PRESET INPUTS
//------------------------------------------------------------------------------
preset = input.string("NIFTY", "Instrument Preset", options = )
sweepBuffer = input.float(1.0, "Sweep Buffer (points)", minval = 0)
minBodyPerc = input.float(50.0, "Min Body % for Reversal Candle", minval = 0, maxval = 100)
useVolFilter = input.bool(true, "Use Volume Spike Filter")
volLen = input.int(20, "Volume Lookback", minval = 1)
volMult = input.float(1.5, "Volume Spike Multiplier", minval = 1.0)
showTodayHighLow = input.bool(true, "Show Today's High/Low + Labels")
showPrevHighLow = input.bool(true, "Show Previous Day High/Low + Labels")
showLabels = input.bool(true, "Show BS/SS Labels")
showZones = input.bool(true, "Show Sweep Zones")
showLevelLines = input.bool(true, "Show All Level Lines + Labels")
//------------------------------------------------------------------------------
// APPLY PRESETS (override at start)
//------------------------------------------------------------------------------
if barstate.isfirst
if preset == "NIFTY"
sweepBuffer := 1.0
minBodyPerc := 60.0
volLen := 20
volMult := 1.5
if preset == "BANKNIFTY"
sweepBuffer := 3.0
minBodyPerc := 50.0
volLen := 15
volMult := 1.8
//------------------------------------------------------------------------------
// DAILY + PREVIOUS DAY LEVELS
//------------------------------------------------------------------------------
var float dayHigh = na
var float dayLow = na
var float prevDayHigh = na
var float prevDayLow = na
newDay = ta.change(time("D")) != 0
if newDay
prevDayHigh := dayHigh
prevDayLow := dayLow
dayHigh := high
dayLow := low
else
dayHigh := na(dayHigh) ? high : math.max(dayHigh, high)
dayLow := na(dayLow) ? low : math.min(dayLow, low)
//------------------------------------------------------------------------------
// VOLUME FILTER
//------------------------------------------------------------------------------
avgVol = ta.sma(volume, volLen)
volSpike = useVolFilter ? (volume > avgVol * volMult) : true
//------------------------------------------------------------------------------
// STRONG REVERSAL CANDLES
//------------------------------------------------------------------------------
f_strongBull(level) =>
rng = high - low
body = math.abs(close - open)
bp = rng > 0 ? body / rng * 100 : 0
close > open and close > level and bp >= minBodyPerc
f_strongBear(level) =>
rng = high - low
body = math.abs(close - open)
bp = rng > 0 ? body / rng * 100 : 0
close < open and close < level and bp >= minBodyPerc
//------------------------------------------------------------------------------
// SWEEP DETECTION (previous candle sweeps, current confirms)
//------------------------------------------------------------------------------
f_processLowSweep(level, enabled, code) =>
bool out = false
string tag = ""
float price = na
float wick = na
if enabled and not na(level)
sweepCond = low < level - sweepBuffer and close >= level
if sweepCond and f_strongBull(level) and volSpike
out := true
tag := code
price := level
wick := low
f_processHighSweep(level, enabled, code) =>
bool out = false
string tag = ""
float price = na
float wick = na
if enabled and not na(level)
sweepCond = high > level + sweepBuffer and close <= level
if sweepCond and f_strongBear(level) and volSpike
out := true
tag := code
price := level
wick := high
//------------------------------------------------------------------------------
// FINAL SIGNALS (RESET EVERY BAR)
//------------------------------------------------------------------------------
bool buySignal = false
bool sellSignal = false
string sigLevel = ""
float sigPrice = na
float wickLow = na
float wickHigh = na
// Priority TL → TH → PDL → PDH
= f_processLowSweep(dayLow, showTodayHighLow, "TL")
if b1 and not(buySignal or sellSignal)
buySignal := true
sigLevel := n1
sigPrice := p1
wickLow := l1
= f_processHighSweep(dayHigh, showTodayHighLow, "TH")
if s1 and not(buySignal or sellSignal)
sellSignal := true
sigLevel := n2
sigPrice := p2
wickHigh := h1
= f_processLowSweep(prevDayLow, showPrevHighLow, "PDL")
if b2 and not(buySignal or sellSignal)
buySignal := true
sigLevel := n3
sigPrice := p3
wickLow := l2
= f_processHighSweep(prevDayHigh, showPrevHighLow, "PDH")
if s2 and not(buySignal or sellSignal)
sellSignal := true
sigLevel := n4
sigPrice := p4
wickHigh := h2
//------------------------------------------------------------------------------
// SAFE LABEL CREATOR (Pine v6 compliant)
//------------------------------------------------------------------------------
f_makeLabel(existing, x, y, txt) =>
if na(existing)
label.new(
x, y, txt,
style = label.style_label_center,
textcolor = color.white,
color = color.new(color.black, 40),
size = size.small
)
else
label.set_x(existing, x)
label.set_y(existing, y)
label.set_text(existing, txt)
existing
//------------------------------------------------------------------------------
// LEVEL LINES + LABELS (SYNC-SAFE VERSION)
//------------------------------------------------------------------------------
var line lTH = na
var line lTL = na
var line lPDH = na
var line lPDL = na
var label labTH = na
var label labTL = na
var label labPDH = na
var label labPDL = na
f_updLine(ln, y) =>
if not na(ln)
line.set_xy1(ln, bar_index - 50, y)
line.set_xy2(ln, bar_index, y)
line.set_extend(ln, extend.right)
if showLevelLines
//------------------------- TH
if showTodayHighLow and not na(dayHigh)
if na(lTH)
lTH := line.new(bar_index, dayHigh, bar_index+1, dayHigh,
extend=extend.right, color=color.rgb(255,180,80), width=4, style=line.style_dotted)
f_updLine(lTH, dayHigh)
labTH := f_makeLabel(labTH, bar_index, dayHigh, "TH")
else
if not na(lTH)
line.delete(lTH)
lTH := na
if not na(labTH)
label.delete(labTH)
labTH := na
//------------------------- TL
if showTodayHighLow and not na(dayLow)
if na(lTL)
lTL := line.new(bar_index, dayLow, bar_index+1, dayLow,
extend=extend.right, color=color.rgb(80,150,255), width=4, style=line.style_dotted)
f_updLine(lTL, dayLow)
labTL := f_makeLabel(labTL, bar_index, dayLow, "TL")
else
if not na(lTL)
line.delete(lTL)
lTL := na
if not na(labTL)
label.delete(labTL)
labTL := na
//------------------------- PDH
if showPrevHighLow and not na(prevDayHigh)
if na(lPDH)
lPDH := line.new(bar_index, prevDayHigh, bar_index+1, prevDayHigh,
extend=extend.right, color=color.rgb(255,210,60), width=4, style=line.style_solid)
f_updLine(lPDH, prevDayHigh)
labPDH := f_makeLabel(labPDH, bar_index, prevDayHigh, "PDH")
else
if not na(lPDH)
line.delete(lPDH)
lPDH := na
if not na(labPDH)
label.delete(labPDH)
labPDH := na
//------------------------- PDL
if showPrevHighLow and not na(prevDayLow)
if na(lPDL)
lPDL := line.new(bar_index, prevDayLow, bar_index+1, prevDayLow,
extend=extend.right, color=color.rgb(60,220,255), width=4, style=line.style_solid)
f_updLine(lPDL, prevDayLow)
labPDL := f_makeLabel(labPDL, bar_index, prevDayLow, "PDL")
else
if not na(lPDL)
line.delete(lPDL)
lPDL := na
if not na(labPDL)
label.delete(labPDL)
labPDL := na
//------------------------------------------------------------------------------
// BS / SS LABELS (ONLY ON TRUE SWEEP)
//------------------------------------------------------------------------------
if showLabels and barstate.isconfirmed
if buySignal
label.new(
bar_index, low, "BS",
style=label.style_label_up,
color=color.new(color.rgb(0,180,110), 0),
textcolor=color.white,
size=size.tiny
)
if sellSignal
label.new(
bar_index, high, "SS",
style=label.style_label_down,
color=color.new(color.rgb(210,40,40), 0),
textcolor=color.white,
size=size.tiny
)
//------------------------------------------------------------------------------
// SWEEP ZONES
//------------------------------------------------------------------------------
var box lastZone = na
if showZones and barstate.isconfirmed
if not na(lastZone)
box.delete(lastZone)
if buySignal and not na(wickLow)
lastZone := box.new(
bar_index-1, sigPrice,
bar_index, wickLow,
bgcolor=color.new(color.rgb(0,200,120), 82),
border_color=color.rgb(0,180,110),
border_width=1)
if sellSignal and not na(wickHigh)
lastZone := box.new(
bar_index-1, wickHigh,
bar_index, sigPrice,
bgcolor=color.new(color.rgb(230,80,80), 82),
border_color=color.rgb(210,40,40),
border_width=1)
if not showZones and not na(lastZone)
box.delete(lastZone)
lastZone := na
//------------------------------------------------------------------------------
// ALERTS
//------------------------------------------------------------------------------
alertcondition(buySignal and barstate.isconfirmed, "Buy Sweep Reversal", "Buy sweep reversal confirmed.")
alertcondition(sellSignal and barstate.isconfirmed, "Sell Sweep Reversal", "Sell sweep reversal confirmed.") Indicatore

Indicatore

Indicatore

Indicatore

David Ryan Setup Screener-SunilHere's what the script does, section by section:
Setup
It runs on whatever chart is open, plotting directly on the price chart (not a separate pane).
Inputs you can tweak
A settings panel lets you adjust: which index to compare against for relative strength (default Nifty), how close to the 52-week high counts as "near," how many weeks define a valid base, how tight that base must be, how big a volume spike counts as a spike, and the lookback window for RS new-highs.
The six checks it runs on every bar
Uptrend (#2) — price above its 50-day average, which is above the 150-day, which is above the 200-day, and the 200-day itself is rising. That's the classic "stacked moving averages" trend filter.
Near 52-week high (#3) — is price within your chosen % (default 3%) of its highest point in the last year.
Proper base (#5) — over the last N weeks (default 6), how tight was the trading range? If price stayed within 15% high-to-low, it counts as a real base rather than a choppy mess.
Weekly chart clean (#6) — pulls the weekly timeframe's 10-week moving average and checks if price is above it, regardless of what timeframe you're viewing.
RS strength (#7) — divides the stock's price by the index price to build a relative-strength line, then checks if that ratio is trending up or making new highs — meaning the stock is outperforming the market, not just going up with it.
Volume spike on an up day (#8) — today's a green candle AND volume is at least 1.5x the 50-day average — a sign of institutional buying.
What you see on the chart
Orange line = 50-day MA, red line = 10-week MA (your reference stop-loss level), gray dotted line = 52-week high
Green background tint when 5 or 6 of the 6 checks pass; yellow tint for 3–4
Green triangle below the bar when it's a strong setup (score ≥5) breaking to new highs
Table in the top-right corner showing a live ✓/✗ for each of the 6 criteria plus the total score, so you can read the setup at a glance without hovering over lines
The alert
You can set a TradingView alert on this script so it notifies you (not stuck watching the chart) the moment a stock crosses 5+/6 with a fresh breakout. Indicatore

TuraTuruOpitlo-CISD# TuraTuruOpitlo-CISD
A multi-layered CISD-based trading indicator designed to help traders identify high-quality market delivery changes, liquidity reactions, market structure shifts, and structured trade opportunities.
Built primarily for **US100, US500, US30 and XAUUSD on the 5-minute timeframe**, TuraTuruOpitlo-CISD combines CISD detection with confluence filters, FVG confirmation, market structure, Supply & Demand, Killzones, and a dedicated risk engine for funded/prop-firm trading.
## Core Features
### CISD Signal Engine
Detects bullish and bearish **Change in State of Delivery (CISD)** based on displacement and configurable noise filtering.
Signals can be filtered using:
* Displacement strength
* Liquidity sweep
* Higher-timeframe bias
* Volume surge
* ADX trend filter
* Trading session filter
* Signal cooldown
Qualified signals receive a configurable **A / B / C quality grade** based on the available confluence score.
### FVG Full-Body Break Entry
One of the main features of this version.
When a qualified CISD creates a directional Fair Value Gap (FVG), the indicator can wait for a **full-body candle break through the FVG** before producing the FVG entry signal.
The setup includes:
* Directional FVG detection
* FVG zone visualization
* Full-body break confirmation
* Automatic SL calculation
* Configurable Risk : Reward
* Funded position sizing
The FVG setup can also be used in **FVG-Only Focus mode**, hiding standard CISD levels and allowing the funded risk engine to follow FVG entries.
### Real-Time CISD Preparation
Before a CISD is fully confirmed, the indicator can display a preparation setup showing:
* Potential Entry
* Potential SL
* Potential TP
* Real-time "CALON CISD" level
* Buy Stop / Sell Stop preparation
Potential setups automatically expire after the configured number of candles if they are not triggered.
### Market Structure
Includes a lightweight market structure mapper displaying:
* BOS — Break of Structure
* CHoCH — Change of Character
* MSS — Market Structure Shift
This helps provide additional structural context around CISD setups.
### Supply & Demand
Automatically maps Supply and Demand zones based on swing structure, with configurable zone visibility, transparency, maximum zones, and mitigation handling.
### Killzones
Built-in session boxes for:
* Asia
* London
* New York AM
* New York PM
Killzone timezone and session settings are configurable.
### Funded / Prop-Firm Risk Engine
The Funded Edition adds a dedicated risk-planning layer designed for traders who need more disciplined position sizing.
Features include:
* Account-size based position sizing
* Risk percentage per trade
* SL-distance based sizing
* Point-value calculation
* Spread-aware position sizing
* Daily risk-budget / trade allowance
* News / avoid windows
* ATR percentile volatility regime filter
* Optional Risk Engine HUD
* Alert when the daily risk budget is reached
The daily trade allowance is intended as a **risk-management and discipline tool**, not as a real-time account P&L tracker. The indicator cannot directly read your actual broker or prop-firm account balance/P&L.
## Recommended Use
The default configuration is optimized around:
**5-Minute | US100 | US500 | US30 | XAUUSD**
However, parameters such as noise filter, swing period, session, ADX threshold, FVG expiry, risk percentage, RR, and other filters can be customized to match different instruments and trading styles.
## Alerts
The indicator includes alerts for:
* Bullish / Bearish CISD
* Strong CISD with liquidity sweep
* Qualified Bull / Bear signals
* BOS / CHoCH structure breaks
* Buy Stop / Sell Stop preparation
* FVG Break Buy / Sell
* Daily funded risk budget reached
* News / avoid window activation
## Important Notes
This indicator is a **technical analysis and risk-planning tool**, not a guarantee of profitable trades.
Market conditions can change, and signals should be evaluated together with your own trading plan, execution rules, and risk management.
For serious validation, test the methodology using historical data and, where appropriate, a TradingView strategy implementation including realistic spread, commissions, and execution costs.
**Trade the setup. Respect the risk. Let the market confirm.**
### Credits & License
The core CISD methodology is credited to **Viprasol**.
This script includes additional components and integrations developed for the TuraTuru version, including the funded risk engine, FVG entry logic, preparation levels, market structure, Supply & Demand, and Killzones.
The script is subject to the **Mozilla Public License 2.0 (MPL 2.0)**.
Indicatore

RSI14 - EMA9 - WMA45RSI14 - EMA9 - WMA45
An RSI-based indicator combined with two smoothing moving averages (EMA and WMA) for clearer trend and momentum observation, plus two SMA lines plotted directly on the price chart.
Key Features:
📊 Multi-layer RSI
RSI (14) — the main line measuring price momentum
EMA (9) of RSI — fast smoothing, reacts early to momentum shifts
WMA (45) of RSI — slow smoothing, defines the underlying trend
🎨 5 fixed background zones based on the RSI scale
Overbought (80–100)
Bullish (60–80)
Neutral (40–60)
Bearish (20–40)
Oversold (0–20)
Each zone can be toggled on/off and recolored individually, making it easy to spot at a glance which zone the RSI currently sits in without manual calculation.
⚡ Overbought / Oversold highlight
Automatically highlights the background whenever RSI crosses above the Over Buy level or below the Over Sell level (default 80/20, fully configurable), helping to quickly spot potential reversal extremes.
📈 Bullish/Bearish reference bands
Two configurable horizontal levels (default 70/30) to help identify the transition zone between bullish and bearish momentum.
📉 Two SMA lines on the price chart
Adds two simple moving averages (default length 10 and 20) plotted directly on the price chart, helping confirm price trend alongside the RSI signals.
📋 Multi-Timeframe RSI table
Displays RSI values across multiple timeframes (1H, 4H, D, W) simultaneously, giving broader trend context before making a decision. Table position and size are customizable.
Suggested usage:
Watch for crossovers between RSI's EMA(9) and WMA(45) to catch early momentum shifts.
Combine the Overbought/Oversold background zones with the Over Buy/Over Sell highlight to time areas with higher reversal probability.
Use the Multi-Timeframe table to avoid trading against the higher timeframe trend.
⚠️ Disclaimer: This is a technical analysis tool, not investment advice. Traders should combine it with other factors before making trading decisions. Indicatore

RSI14 - EMA9 - WMA45RSI14 - EMA9 - WMA45
An RSI-based indicator combined with two smoothing moving averages (EMA and WMA) for clearer trend and momentum observation, plus two SMA lines plotted directly on the price chart.
Key Features:
📊 Multi-layer RSI
RSI (14) — the main line measuring price momentum
EMA (9) of RSI — fast smoothing, reacts early to momentum shifts
WMA (45) of RSI — slow smoothing, defines the underlying trend
🎨 5 fixed background zones based on the RSI scale
Overbought (80–100)
Bullish (60–80)
Neutral (40–60)
Bearish (20–40)
Oversold (0–20)
Each zone can be toggled on/off and recolored individually, making it easy to spot at a glance which zone the RSI currently sits in without manual calculation.
⚡ Overbought / Oversold highlight
Automatically highlights the background whenever RSI crosses above the Over Buy level or below the Over Sell level (default 80/20, fully configurable), helping to quickly spot potential reversal extremes.
📈 Bullish/Bearish reference bands
Two configurable horizontal levels (default 70/30) to help identify the transition zone between bullish and bearish momentum.
📉 Two SMA lines on the price chart
Adds two simple moving averages (default length 10 and 20) plotted directly on the price chart, helping confirm price trend alongside the RSI signals.
📋 Multi-Timeframe RSI table
Displays RSI values across multiple timeframes (1H, 4H, D, W) simultaneously, giving broader trend context before making a decision. Table position and size are customizable.
Suggested usage:
Watch for crossovers between RSI's EMA(9) and WMA(45) to catch early momentum shifts.
Combine the Overbought/Oversold background zones with the Over Buy/Over Sell highlight to time areas with higher reversal probability.
Use the Multi-Timeframe table to avoid trading against the higher timeframe trend.
⚠️ Disclaimer: This is a technical analysis tool, not investment advice. Traders should combine it with other factors before making trading decisions. Indicatore

Futia Deviation Bands█ OVERVIEW
Futia Deviation Bands (200D SMA / 48M SMA) plots, in a separate pane, the percentage deviation of price from two fixed-timeframe simple moving averages: the 200-day SMA and the 48-month SMA. Both series are computed from daily and monthly data regardless of the chart timeframe. The thesis is that extreme downside stretch from these two reference trends has historically marked two distinct classes of mean-reversion conditions in broad equity indexes: a short-horizon tactical condition and a rare long-horizon undervaluation condition.
█ HISTORY / BACKGROUND
The method derives from the contrarian trading framework described by Carl Futia in the book The Art of Contrarian Trading (2009). Futia proposed the 48-month simple moving average of a broad stock index as a rough proxy for long-term fair value, and used deviations from the 200-day moving average as a tactical gauge of bearish sentiment extremes. In his framework these price conditions are meant to be combined with a discretionary assessment of crowd psychology; this indicator implements only the mechanical price conditions.
The conceptual basis is mean reversion around trend. A close far below the one-year trend (200-day SMA) reflects a compressed, fear-driven market state that has tended to resolve over weeks to months. A close far below the four-year trend (48-month SMA) is a much rarer state, historically clustered into a small number of major bear market episodes, and reflects deep departure from long-run value rather than short-term sentiment.
█ HOW IT WORKS
The script performs the following computations on every chart bar:
It requests daily data for the chart symbol and computes 100 * (close / SMA(close, 200) - 1), the percentage deviation of the daily close from the 200-day SMA.
It requests monthly data for the chart symbol and computes 100 * (close / SMA(close, 48) - 1), the percentage deviation of the monthly close from the 48-month SMA.
When the confirmed-bars input is enabled, both requests return the value of the previously completed daily or monthly bar, using the standard non-repainting higher-timeframe pattern (offset by one bar with lookahead on). When disabled, the requests return the developing value of the current daily or monthly bar with lookahead off.
Condition 1 is true when the daily deviation is at or below the Condition 1 threshold (default -10 percent).
Condition 2 is true when the monthly deviation is at or below the Condition 2 threshold (default -20 percent).
The pane background is shaded aqua when only Condition 1 is active, orange when only Condition 2 is active, and red when both are active.
A small triangle marker labeled C1 or C2 is drawn at the bottom of the pane on the first bar where each condition becomes true after being false.
Three alert conditions are provided: Condition 1 onset, Condition 2 onset, and both conditions active.
█ HOW TO USE
The indicator loads in its own pane below the chart. The aqua line is the deviation from the 200-day SMA; the orange line is the deviation from the 48-month SMA. A dotted gray line marks zero deviation, and dashed horizontal lines mark the two thresholds.
Because both series are pinned to daily and monthly resolutions through higher-timeframe requests, the indicator can be applied to any chart timeframe and will display the same deviation values. On intraday charts each bar shows the most recent completed daily and monthly readings when the confirmed-bars input is on. A daily chart is the natural resolution for routine monitoring, since Condition 1 is defined on daily closes.
Interpretation follows the two-condition design. Condition 1 identifies short-horizon stretch below the one-year trend; in the historical record of the S&P 500 from 1950 to 2018 it occurred roughly 21 distinct times, and it says nothing about whether a bear market has ended. Deep bear markets have triggered it repeatedly on the way to lower lows. Condition 2 identifies deep departure from the four-year trend; in the same record it was active in only a few dozen monthly observations, clustered into a small number of major bear market episodes. The red combined state corresponds to the deepest of those episodes. The indicator is a conditioning and context tool, not a complete trading system, and its author intended such conditions to modulate exposure around a baseline allocation rather than to switch fully in and out of a market.
█ SETTINGS
Condition 1: % below 200-day SMA. The deviation threshold at or below which Condition 1 is active. Default -10.
Condition 2: % below 48-month SMA. The deviation threshold at or below which Condition 2 is active. Default -20.
Use confirmed HTF bars (no repaint). When on, both deviations update only when the underlying daily or monthly bar closes, so signals do not change intrabar. When off, the current developing daily and monthly values are used and can change until those bars close. Default on.
█ WHAT MAKES IT ORIGINAL
The script combines two deviation measures from different fixed timeframes in a single pane and keeps both pinned to their native resolutions independently of the chart timeframe. Most deviation or distance-from-average tools compute on the chart resolution, which changes the meaning of the reading whenever the user changes timeframes. Here the 200-day and 48-month references are structural: they always mean one year of trading days and four years of months. The pairing is also specific: one fast sentiment-stretch measure and one slow value-stretch measure, with a distinct visual state for their intersection, which historically has been the signature of the deepest bear market conditions. The threshold logic, the non-repainting toggle, and the onset markers implement the mechanical portion of a published discretionary framework in reproducible form.
█ NOTES / LIMITATIONS
The 48-month SMA requires at least 48 completed monthly bars, and the 200-day SMA requires at least 200 completed daily bars. On symbols with shorter history the corresponding line returns na and does not render.
The thresholds were studied on a broad large-cap equity index (S&P 500 daily history, 1950 to 2018). On individual stocks, volatile sector indexes, or other asset classes, deviations of these magnitudes occur at very different frequencies and the default thresholds are not calibrated for them.
With the confirmed-bars input off, the current daily and monthly deviation values update intrabar and a condition can appear and disappear before the underlying bar closes. With it on, values lag by one completed daily or monthly bar.
Higher-timeframe values are obtained with request.security. On chart timeframes above daily or monthly, each chart bar displays the last completed reading available within that bar.
Condition 2 changes state only on monthly closes, so it is inherently slow and infrequent by construction.
The indicator generates context conditions, not trade signals with defined exits, position sizing, or risk management.
Indicatore

Indicatore

Fulcrum: volume-weighted average of a two-market ratioA volume-weighted average price computed on the relationship between two markets rather than on a single price, with dispersion bands built from the same weighted pass.
What it does
Most relative-value work is done by eye: put two markets on one chart, watch the spread, decide when it looks stretched. This computes that judgement. It takes the ratio between two instruments, defaults to the Nasdaq and S&P futures contracts, and runs a volume-weighted average through it with standard deviation bands around that average. It lives in its own pane on its own scale, so the symbol you happen to have loaded is irrelevant to the reading.
What is different here
Volume-weighted average price, standard deviation bands and ratio charting are all public methodology and I claim none of them. The reason this is one script rather than three is the problem in the middle, which is that a ratio has no volume of its own.
If you divide one market by another, the resulting series has a price and no trade behind it. Every implementation has to decide what to weight by, and most sidestep it by using a simple moving average, which throws away the participation information entirely.
Three specific choices follow from taking that problem seriously.
First, the weight is the geometric mean of both legs' volume rather than either leg alone or their sum. A bar where both markets traded heavily is genuine two-sided participation in the relationship. A bar where one leg was busy and the other was dead is not, and the geometric mean punishes that asymmetry in a way an average does not.
Second, the variance is accumulated in the same volume-weighted pass as the mean, using running sums of weighted value and weighted squared value. The bands therefore describe the dispersion of the ratio as it was actually traded, not the standard deviation of the drawn line. Those two are not the same number and the difference matters most exactly when participation is uneven.
Third, the ratio can be normalised by a volatility and rates term, and that term is frozen at each anchor reset rather than updated daily. This matters more than it sounds. The volatility and rates inputs move once a day, so on any anchor longer than a session the divisor would step in the middle of the window being averaged, and you cannot take a volume-weighted average of a quantity whose units change halfway through: the mean chases the step and the variance ends up describing the divisor instead of the two markets. Freezing it means the unit is constant across the window and the level shift lands exactly where the average restarts anyway. Both inputs are read from the prior session's confirmed close, so the value is identical live and on reload, and when either feed is unavailable the table reports the fallback rather than changing every number on screen silently.
How it works
The ratio is computed from both legs bar by bar, including a high and low estimate taken from the most and least favourable combination of the two legs' extremes, so the typical price is a real range rather than just the close.
Volume for the weighting is the geometric mean of the two legs. The average, and the variance around it, accumulate from the anchor point using running weighted sums.
The anchor resets on a schedule, and by default that schedule is chosen from your chart: session on intraday timeframes up to twenty minutes, weekly up to four hours, monthly above that. The point is that an anchor should outlive more than a handful of bars, and a session anchor on a four hour chart does not. You can override it if you disagree.
Bands are hidden for the first few bars after each reset, and the distance reading is suppressed along with them. Cumulative dispersion on two or three samples is tiny but not zero, and dividing by it turns a two-basis-point wiggle into a double-digit sigma reading. Until the window has enough behind it to have measured anything, the readout says it is warming up rather than inventing an extension, and the band alerts stay silent.
The ratio line is coloured by which side of the average it sits on, with a small dead zone so that a ratio hugging its average does not strobe the line bar by bar.
How to use it
Load it on any chart. The pane draws the relationship, not your symbol.
Read the distance in standard deviations rather than the absolute level, which is reported in the table. The absolute number depends on the multiplier and the divisor and means nothing on its own.
The table reports whether both feeds are live, the current average, the current ratio, the distance from the average in percent and in standard deviations, which zone the ratio occupies, and the divisor with a fallback flag if either input is missing. Check the feed status first if the numbers look wrong.
Change the two symbols to compare any pair you like. The scaling multiplier exists to bring the ratio into a readable range and has no effect on the shape.
What it cannot do
It describes a relationship and not a direction. A stretched ratio tells you the two markets have diverged from how they have recently traded together. It does not tell you which leg corrects, or whether either does, or when. Relationships can stay stretched for as long as the reason for the stretch persists.
Standard deviation bands assume a distribution that ratio spreads do not reliably follow. Two sigma here is a description of the recent sample, not a probability of anything.
Requesting two symbols means depending on two data feeds. If either is unavailable on your plan or a symbol is wrong, the reading is incomplete, which is why the table reports feed status rather than drawing a confident line over missing data.
The volatility and rates divisor falls back to fixed placeholder values when its feeds are missing. Those numbers are arbitrary and they change the scale of everything on screen. The table flags it.
There are no entries, exits or trade marks anywhere in this script, and no performance of any kind is claimed or implied.
On authorship
The methodology is public and I have said so plainly. The implementation is not borrowed. Every line is written from scratch, and no code in it is copied or adapted from another author's script on this platform or anywhere else.
Settings
The two ratio symbols and a scaling multiplier; the volatility and rates divisor with its two symbols and an on-off switch; anchor period with an automatic default, band multipliers, band visibility and the post-reset warm-up length; and visual settings for colours, line width, fill, labels, the info table and the extension tint.
Indicatore

Serene ORB Strategy IndicatorThe Serene ORB Indicator is designed to help day traders identify high-quality Opening Range Breakout opportunities using the first five minutes of the regular market session. The indicator automatically plots the Opening Range High and Low from 9:30–9:35 AM ET, then monitors price for confirmed bullish and bearish breakouts.
It combines ORB structure with VWAP and volume confirmation to help filter weaker moves and reduce false breakouts. Bullish signals appear when price confirms above the opening-range high, while bearish signals appear when price confirms below the opening-range low. The indicator also identifies potential break-and-retest setups, allowing traders to wait for price to return to the breakout level and confirm support or resistance before entering.
The script includes visual CALL, PUT, CALL RETEST, and PUT RETEST signals, along with automatically calculated entry, stop-loss, and 1R, 2R, and 3R profit targets. Traders can customize the volume requirements, VWA Indicatore

Indicatore

NQ Adaptive Regime Engine v6.4# 🚀 NQ Adaptive Regime Engine v6.4
The **NQ Adaptive Regime Engine v6.4** is an overlay indicator built specifically for **NQ and MNQ futures traders**. It combines **Big Tech leadership, Nasdaq market breadth, VIX direction, price structure, and market psychology** into one simple dashboard that helps you stay on the right side of the market.
Instead of filling your chart with dozens of indicators, the goal is to answer one simple question:
👉 **"Should I be looking for longs, shorts, or should I stay out?"**
---
# ⚠️ Important
The numerical values displayed by this indicator are **NOT probabilities.**
For example:
• Market Pressure: **+72**
• Big Tech: **-81**
These do **NOT** mean there is a 72% or 81% chance the market will move in that direction.
The numbers simply measure **the strength of the current bullish or bearish conditions** on a scale from **-100 to +100**.
Think of them like a **speedometer**, not a crystal ball. 🔮
---
# 📊 Dashboard
## 🌎 Today's Market
Shows what type of trading day you're in.
### ⚡ FAST MARKET
High volatility.
Usually caused by CPI, FOMC, major economic reports, or breaking news.
Expect bigger moves and avoid chasing extended candles.
---
### 📈 TREND DAY
The market is moving with strong directional momentum.
These are generally the best days to:
- Buy pullbacks
- Sell rallies
---
### 🔄 ROTATION DAY
Money is rotating between sectors.
Expect mixed internals, more fake-outs, and less reliable breakouts.
---
### ↔️ RANGE DAY
The market is moving sideways.
Directional trades become lower probability.
---
## 💪 Market Pressure
This is the **most important reading** on the dashboard.
It measures who currently has control:
🟢 Buyers
or
🔴 Sellers
Market Pressure is calculated using:
• Big Tech (80%)
• Nasdaq Breadth (20%)
Possible readings:
• Strong Bull
• Bullish
• Mixed
• Bearish
• Strong Bear
Higher positive numbers mean buyers currently have stronger internal pressure.
Lower negative numbers mean sellers currently have stronger internal pressure.
---
## 🏢 Big Tech
Shows whether the companies that actually drive the Nasdaq are participating.
The indicator tracks:
• NVDA
• MSFT
• AAPL
• AMZN
• META
• TSLA
• AVGO
• GOOGL
• GOOG
When Big Tech agrees with Market Pressure, trends tend to be stronger and more reliable.
---
## 📉 VIX
VIX is used **only as confirmation.**
Possible readings:
✅ Confirming
⚠️ Opposing
➖ Neutral
VIX does **NOT** determine trade direction.
It simply tells you whether volatility agrees with your directional bias.
---
## 📍 Price Trend
Shows what **NQ itself** is doing.
Possible readings:
🟢 Bullish
🔴 Bearish
🟡 Mixed
Price should agree with Market Pressure before considering a trade.
---
## 🧠 Psychology
Identifies common trader behavior.
### 😌 Balanced
Normal market conditions.
---
### 😬 FOMO / Chasing
Price has become stretched.
Avoid entering late.
---
### 😨 Fear / Panic
A sharp emotional selloff.
Wait for price to stabilize instead of chasing.
---
### 🪤 Trapped Longs
Breakout buyers failed.
Can strengthen bearish setups.
---
### 🪤 Trapped Shorts
Breakdown sellers failed.
Can strengthen bullish setups.
---
## 🎯 Action
This is the **only row that tells you what to do.**
### ⏸️ NO EDGE
Nothing is aligned.
Stay patient.
---
### 🟢 BUY PULLBACK
Bullish conditions are aligned.
Wait for price to pull back toward the **9 EMA** or **VWAP**.
---
### 🔴 SELL RALLY
Bearish conditions are aligned.
Wait for price to rally toward the **9 EMA** or **VWAP**.
---
### 🚀 LONG READY
Everything is aligned and a proper pullback has already occurred.
A long setup is ready.
---
### ⬇️ SHORT READY
Everything is aligned and a proper rally has already occurred.
A short setup is ready.
---
### ✋ DO NOT CHASE
The direction may still be correct...
...but price is already extended.
Wait for a better entry.
---
# 📖 How to Use
Read the dashboard **from top to bottom.**
### 1️⃣ Check Today's Market
Know what type of day you're trading.
---
### 2️⃣ Look at Market Pressure
This tells you who currently has control.
---
### 3️⃣ Confirm Big Tech
If Big Tech agrees with Market Pressure, confidence increases.
---
### 4️⃣ Check VIX
Use it as confirmation—not as the deciding factor.
---
### 5️⃣ Confirm Price Trend
Never fight the trend.
---
### 6️⃣ Check Psychology
Avoid chasing emotional moves.
---
### 7️⃣ Follow the Action row
This is your trading plan.
Example:
TODAY'S MARKET → TREND DAY
MARKET PRESSURE → BULLISH (+54)
BIG TECH → BULLISH (+63)
VIX → CONFIRMING
PRICE TREND → BULLISH
PSYCHOLOGY → BALANCED
ACTION → BUY PULLBACK
This means:
✅ The market is trending.
✅ Buyers have control.
✅ Big Tech is participating.
✅ VIX agrees.
✅ Price is trending higher.
➡️ Wait for price to pull back toward the **9 EMA** or **VWAP**.
Once buyers step back in, the dashboard will change to:
🚀 **LONG READY**
The same process works in reverse for short trades.
---
# ⏱️ Recommended Timeframes
This indicator was designed primarily for:
📈 NQ
📈 MNQ
⏰ 5-minute charts
It can be used on other intraday timeframes, but the default settings are optimized for short-term Nasdaq futures trading.
---
# ⚠️ Disclaimer
This indicator is a **decision-support tool**, not an automated trading system.
It does **NOT** predict the future or guarantee profitable trades.
The numerical scores represent **current market strength**, **not probabilities or win rates**.
Always use proper risk management, predefined stop losses, and disciplined trade management.
Good trading is about stacking small edges over time—not finding a perfect indicator. 🎯 Indicatore

Indicatore

Indicatore