Phantom Support & Resistance Auto [PT-IND-SR.001]Overview
Phantom Support & Resistance Auto is a context-focused support and resistance indicator designed to visualize price interaction zones derived from multiple market behaviors.
The script does not generate buy or sell signals.
Instead, it provides a structured map of potential reaction areas, allowing traders to better understand where price has historically reacted, consolidated, or extended liquidity.
This indicator is intended to be used as a decision-support and contextual analysis tool, not as a standalone trading system.
How the Script Works
The indicator combines several independent but complementary methods of identifying support and resistance.
Each method captures a different type of market behavior, and all components can be enabled or disabled independently.
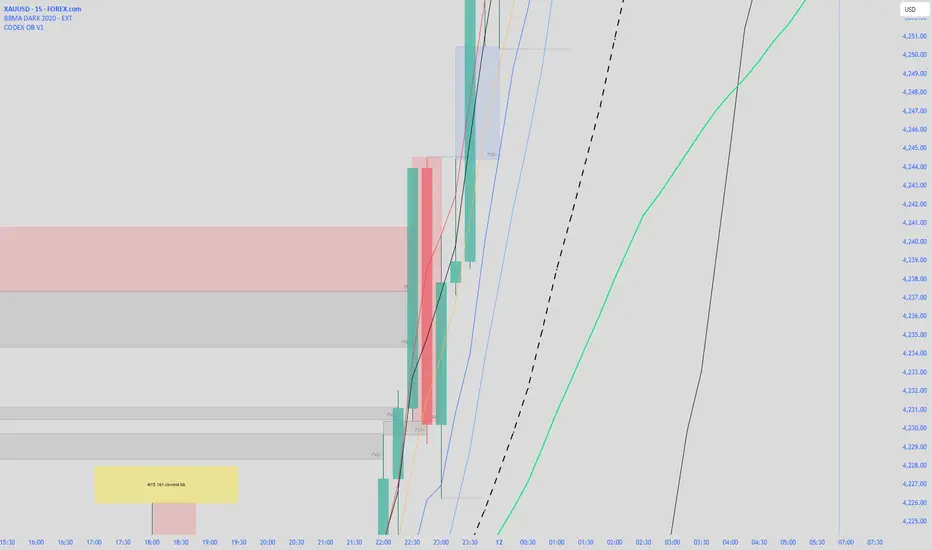
1) High / Low Zones (Range Extremes)
This module tracks the highest high and lowest low over a configurable lookback period.
These levels represent recent range boundaries, which often act as reaction zones during consolidation or pullbacks.
They are visualized as extended horizontal levels to preserve historical context.
2) Pivot Zones (Filtered & Merged Levels)
Pivot zones are derived from confirmed pivot highs and lows.
To avoid excessive and overlapping levels, the script applies a merge tolerance based on either:
ATR distance, or Percentage distance from price
Nearby pivot levels are merged into a single zone, and each zone tracks how many times price has interacted with it.
This interaction count adjusts visual strength, creating a relative importance hierarchy rather than treating all levels equally.
An optional higher-timeframe source can be used to project structurally significant levels onto lower timeframes.
3) Wick Liquidity Zones
This module detects candles with disproportionately large wicks relative to their bodies.
Such candles often indicate liquidity grabs, stop runs, or rejection areas.
Detected wick levels are extended forward to highlight areas where liquidity was previously absorbed.
This component focuses on price rejection behavior, not trend direction.
4) PR Levels (Volatility-Adjusted Predicted Ranges)
PR levels are derived from a volatility-adjusted average price model.
Using ATR as a normalization factor, the script calculates a central average along with upper and lower projected zones.
These levels are adaptive, expanding and contracting with volatility, and are intended to represent probabilistic price ranges, not fixed targets.
5) MACD-Based Support & Resistance (Heikin Ashi Source)
This module derives dynamic support and resistance levels based on MACD momentum shifts, calculated from Heikin Ashi price data to reduce noise.
When MACD momentum transitions occur, recent highs and lows are captured and projected as potential reaction zones.
This component focuses on momentum-driven structural changes, rather than static price levels.
Why These Components Are Combined
Each component captures a different dimension of market behavior:
High / Low zones → Range extremes
Pivot zones → Structural reaction points
Wick zones → Liquidity and rejection behavior
PR levels → Volatility-normalized price ranges
MACD S&R → Momentum-based structural shifts
By combining these sources, the indicator provides a layered view of support and resistance, allowing traders to evaluate confluence, alignment, or divergence between different types of levels instead of relying on a single method.
The script does not assume all levels are equal; visual weighting helps distinguish structural levels from situational ones.
Visualization & Outputs
Color-coded horizontal zones with strength-based opacity
Optional glow effects for visual clarity
Independent toggles for each S&R source
A table showing percentage distances between projected PR levels, helping users contextualize price location within its current range
All visual components are configurable and can be selectively disabled to reduce chart clutter.
How to Use
Use this indicator as a context and mapping tool
Observe areas where multiple zone types align for higher contextual significance
Combine with your own entry logic, confirmations, and trade management rules
Suitable for multi-timeframe analysis and market structure studies
Risk Management Notice
This indicator should always be used as part of a well-defined risk management plan.
Support and resistance zones represent areas of potential interaction, not guaranteed reactions.
Users are responsible for applying appropriate:
Position sizing
Stop placement
Risk-to-reward rules
The indicator does not manage risk automatically and should not replace proper risk management practices.
What This Script Is NOT
It is not a buy/sell signal generator
It does not predict future price direction
It does not guarantee reactions at every level
It should not be used as a standalone trading strategy
Originality & Purpose
The originality of this script lies in its structured integration of multiple support and resistance methodologies, each preserved as a distinct analytical layer rather than blended into a single opaque output.
The purpose is to help traders understand where price has interacted with liquidity, structure, and volatility, not to automate trade decisions.
Indicatore Pine Script®